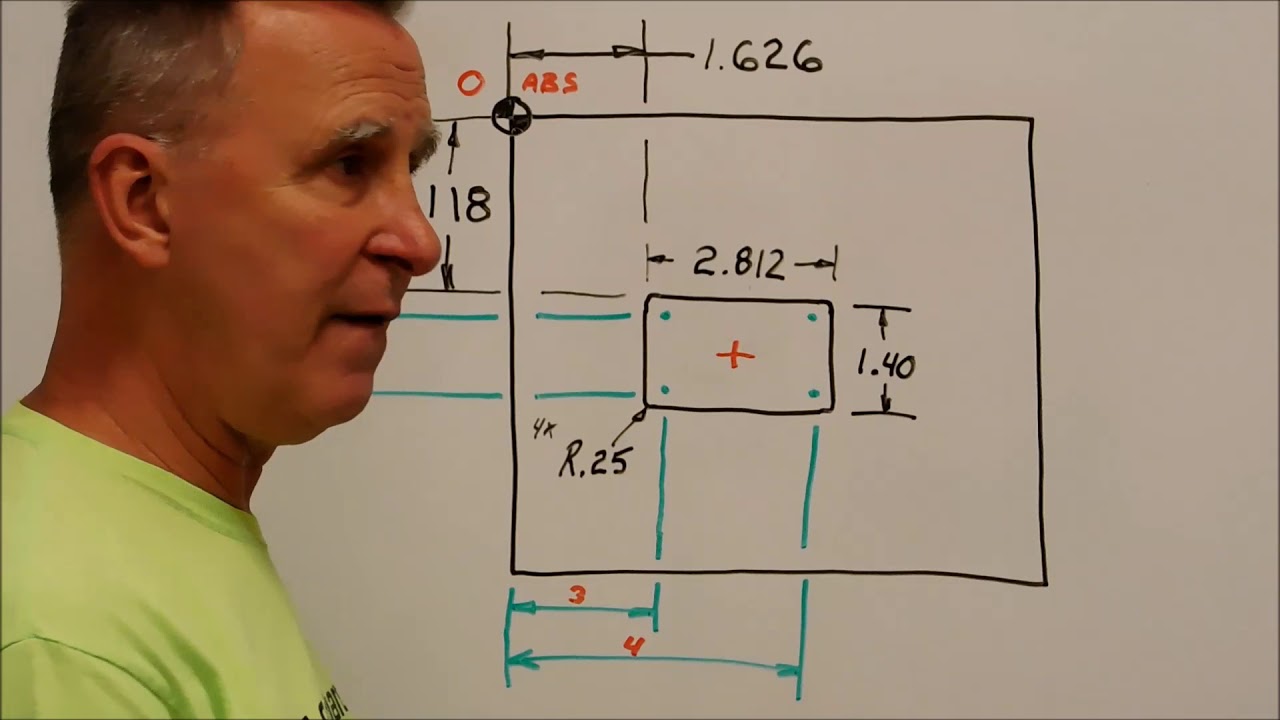
Easier Machining Using the Incremental Mode on your DRO

preview_player
Показать описание
Many of us with DRO's rarely switch over to the incremental mode. Once you see the benefits and possible applications of using it, I bet you use it more often. Take a Look !!
Рекомендации по теме
Комментарии
Автор

While I'm still a relatively new hobbyist machinist, I've had a low priced dro on my little lathe for 8 years or so with abs and inc capabilities and have never really understood how to use the features or even understand their value. I now know! Thank you, you have a talent for explaining things well.

worzyno
Автор

Keep them coming Joe! I have had numerous question but never want to bug you with them in an email. I usually find that after a while, you post a video on the topic I have questions about. By the way, I did my first grinding job on my milling machine using your technique (a motor shaft that needed a very precise flat for a pump impeller alignment for work) and it worked a treat. Thank you for all you do!

brucewilliams
Автор

Every once in awhile I have a home project to use my old Bridgeport mill. I installed a DRO on the mill a couple of years ago and recalled this video and made my work so much easier. Thanks for your time and videos once again!

Mike_S_Swift
Автор

Joe I feel like I am back in school again, you are helping to wakeup my 70 year old brain. Looking forward to reviewing all your videos. Thanks BB

billbrennan
Автор

Thanks Joe;
I've been using manual machines for so long, and never had a "real" DRO, but I get this. It's like remembering where "home base" is when you are doing a hole pattern or finding corners using just the dials. Someday, if I get a DRO before I die, I"m gonna forget all about taking up backlash, which I have been doing for the last three decades. That will be a wonderful day!
I always appreciate your vids. Thanks again!
Dean

dcw
Автор

2 years down the line, but thank you Joe that's helped me to understand this.

samrodian
Автор

Great quick tip, Joe. I use incremental when I have multiple features with one setup – as you noted, this makes keeping track of what you are doing a lot easier.

ChazzC
Автор

Once again, good stuff Joe. Keep 'em' coming .Your a great mentor! - ( That 30 year engineer )

anthonyfox
Автор

It can be used also for two operations in two separate vises so you can run multiple parts that require multiple ops e.g. blind holes on the top and bottom of the parts. This two zero points allows you to complete one side of your part flip it over to your second vise switch the dro over to your second zero point and complete your second op. It can also be used when you have a super spacer setup alongside a vise. It’s basically saving your indicated center of the super spacer while you use the vice for something else.

MrHanky_YT
Автор

Thank you! Short, simple, and to the point as always!!

aircrow
Автор

Makes sense...all I need now is a milling machine.

colinsteam
Автор

Thanks Joe, I knew the feature was there, but never quite new why:) Thanks for taking the time to (succinctly) point out what must be obvious to many, so the rest of us can up our game👍

lefThumbs
Автор

There is so much these things can do the mind boggles... PCD, linear, 1/2 function (love this) corner radius and like you have mentioned Abs n Inc and I know there are a lot more that I cant think of @ the min. TFS Joe. G :)

graemebrumfitt
Автор

Very nice. I always learn something new from you. I probably use 10% of the features in my DRO.

kmitchl
Автор

Hey I appreciate your content. I have been trying to tell people about this for years. Best tool ever invented! Great job. Just noticed, boy I need a

georgestone
Автор

I once was using a Webster & Bennett borer that could only hold one program, but had to do nine different bore sizes on a production line. We started the program from a start block ( N100-N900 ) that had a jump to command then M30. The middle of the program started at block N1000 had the main coordinate of each bore then another M30, it then called blocks (N4000 N6000 N8000 )at the end of the program that had the main features( top chamfer, bottom radius, and mid bore oil groove) all of these features was programmed in incremental. this allowed us to use one program to quickly do nine different bore sizes on a production line.
I thought this was very clever

swamppifi
Автор

Great stuff Joe. I use mostly reground end mills so I use the incremental mode regularly. As I change features and cutter radius I always have absolute mode so as not having to touch off again as I flip and rotate part(s). Recently made a few sets of soft jaws, 3 sets for large, medium, and small diameters. Used the incremental mode as I had seen a resent video of yours where you just casually mentioned this feature. The light came on, and another valuable tool added to my kit. Thanks Joe!

jameslezak
Автор

On my Shumatech DRO, bolt hole circles, rounded corners, really anything that programtically moves the cutter around the work pushes the machine into incremental mode. Yes my DRO was a DIY kit, not sure if it is still available, but it works great for my needs and it was priced very reasonably for the hobby user market. Had lathe and mill programming and up to 5 inputs for cheap capacitive scales or glass scales plus the fifth could be a tacho. One of my favorite uses is cutting large circular features by overlapping bolt holes (up to 99 holes). Made a lot of circles bigger than I can fit in my little rotary table chuck this way. Might be considered crude by real machinists, but I get a lot of work done this way.

minigpracing
Автор

A couple of people mentioned that you can find the pocket center and zero ABS there. And they are right. However, consider a slightly more complex example with another pocket to the right of the one Joe used. Now you could use the difference from the centers and zero in the new pocket. But if you use INC, you can work the first with INC, switch back to ABS, find the center of the second pocket using the original zero, INC zero, and make the second pocket.

Now consider that you might have other features based on the original zero. Being able to use a separate zero is handy.

I recently did a project (AXA toolholders) that requires 5 holes drilled and tapped on 6 identical parts. I found each hole, set them to zero in the SDM mode (lots of INC slots, really for tool offsets) and now I could just switch to each number, move to zero, work and repeat.

ttabbal
Автор

I really enjoy your videos Joe. I would love to see some examples of using the tilt and nod on a mill. Generally you always want to set the part at an angle (not the machine) for obvious reasons. Also I never see anyone mention tramming the turret in before using the tilt or nod.

robertegan