filmov
tv
Feathering Light: The Secret to Perfect Portraits Revealed!

Показать описание
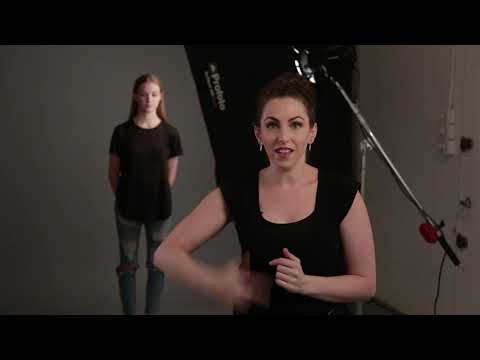
Curious about the best way to light your portraits? In this video, I dive deep into the technique of feathering your light. Feathering can control light spread and enhance texture and dimensionality, making your photos look stunning and professional. Whether you’re a seasoned photographer or just starting out, understanding how to feather your light can transform your work.
I will walk you through a side-by-side comparison between feathered and direct light, highlighting the differences in background darkness and contrast, and demonstrating why feathering often results in more visually appealing photos.
Next, we debunk a common myth that feathered light is always softer light. Many photographers, including myself at one time, believed that feathering your light source would soften it. However, through a series of practical tests and comparisons, we explore how feathering can create a harder light with more defined shadows. By examining the nuances of light spread and the perceived size of the light source relative to the subject, you’ll gain a deeper understanding of how to manipulate light to achieve your desired effect.
To round out the tutorial, I share my insights on the best practices for placing your light. I introduce a concept I call “being in the L,” which guides you on positioning your light for optimal results. Understanding the principles of feathering will help you create beautifully lit portraits with enhanced three-dimensionality. Additionally, I discuss the importance of selecting the right light modifier to ensure the best results when feathering your light.
🎥 In This Video:
• Quick comparison between feathered and direct light
• Dispelling the myth that feathered light is softer
• The secret to placing your light which I call being in the L
✨Key Takeaways:
• Feathering enhances texture and dimension by controlling light spread.
• Feathered light creates darker backgrounds and more contrast compared to direct light.
• Feathering can result in harder light and more defined shadows.
• The “being in the L” technique helps with optimal light placement.
• Choose the right light modifier to achieve the best results in portrait photography.
📸 Gear Mentioned in This Video:
Studio Titan Camera Stand STA-01-360 MK2
ELINCHROM
Elinchrom FIVE
Elinchrom Litemotiv 120cm Parabolic Softbox
Elinchrom Indirect Litemotiv Strip Softbox (13 x 69”)
#PhotographyTips #FeatheringLight #ContinuousLightVsFlash #PhotographyTutorial
#PhotographyTips #FeatheringLight #PortraitLighting #PhotographyTutorial #StudioLighting #ProPhotography #PhotographySkills #LightingTechniques #prophotographer #OurPPA #SponsoredAd #PPAAmbassador #PPA
CHAPTERS
00:00 - Introduction
01:03 - Feathering Test
02:41 - Improve your photography
03:52 - Is feathered light softer?
05:55 - Being in the L
06:58 - Shooting with feathered light
07:14 - Shooting with direct light
07:46 - Feathering from the right
08:16 - Conclusion
 0:09:23
Feathering Light: The Secret to Perfect Portraits Revealed!
 0:08:56
How to use Feathered Light | Take and Make Great Photography with Gavin Hoey
 0:07:04
5 Feathering the Light Bonus
 0:04:22
Feathering Light with a 38' White Umbrella
 0:17:01
Profoto Live - Feathering your light
 0:07:42
Feathering Light
 0:01:06
Feathering the Light
 0:03:14
Feathering Light for Toy Photography
 0:19:58
Birmingham Pen Co. Longbill Spearfish
 1:04:41
Feathering Light. How to light a group photo evenly.
 0:08:30
Learning How to Feather Soft Boxes - Lighting Tutorial
 0:10:27
Feathered Light: OnSet ep. #285
 1:04:26
Feathering Portrait Lighting W/Different Modifiers. What Works Best?
 0:09:26
How to get amazing images not feathering the light using the Godox XPLOR 400 PRO
 0:03:58
Feathering the light
 0:14:07
HOW I CREATE BEAUTIFUL PORTRAITS WITH FEATHERED LIGHTING IN MY HOME STUDIO
 1:02:25
Feathering Light Part III - The Wrap up and Some Cool Lighting Tricks
 0:00:44
What Exactly is “Feathering the Light?”
 0:02:23
Table Top Lighting - Feathering the Light for ultra-softness
 0:01:32
Feathering the Light in Photography
 0:04:44
Feathering your softbox vs beauty Dish
 0:00:32
Feathering the Light #shorts
 0:12:13
Setup lumière simple, feathering light avec Godox QT 600 II et Nikon D850
 0:04:58
EASY Blends In Seconds! | Feathering explained in 5 minutes
Комментарии