filmov
tv
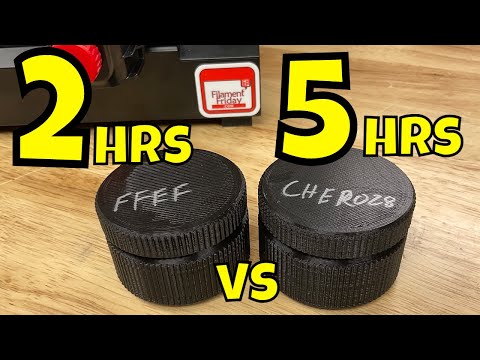
Faster 100% Infill Prints with Cura 4.13 on Ender 3D Printer

Показать описание
Chuck shows you Cura 4.13 and a trick to get 2x faster 100% infill prints on an Ender 3D Printer. He shows you all the tricks he used to apply an Ultimaker Profile with Extra Fast printing and apply it to an Ender 2 Pro. He shares the custom profile below. Check it out right here on Filament Friday.
The profile in this video has been updated and replaced by this:
Filament Friday Extra Fast (0.28) Cura Profile
****** Buy Ender 2 Pro ******
Filament Friday E-Leveler Tool
E-Leveler STL's
Ender 2 Pro GCode files for E-Leveler:
Dragon Knight Miniature:
CHEP Profiles:
Filament Friday Tool Kit:
Nozzle Removal Tool:
****** Creality Ender 3 V2 *******
***** Support the Channel ******************
Financial Support through Patreon:
Direct Support through PayPal donation:
Buy thru this link to Slice Engineering for the Best Hot Ends and get 5% off your purchase:
Buy direct from Sainsmart and support the channel:
************************************
Handy CHEP Designed 3D prints:
Tool Holder:
4040 Bracket 3D Print for your own design:
PTFE Cutter 3D Print:
*****************************
Ender 3 V2 Firmware:
Firmware Wiki:
****** Creality Ender 3: *******
****** Creality Ender 3 Pro: ******
****** Creality Ender 3 Max ******
******** Silent Driver Boards ****************
Creality V4.2.7 32-bit Silent Stepper Board:
Creality Official Firmware:
***************** Creality Ender 3 Parts/Upgrades **********************
Ender 3 Glass Bed:
Replacement Nozzles for CR10/Ender 3:
X-Axis Tensioner
Y-Axis Tensioner
Chuck's Favorite EZR Extruder:
***** Support the Channel ******************
Note:
As an Amazon Associate, I earn from qualifying purchases.
****************************************************
Filament Friday Sticker:
Send Self Addressed Stamped Envelope to:
Electronic Products
PO Box 251
Milford, MI 48381
****************************************************
Chuck's Arduino Book:
Intro animation by Pablo Licari based on Filament Friday Logo by Brian Carter.
**************** Free Filament Friday Sticker ***************
Send Self Addressed Stamped Envelope to:
Electronic Products
P.O.Box 251
Milford, MI 48381
**********************************************************
 0:06:38
Faster 100% Infill Prints with Cura 4.13 on Ender 3D Printer
 0:04:14
Stop 3d printing so slow!!! 🤯 (how to print faster)
 0:07:40
From 10% to 100%: Infill Compression Strength
 0:04:33
Cura Infill Setting for Stronger 3D Prints using Less Plastic
 0:02:44
5 must-know 3D printing tips & tricks. (stronger and better looking prints)
 0:00:08
This is what 100 percent infill looks like
 0:07:33
Print Faster with Custom Cura Profiles for Ender 3 and Ender 3 Clones
 0:12:02
100% infill vs max number of walls (or perimeters or shells) - which is stronger for solid object?
 0:06:54
Print Faster on Your Ender 3 Style Printer Using Tricks in Cura
 0:08:23
9 3D Printing Sins...
 0:13:33
Which LAYER HEIGHT gives you the STRONGEST 3D prints?
 0:07:02
Creality Ender 3 V2 - Speed up prints without sacrificing quality by turning on this setting
 0:00:56
Don't throw away all your 3D printing filament ends! Do this!
 0:14:42
3D Print parts TWICE as fast with simple slicer tweaks. 3DP101
 0:07:00
Cura Infill Patterns: Fastest? Strongest? When to use each one
 0:00:27
Choose the right infill EVERYTIME! #3dprinting #3dprinter #bambulab
 0:05:35
Which Infill Pattern is the STRONGEST? | 3D Printing Testing Lab
 0:01:23
3D Printing infill 100% vs 20% GoPro
 0:04:35
10 Secret 3D Printing Tricks Only Experts Know...
 0:08:26
Creality Ender 3 V2 - Simple Tips for Super Clean 3D Prints
 0:04:35
ender 5 infill problem with cura help please
 0:00:58
Creality K1 Torture Toaster Time 🍞
 0:17:37
Whats the Fastest 3D Printing Infill? Cura Questions
 0:08:35
TESTING 3D printed INFILL PATTERNS for their STRENGTH
Комментарии