filmov
tv
How to Make Wild Yeast Bread & Why It Works

Показать описание
Wild Yeast For Bread Baking - How To Make Wild Yeast Bread
Baking bread with wild yeast is sort of like baking with sourdough - in that we are cultivating a colony of wild unknown yeast and bacteria in order to bake bread. But in most cases the wild yeast water method gives you a ‘cleaner’ and less acidic taste more like what you would get with a commercial bread baking yeast.
However - as with all wild and unknown yeast strains… it might not always work out.
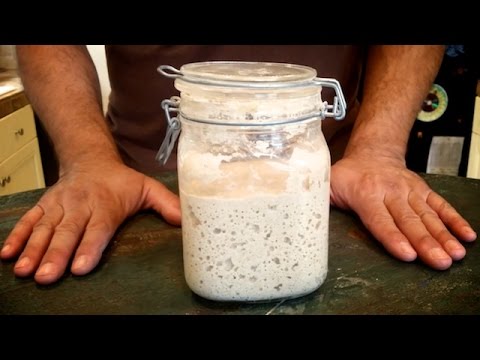
For this experiment I grabbed a handful of grape vines and partially dried grape clusters from the vines in our backyard. Put the vines into a mason jar with about 600 mL of distilled water, and a teaspoon of sugar. Gave this a shake and let it sit (loosely covered) on the counter for a few days. I gave it a swirl whenever I walked by, and added a tsp of sugar each day to feed the yeast. After 4-5 days I had a viable yeast colony to bake with; I also did the same thing with a hand full of raisins. After your colony is established you can remove the grape vines (or whatever fruit you used), and re-fill the jar with the same amount of water you take out to bake with. Feeding every week with a small amount of sugar - 1 tsp - keeping it in the fridge will slow down activity and extend the time between feeding.
You will need to watch, learn, and listen to your wild yeast water colony - because every one will be different. There isn’t a one size fits all group of instructions that will guide you through this process of creating yeast water.
Over time the make-up of the yeast colony will change; every time you open the jar new yeast will be introduced and the flavour will imperceptibly shift. The same thing happens with sourdough - that ‘100 year old’ starter that people brag about tastes nothing like it did 100 years ago… or even 5 years ago.
You could use just about any dried fruit, flowers, herbs, twigs…
But don’t use these fruits because they have an enzyme (Actinidain) that will destroy / prevent gluten development in your bread: Mango, Pineapple, Banana, Papaya, and Kiwi.
Eventually the colony will give up and die - letting you start over with some other flower or herb you might find in your backyard.
The bread recipe is pretty straightforward:
Day 1 Poolish / pre-ferment Ingredients:
250g all-purpose flour
250 mL yeast water (room temp)
Day 2 Final Mix Ingredients:
250g all-purpose flour
125 mL water 40ºC (100ºF)
10g salt
All of the polish from day 1
Bread bakers %
Total flour: 100%
Total water: 75%
Salt: 2%
Method:
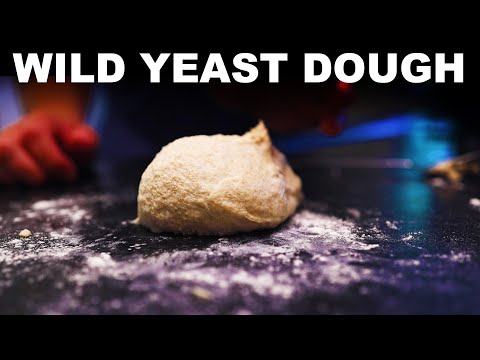
On day one; make the polish by combining the flour and yeast water.
Cover with a lid or tea towel, and leave at room temperature for 12 -18 hours.
On day two; in a large container, mix together the flour, water, salt, and polish from day one into a ragged dough; cover and let rest 20 minutes.
Uncover and ‘fold’ the dough; wet your hand and grab a piece of dough from underneath and fold over the top.
Turn the container slightly and fold again; repeat around the container 6-8 times then recover and let rest 10 minutes.
Uncover and repeat the folding process two more times - a total of 3 folds: fold at 20 minutes, 30 minutes, and 40 minutes.
After the third fold, cover and allow to rise until tripled in bulk which could take 3-4 hours.
Dust a proofing basket, and lightly flour part of your workbench.
Carefully tip the dough out of the container onto the floured workbench; without deflating it too much.
Repeat the folding process, then flip the dough over onto an unfloured surface.
Carefully move the dough ball to the proofing basket seam side up.
Cover and let proof around one hour.
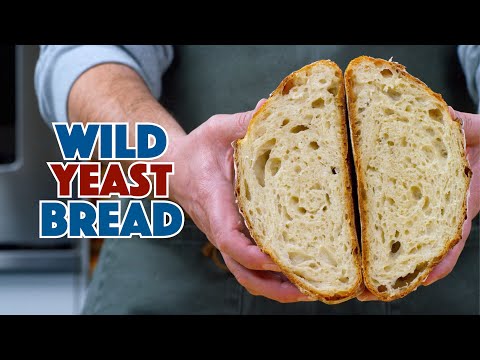
Preheat a cast iron Dutch oven or challenger Bread Pan in your oven to 450ºF.
After proofing, carefully turn the dough out on to your lightly floured counter and then transfer seam side down to the Dutch oven.
Score the top of the loaf with a lame of a knife.
Bake with the lid on for 30 minutes, then remove the lid and bake 20 - 30 more minutes.
The bread is done when it registers at least 190ºF internally, but I usually bake until around 205ºF.
Remove to a wire rack and let cool 20 minutes before slicing.
#LeGourmetTV #GlenAndFriendsCooking
Baking bread with wild yeast is sort of like baking with sourdough - in that we are cultivating a colony of wild unknown yeast and bacteria in order to bake bread. But in most cases the wild yeast water method gives you a ‘cleaner’ and less acidic taste more like what you would get with a commercial bread baking yeast.
However - as with all wild and unknown yeast strains… it might not always work out.
For this experiment I grabbed a handful of grape vines and partially dried grape clusters from the vines in our backyard. Put the vines into a mason jar with about 600 mL of distilled water, and a teaspoon of sugar. Gave this a shake and let it sit (loosely covered) on the counter for a few days. I gave it a swirl whenever I walked by, and added a tsp of sugar each day to feed the yeast. After 4-5 days I had a viable yeast colony to bake with; I also did the same thing with a hand full of raisins. After your colony is established you can remove the grape vines (or whatever fruit you used), and re-fill the jar with the same amount of water you take out to bake with. Feeding every week with a small amount of sugar - 1 tsp - keeping it in the fridge will slow down activity and extend the time between feeding.
You will need to watch, learn, and listen to your wild yeast water colony - because every one will be different. There isn’t a one size fits all group of instructions that will guide you through this process of creating yeast water.
Over time the make-up of the yeast colony will change; every time you open the jar new yeast will be introduced and the flavour will imperceptibly shift. The same thing happens with sourdough - that ‘100 year old’ starter that people brag about tastes nothing like it did 100 years ago… or even 5 years ago.
You could use just about any dried fruit, flowers, herbs, twigs…
But don’t use these fruits because they have an enzyme (Actinidain) that will destroy / prevent gluten development in your bread: Mango, Pineapple, Banana, Papaya, and Kiwi.
Eventually the colony will give up and die - letting you start over with some other flower or herb you might find in your backyard.
The bread recipe is pretty straightforward:
Day 1 Poolish / pre-ferment Ingredients:
250g all-purpose flour
250 mL yeast water (room temp)
Day 2 Final Mix Ingredients:
250g all-purpose flour
125 mL water 40ºC (100ºF)
10g salt
All of the polish from day 1
Bread bakers %
Total flour: 100%
Total water: 75%
Salt: 2%
Method:
On day one; make the polish by combining the flour and yeast water.
Cover with a lid or tea towel, and leave at room temperature for 12 -18 hours.
On day two; in a large container, mix together the flour, water, salt, and polish from day one into a ragged dough; cover and let rest 20 minutes.
Uncover and ‘fold’ the dough; wet your hand and grab a piece of dough from underneath and fold over the top.
Turn the container slightly and fold again; repeat around the container 6-8 times then recover and let rest 10 minutes.
Uncover and repeat the folding process two more times - a total of 3 folds: fold at 20 minutes, 30 minutes, and 40 minutes.
After the third fold, cover and allow to rise until tripled in bulk which could take 3-4 hours.
Dust a proofing basket, and lightly flour part of your workbench.
Carefully tip the dough out of the container onto the floured workbench; without deflating it too much.
Repeat the folding process, then flip the dough over onto an unfloured surface.
Carefully move the dough ball to the proofing basket seam side up.
Cover and let proof around one hour.
Preheat a cast iron Dutch oven or challenger Bread Pan in your oven to 450ºF.
After proofing, carefully turn the dough out on to your lightly floured counter and then transfer seam side down to the Dutch oven.
Score the top of the loaf with a lame of a knife.
Bake with the lid on for 30 minutes, then remove the lid and bake 20 - 30 more minutes.
The bread is done when it registers at least 190ºF internally, but I usually bake until around 205ºF.
Remove to a wire rack and let cool 20 minutes before slicing.
#LeGourmetTV #GlenAndFriendsCooking
 0:06:06
Cultivate Your Own Wild Yeast Starter
 0:04:08
Easy Sourdough Starter Recipe | Make a Wild Yeast Starter at Home
 0:14:23
How to capture wild yeast for bread (and WHY it works)
 0:19:20
How to Make a Wild Yeast Mead
 0:07:22
I'm Capturing Wild Yeast! (NO FUSS Sourdough Starter Recipe)
 0:10:39
How to Make Yeast From Scratch (DIY) with a Potato
 0:09:15
Making yeast traps and capturing wild yeast!
 0:01:04
Wild Yeast - where to find it
 0:06:17
Wild Yeast Starter for Home Brewing
 0:06:43
How to harvest wild yeast For making Moonshine
 0:07:27
Wine Wild Yeast Starter
 0:05:12
How to make NATURAL YEAST STARTER from Raisins Part 1 (EP 295)
 0:03:25
Managing Your Wild Yeast Starter
 0:09:57
Homemade Bread with WILD YEAST from Grapes
 0:13:51
Homemade YEAST for WINE, BEER and BREAD - How to make YEAST from scratch
 0:00:54
Natural Yeast for Wine Making and Starter Dough
 0:20:54
How to Make WILD YEAST BREAD
 0:03:14
How To Make Natural Dry Yeast At Home From ( Flour & Water )
 0:05:12
How To Make Yeast Water For Bread
 0:16:34
How to Make Wild Yeast Bread & Why It Works
 0:08:54
MAKE YOUR OWN WILD YEAST SOURDOUGH STARTER | EASY SOURDOUGH STARTER RECIPE
 0:19:17
Cultivate Your Own Homemade Wild Yeast EASY [Prepper Food] [2018]
 0:08:59
The Ultimate Sourdough Starter Guide
 0:06:55
Catch Your Own Wild Yeast - With A Pro Brewer
Комментарии