filmov
tv
Setting Up a TO Can Laser Diode (Viewer Inspired) | Thorlabs Insights
Показать описание
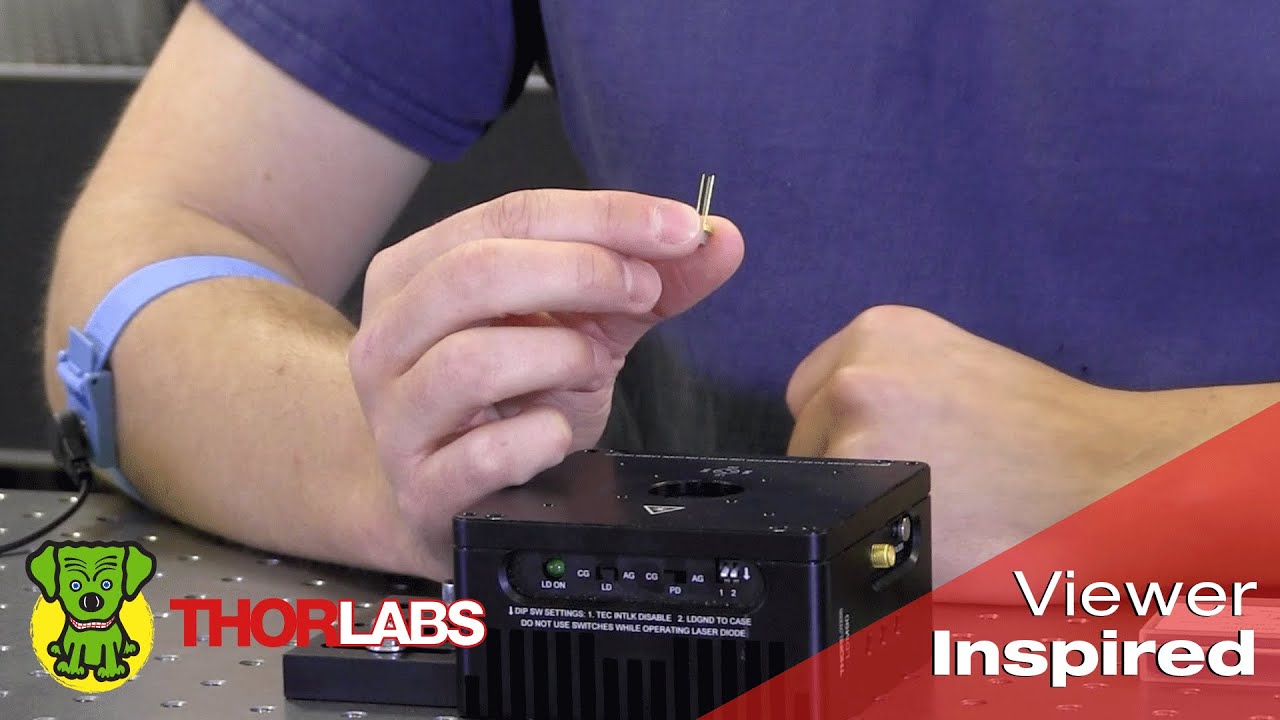
Installing a TO can laser diode in a mount and setting it up to run under temperature and current control presents many opportunities to make a mistake that could damage or destroy the laser. This step-by-step guide includes tips for keeping humans and laser diodes safe from harm.
Protection from the considerable risk of electrostatic discharge (ESD) is provided by an ESD strap, but only if the strap is grounded and worn correctly. Wearing the strap as demonstrated makes it easier to keep the strap's metal plate in constant skin contact. Moisturizing the skin with lotion formulated for use in electronic and cleanroom environments can also help.
A laser diode can be damaged by attempting to force it into a socket that is the wrong size. To avoid this, find a suitable mount by referencing the physical dimensions of the pins identified in the video. Since current flow in the wrong direction is also dangerous to laser diodes, it is critical to correctly orient the laser in the socket, as well as properly set the polarity of the mount's switches. Current drivers typically also have a polarity setting. The diode orientation and mount and driver settings can be determined using information included in the laser's pin diagram and electrical diagram, whose symbols are decoded and explained in the video.
Excessive operating temperatures and drive current are both risks that can be mitigated using correctly configured current and temperature controllers. Their setup is demonstrated. The proper use of two frequently misunderstood parameters, maximum power and maximum current, in configuring the current driver is also shown.
00:00 - Introduction
00:42 - How to Reduce the Risk of ESD
03:03 - TO Can Dimensions Used to Choose the Mount
04:59 - How to Read and Use the Laser's Pin Diagram
06:24 - Orient and Install the Laser in the Mount
07:27 - Set Laser's Polarity on Mount and Controller
09:03 - Other Controller Settings that Safeguard the Laser
Components used in this demonstration include:
 0:14:00
Setting Up a TO Can Laser Diode (Viewer Inspired) | Thorlabs Insights
 0:07:56
Can O Worms Set-Up (how to)
 0:02:32
Home Canning Setting up your Canning Machine to your Can High.
 0:04:44
Setting Up a Chafing Dish for Buffet Service
 0:11:12
🛠 How to set up a CAN Keypad with Elite ECU | TECHNICALLY SPEAKING
 0:08:08
How To Set Up A Sound System For A Live Event [PA System Setup Tutorial]
 0:07:19
How to Set Up a PA System for a Band
 0:16:43
Setting Up CAN Bus On Your 3D Printer (U2C & EBB)
 0:00:44
Here is how you can set up your children for success!
 0:01:48
Whatsapp Can't Set Up The Recorder Now Please Try Again Later❗Can't Set Up The Recorder No...
 0:17:11
Setting up a gas can cabinet
 0:06:19
How To set up and use your Can-O-Worms.mp4
 0:03:23
Ergonomics Expert Explains How to Set Up Your Desk | WSJ Pro Tip
 0:02:59
Computer Basics: Setting Up a Desktop Computer
 0:10:27
How to Set Up Stage Monitors
 0:12:13
EASIEST tent platform you can build + setting up a LOTUS BELLE tent SOLO
 0:10:53
Setting Up A Can-O-Worms Worm Farm........And Learning Why Instructions Are Important!
 0:05:09
Setting Up a TV Antenna - Tech Tips from Best Buy
 0:16:42
Setting Up Your Business Address WRONG Can Cost You THOUSANDS!
 0:07:22
How to set up an aquarium | Fish tank setup step by step
 0:29:37
How To Properly Set Up Your Weight Distribution System - Can-Am RV Centre
 0:00:37
10 How can I set up the Power Saving Timer (2021)
 0:05:53
How to Properly Setup a Food Tent
 0:01:39
Fix WhatsApp can't set up the recorder now please try again later problem 2024
Комментарии