filmov
tv
Calling an HTTP GET API from Flutter App with Future and FutureBuilder

Показать описание
Hi everyone!
Today I am going to show you how to make a GET request to an API from a Flutter app. I will also show you how to use FutureBuilder to show a progress indicator to the user while the API call is being made, and then display the api call data or error when the api call completes.
My code is available on GitHub:
For more on the FutureBuilder widget:
And to gain more experience in the dart language:
You’ve clearly come here to learn and a free audible trial allows you to increase your learning potential in situations where you may be hands free like at the gym or on your commute. It allows you to spend more time on theory when you aren’t able to watch a screen, so that you can maximise your screen time to pick up technical skills. Try it for free today:
// ABOUT ME
My name is Chelsea and I started studying software engineering in 2010. I have been working commercially full time since 2014 and have been in various positions from graduate developer to tech lead to solution architect.
I'm a full stack developer with a lot of experience in C# and Javascript but my passion is for mobile development; specifically native iOS development and cross platform using React Native.
I always have many things on the go and am always trying out a new side hustle and failing at it; perhaps you can learn from my mistakes!
Please like and subscribe if you enjoyed this video and want to see more like it!
Have any suggestions on topics you would like to learn more about? Please suggest them in the comments... I would love to help you out while doing a bit of learning myself!
// PRODUCTS USED
I use the following products in the creation of my videos:
A reasonable quality and reasonably sturdy but cost effective microphone that can be used by both DSLR cameras, mobile phones and laptops
A kit lens but a decent quality lens for beginners getting used to a DSLR
This is the kit I started with it includes the lens linked above and is a great starter camera.
I love Apple devices... These are the ones I use for my channel content creation:
A good all round phone, good for Apple development and recording videos with enough high quality features but at a cheaper price point than the pro versions.
A nice portable computer for working from anywhere and perfect for iOS development
Really easy to use for graphic design if required for logos as part of my app development or editing the videos on the go.
For logo and icon design in Affinity Designer app for iPad
Adds keyboard and touchpad to iPad Air, making it easier to use for writing code/eBooks etc. on the go!
DISCLAIMER: Links included in this description might be affiliate links. If you purchase a product or service with the links that I provide I may receive a small commission. There is no additional charge to you! Thank you for supporting my channel so I can continue to provide you with free content each week!
//CONTACT:
//CRAVING MORE:
 0:03:12
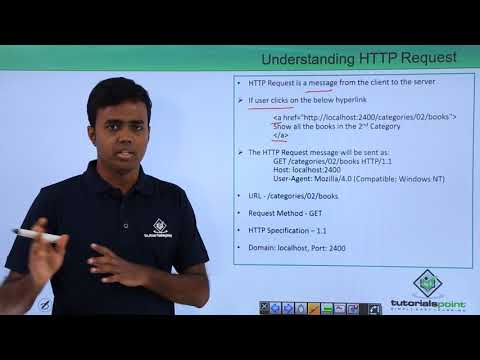
REST API - Understanding HTTP Request
 0:06:35
Learn Fetch API In 6 Minutes
 0:02:43
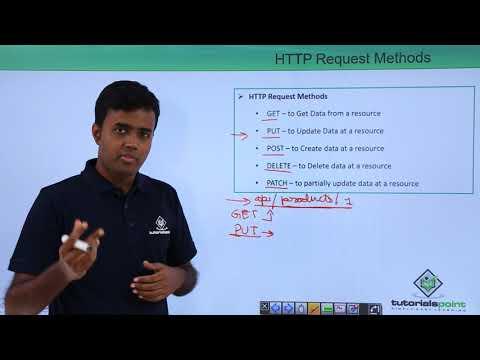
REST API - HTTP Request Methods
 0:29:14
How To Call a REST API In Java - Simple Tutorial
 0:06:52
Angular 10 tutorial #28 call API | HTTP
 0:04:33
Flutter Tutorial - HTTP Requests and REST API (GET, POST, PUT and DELETE)
 1:00:59
How To Call An API in C# - Examples, Best Practices, Memory Management, and Pitfalls
 0:11:19
API integration in angular with http
 0:35:40
Master AWS API Gateway: Hands-On Live Tutorial for Building Scalable APIs
 0:10:58
4 ways to make an api call in JavaScript | Http requests | JavaScript Tutorials
 0:06:27
Call External API Using Node Js https & request module
 0:10:34
Rest Assured API automation : How to automate HTTP get request? (Real-time scenario walkthrough)
 0:14:15
How to CALL POST API in C#! - THIS EASY!
 3:07:07
APIs for Beginners 2023 - How to use an API (Full Course / Tutorial)
 0:05:45
98. Sending HTTP Headers in the API Request Call with HTTPClient in the angular.
 0:11:40
01 Flutter API call | Flutter REST API Series
 0:09:13
What is an HTTP POST API? REST API Series,POST method, response codes, errors, best practices & ...
 0:30:39
Flutter BLoC Http Get Example | Fetch API Data | Flutter BLoC Pattern Rest Api Call
 0:22:26
REST API Calls in Power Automate - Beginners Tutorial
 0:08:37
How to call api in angular | simple example
 0:07:32
How to Fetch APIs with Python | API Fetching With Python
 0:45:10
Flutter Tutorial for Beginners: How to Make HTTP and API Calls with Flutter!
 0:04:48
ESP32 GET JSON from API - ESP32 GET request from API receive JSON
 0:05:50
GET Data from API & Display in HTML with JavaScript Fetch API
Комментарии