filmov
tv
How To Rewire A Trailer

Показать описание
The plug had a broken pin and the wires were brittle and chewed up.
So, I got a new wiring harness and everything else I needed.
First, I unbolted the wiring harness ground from the tongue of the trailer.
Next, I cut the wires and pulled out each section.
The LED taillights on this trailer were recently installed, but the front marker lights were old and corroded, so I replaced those as well.
All four of the screws broke off when I removed them. I used a hammer and punch to beat out 3 of the broken screws and the fourth one had to be drilled out.
The area around the marking lights was rusty so I decided to grind it down and repaint it.
I also hit the area where the wiring harness grounds to the trailer to make sure there would be a good connection.
After cleaning the bare metal with paint thinner I sprayed it with Rust-oleum’s paint and primer in one.
I carefully routed the wire on these marking lights through the back and into the little channel so the didn’t get pinched when they were installed.
These screws are stainless steel, so they won’t rust like the last ones did.
I ordered marine grade heat shrink connectors along with a crimping tool from Amazon.
Once crimped, I used a heat gun on the connector to make it water tight.
This flexible conduit helps to protect the wires between the tongue of the trailer and where it plugs into the vehicle.
I fed the wiring harness through the channel on the tongue of the trailer.
Applying dialectic grease where the ground wire meets the frame helps make a better connection and keeps it from rusting.
I spliced into one of the brown taillight wires to get power for my front marker lights.
This multi-wire connector let’s me connect a single wire in one side and two wires into the larger side -that way the brown wire is reconnected, but I’ve also spliced in my white wire.
This crimper won’t release until it’s squeezed down all the way, so you always get the perfect crimp.
Next, I measured how much wire was needed to reach each front marker light.
I repeated the whole process one more time- this allowed me to attach two white wires to the single white wire. One for each marker light.
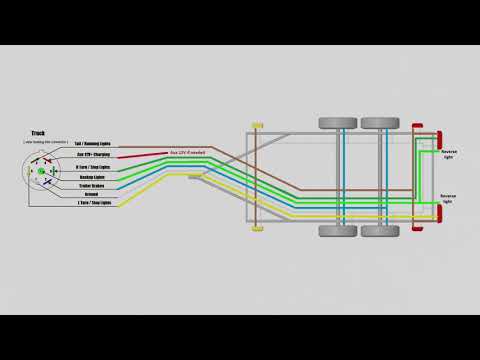
These trailer wiring harnesses are really simple: green for the right side turn signal, yellow for the left side, and brown for both taillights.
The colored wires coming out of the taillights correspond, so all I had to do was match them up and crimp.
These connectors have an adhesive that’s activated when heated, so not only does the tubing shrink but it glues into place.
I moved to the front to hook up the right and left marker lights.
These lights are grounded through the screws that attach them to the trailer.
I put a few cable clips under the trailer to make sure the wires don’t sag.
I hooked it up to my truck and to make sure everything was good to go. @hausplans
#build #building #howto #construction #diy #contractor #tools #trailer #connectors #rewire
 0:02:54
How To Rewire A Trailer
 0:08:11
Do This When You Wire Your Trailer!
 0:32:48
How To Wire A Trailer, New Lights Also
 0:06:58
How to Wire Trailer Lights Correctly!
 0:06:09
How to Completely Wire a Boat Trailer Using LED Lights
 0:02:12
Trailer wiring diagram 7 pin
 0:21:53
Complete Boat Trailer Rewiring and Light Replacment
 0:06:19
How to Wire A Trailer
 0:23:18
How to install lights and wiring on your trailer
 0:02:48
How to Wire Boat Trailer Lights - Wire Diagram, Description, and Install
 0:04:38
Trailer Rewire & Wiring Basics
 0:36:50
HOW TO: Wiring a Trailer, OVERKILL Edition
 0:10:47
How to Rewire Utility Trailer | How to Install Trailer Lights
 0:08:57
Trailer Light Wiring & Rewiring - Boat Trailer Lights & Small Trailer Lights with 4 pin conn...
 0:08:22
How to replace your boat trailer wiring and lights..The easy Way
 0:05:58
How To Rewire a Trailer with Universal Trailer Light Kit Using CURT 53540
 0:07:21
Bulletproof Wiring Your Tow Trailer
 0:26:44
How to completely rewire a trailer the RIGHT way
 0:12:11
How to Rewire a Trailer
 0:16:40
How to re wire a boat trailer.
 0:17:44
How To Rewire a Trailer - Utility Trailer Overhaul Part 1 Installing New Lights #DIY #HowTo #Trailer
 0:17:18
Trailer - DIY how to wire your trailer ( Australian standard )
 0:13:26
TRAILER LIGHTING BOARD REWIRE AND FIX
 0:10:17
How to Wire a Utility Trailer // Brake Lights
Комментарии