filmov
tv
PHP and MySQL Connection in Visual Studio Code | How to Connect MySQL Database to PHP | #1

Показать описание
How to Connect MySQL Database with PHP
MySQL is a highly popular database management system that can power projects of all sizes. Its ability to handle huge volumes of data without breaking a sweat is one of its biggest selling points. Connect MySQL with PHP code, you can make use of one of three methodologies.
Related Queries:-
how to connect xampp with vscode
mysqli_connect in php
mysql php
php
php connect to server
php database connection
php mysqli connect
php pdo
database connection in php
database connection in visual studio code
database connectivity in php with reference to mysql
how to connect mysql database in php
how to connect visual studio code to database
how to run php code in visual studio code
how to run php file in visual studio code with xampp
how to run php in visual studio code
how to run php in visual studio code with xampp
how to use xampp
mysql
mysql connection
php connect to mysql
php in visual studio code
php in vscode
php my sql
php mysql
php mysql connection
php tutorial
php visual studio code
php with mysql
php xampp visual studio code
samsung odyssey neo g7 43
visual studio vs visual studio code
vs code php
vscode mysql
what is php programming
There are three types of methods in PHP to connect MySQL database through backend:
MySQL
MySQLi
PDO
mysql() is now obsolete because of security issues like SQL injection etc, but the other two are being actively used.
MySQLi
MySQLi is an API used as a connector function to link the backend of the PHP app to the MySQL database. It works just like the previous version, but it is safer and faster, and provides a better set of functions and extensions. MySQLi was introduced with PHP 5.0.0 and the drivers were installed in 5.3.0. The API was designed to support MySQL from version 4.1.13 to newer ones.
PDO
PHP Data Objects (PDO) extension is a Database Abstraction Layer. It is like an interface for the backend to interact with the MySQL database and make changes without making any change in the PHP code. It also gives you the freedom to work with multiple databases. The major advantage of using PDO is that your code stays simple and portable.
In this article, I’ll discuss how to connect MySQL Database on different servers and I’ll also give you an overview of connecting Database using PDO.
Connect MySQL using Localhost Server
Connect MySQL using Cloudways Server
Connect MySQL using PDO
Connect MySQL using Remote MySQL
Connect MySQL Database with PHP
Create MySQL Database at the Localhost
Create Database
Create a Folder in htdocs
Create Database Connection File In PHP
Create new php file to check your database connection
Run it
Create MySQL Database at Cloudways Server
Create Database Connection
MySQLi Procedural Query
Connect MySQL Database with PHP Using PDO
Check Connection
Remote MySQL
Top MySQL Management tools
MySQL Workbench
Navicat For MySQL
MySQL Yog
Cloudways MySQL Database Manager
Conclusion
Download MYSQL Cheat Sheet Now
We’ll send a download link to your inbox.
Email Address
I agree to the Cloudways Terms of Service & Privacy Policy
Create MySQL Database at the Localhost
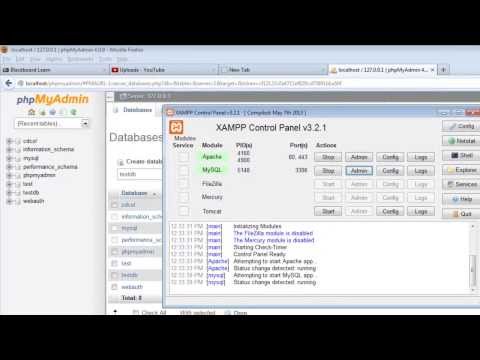
Before you start building PHP connection to MySQL database you need to know what PHPMyAdmin is. It’s a control panel from where you can manage the database that you’ve created. Open your browser and go to localhost/PHPMyAdmin or click “Admin” in XAMPP UI.
When you first installed XAMPP, it only created the username for it to be accessed, you now have to add a password to it by yourself. For this, you have to go to User account where the user is the same as the one shown in this picture:
change password database
Now click Edit privileges and go to Change Admin password, type your password there and save it. Remember this password as it will be used to connect to your Database.
change password database
Note: It is not necessary to change the password to access databases on the localhost. It is a good practice and that is why we have used a password.
Create Database
Now return to the homepage of PHPMyAdmin. Click the New button to create a new database.
phpmyadmin
In the new window, name your database as per your need, I am naming it “ practice ”. Now select Collation as utf8_general_ci, as we are using it for learning purposes and it will handle all of our queries and data that will be covered in this tutorial series. Now click on Create and your database will be created.
create database
The newly created database will be empty now, as there are no tables in it. I will be covering that in the upcoming series where we will learn how to create tables and insert data in it. In this tutorial, we are going to connect this database to localhost using PHP
MySQL is a highly popular database management system that can power projects of all sizes. Its ability to handle huge volumes of data without breaking a sweat is one of its biggest selling points. Connect MySQL with PHP code, you can make use of one of three methodologies.
Related Queries:-
how to connect xampp with vscode
mysqli_connect in php
mysql php
php
php connect to server
php database connection
php mysqli connect
php pdo
database connection in php
database connection in visual studio code
database connectivity in php with reference to mysql
how to connect mysql database in php
how to connect visual studio code to database
how to run php code in visual studio code
how to run php file in visual studio code with xampp
how to run php in visual studio code
how to run php in visual studio code with xampp
how to use xampp
mysql
mysql connection
php connect to mysql
php in visual studio code
php in vscode
php my sql
php mysql
php mysql connection
php tutorial
php visual studio code
php with mysql
php xampp visual studio code
samsung odyssey neo g7 43
visual studio vs visual studio code
vs code php
vscode mysql
what is php programming
There are three types of methods in PHP to connect MySQL database through backend:
MySQL
MySQLi
PDO
mysql() is now obsolete because of security issues like SQL injection etc, but the other two are being actively used.
MySQLi
MySQLi is an API used as a connector function to link the backend of the PHP app to the MySQL database. It works just like the previous version, but it is safer and faster, and provides a better set of functions and extensions. MySQLi was introduced with PHP 5.0.0 and the drivers were installed in 5.3.0. The API was designed to support MySQL from version 4.1.13 to newer ones.
PDO
PHP Data Objects (PDO) extension is a Database Abstraction Layer. It is like an interface for the backend to interact with the MySQL database and make changes without making any change in the PHP code. It also gives you the freedom to work with multiple databases. The major advantage of using PDO is that your code stays simple and portable.
In this article, I’ll discuss how to connect MySQL Database on different servers and I’ll also give you an overview of connecting Database using PDO.
Connect MySQL using Localhost Server
Connect MySQL using Cloudways Server
Connect MySQL using PDO
Connect MySQL using Remote MySQL
Connect MySQL Database with PHP
Create MySQL Database at the Localhost
Create Database
Create a Folder in htdocs
Create Database Connection File In PHP
Create new php file to check your database connection
Run it
Create MySQL Database at Cloudways Server
Create Database Connection
MySQLi Procedural Query
Connect MySQL Database with PHP Using PDO
Check Connection
Remote MySQL
Top MySQL Management tools
MySQL Workbench
Navicat For MySQL
MySQL Yog
Cloudways MySQL Database Manager
Conclusion
Download MYSQL Cheat Sheet Now
We’ll send a download link to your inbox.
Email Address
I agree to the Cloudways Terms of Service & Privacy Policy
Create MySQL Database at the Localhost
Before you start building PHP connection to MySQL database you need to know what PHPMyAdmin is. It’s a control panel from where you can manage the database that you’ve created. Open your browser and go to localhost/PHPMyAdmin or click “Admin” in XAMPP UI.
When you first installed XAMPP, it only created the username for it to be accessed, you now have to add a password to it by yourself. For this, you have to go to User account where the user is the same as the one shown in this picture:
change password database
Now click Edit privileges and go to Change Admin password, type your password there and save it. Remember this password as it will be used to connect to your Database.
change password database
Note: It is not necessary to change the password to access databases on the localhost. It is a good practice and that is why we have used a password.
Create Database
Now return to the homepage of PHPMyAdmin. Click the New button to create a new database.
phpmyadmin
In the new window, name your database as per your need, I am naming it “ practice ”. Now select Collation as utf8_general_ci, as we are using it for learning purposes and it will handle all of our queries and data that will be covered in this tutorial series. Now click on Create and your database will be created.
create database
The newly created database will be empty now, as there are no tables in it. I will be covering that in the upcoming series where we will learn how to create tables and insert data in it. In this tutorial, we are going to connect this database to localhost using PHP
 0:06:21
PHP Connect to MySQL Database | 2 Methods
 0:07:09
How to Connect HTML Form with MySQL Database using PHP
 0:02:51
How to Connect PHP File to MySQL Database using phpMyAdmin | CRUD Operations
 0:13:42
Connecting to MySQL Database from Php Script | PHP Tutorial #24
 0:12:55
16 | Create a Database in MySQL PHP Tutorial | 2023 | Learn PHP Full Course for Beginners
 0:05:54
PHP Tutorial (& MySQL) #25 - Connecting to a Database
 0:22:53
PHP With MySQL Tutorial For Beginners | PHP And MySQL Database Tutorial | PHP Tutorial | Simplilearn
 0:10:16
How to Connect PHP to MySQL Database using XAMPP | Create a new database
 0:15:17
Login using JWT (Encode, Decode) - PHP, MySQL, Laravel
 0:06:41
Connect to MySQL with PHP in XAMPP / Create a new database
 0:04:16
Connect Your HTML Form to MySQL with PHP: Step-by-Step Tutorial
 0:07:46
PHP and MySQL How to connect #HTML #login form to #PHP and #MySQL Part 2
 0:04:33
Apprendre le PHP - 06 - Connexion à une base de données MySQL (PDO)
 0:09:45
Connect to MySQL Database in PHP Using Visual Studio Code 2023
 0:07:50
Insert HTML Form to MySQL Database With PHP In Easy Way | PHP for Beginners
 0:08:10
Connect to MySQL Workbench in PHP | PHP Code to Connect to MySQL workbench #vscode
 0:26:30
How to connect HTML form to MySQL Database with PHP.
 0:10:11
PHP and MySQL Connection in Visual Studio Code | How to Connect MySQL Database to PHP | #1
 0:24:38
Save HTML Form Data to a MySQL Database using PHP
 0:06:14
Should I close my MySQL connections in PHP?
 0:08:10
PDO Connections to MySQL from PHP
 0:41:18
Simple signup and login system with PHP and Mysql database | Full Tutorial | How to & source cod...
 0:43:16
Signup and Login with PHP and MySQL
 0:10:57
Connecting to Local MySQL and Remote MySQL in PHP
Комментарии