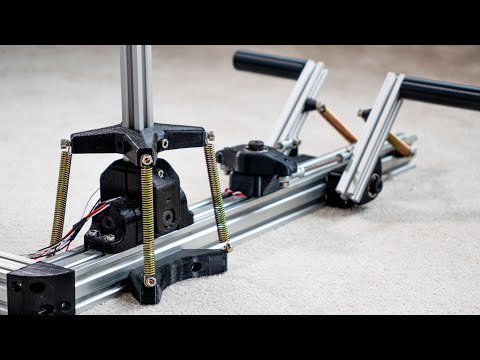
How to: Arduino Flight Simulator 2020 controller (Leonardo/Pro-micro). Part 1/2

preview_player
Показать описание
In this video, I will show you how to wire up an Arduino so we can program it to be used with Microsoft Flight Simulator 2020 in the next video.

You're able to support me on Patreon for exclusive rewards:

Needed for this guide:

optional:
Tools for casing and materials.
Insulating tape
Drill

Disclaimer:
I'm by no means a professional woodworker. I know it looks mediocre.
Рекомендации по теме
Комментарии
Автор

Nice video but aren't you making a mistake with the 220R resistors? From my point of view both endpoints of the resistor is connected to the "same" point and wont do anything. If you want it in serial with your LED then you should connect it in the same way you did with the 10k?

GroenStedts
Автор

Thank you for sharing your knowledge with us. I did not know where to start and thanks to your video I was able to start my Arduino/MSFS2020 learning journey.
So I say once again, "Thank you"

Paul-iyfr
Автор

You connected the 220 ohm limiting resistor incorrectly - it is useless in such a circuit, since the transverse contacts are all closed and the current still flows not through the resistor but through the LED. That's why its brightness hasn't changed. But the 10 kilo-ohm resistor is turned on correctly, so your LED immediately begins to glow dimly - the current is limited through a resistor of as much as (!) 10 kilo-ohms!
And it’s not clear why there are two resistors? It is enough to turn on one at 220 ohms instead of 10 kiloohms. That's all!

markd
Автор

i have 3 position toggle switches how would i use them?

aeoteroa
Автор

Hi, i am following you and start my cockpit. My doubt is regarding the switch with led how do you connect them to de arduino board... try to see the way and dindt find any explanation. please help

hugomartins
Автор

I want to use more switches then I have place on the arduino, can I buy one with more inputs abd still do the rest the same and the same programming?

keepjerre
Автор

Can't you just use an Arduino nano or an Arduino Uno???

prosamgg
Автор

If you put the resistor parallel with the board connected row it’s useless. Bad circuit development ! You even risk your Arduino as the current is on maximum. If you use power supply it’s dead right away.
Never use LED without current limiting resistor!

thomasmoersheim
Автор

maybe go back and learn how a breadboard works.. then come provide instruction about electronics..

texastyrannyresponseteam
Автор

please learn basic circuit theory before releasing instructional videos :D

stueyanderton
Автор

LED and resistor on the same line? OMG xD

hefrenPL
Автор

At 1:24 you show the electrical scheme. but there are no resistors in the drawing. Don't you need resistors in this case?

woetter
Автор

Wow, great video, that’s exactly the kind of vid I was looking for. Rapidly explaining, first I am a complete beginner and yes I am way worse than you with that sort of knowledge. I want to make my own buttons, switches, single and dual rotary knobs with push button to use with VR for MSFS 2020 when it comes out. I knew I had to use Arduino, but that was about it. Now and thanks to you, I understand the full process. I really like the pace of your two videos, everything is clearly explained, like you’re talking to a 4 year old, which is exactly what I need. Before watching your 2 vids, I just bought my first Elegoo UNO Project super starter kit in the hope that would help me to understand how things work. Again, so glad I found your videos, keep’em coming and don’t change anything to your pace. Hopefully you will do a vid on dual rotary knobs with a push button. Thanks again for your tutorials.

calvrsimer
Автор

thanks for your videos, they are very useful for beginners.
However I don't understand if this solution is applicable for a button matrix, if so, how do I insert the led inside a matrix?
I have a 2x5 matrix where the second row are 5 toggle switches to which I would like to add a led when activated, so they have a common row A2 where I added diodes before the toggle switch pin and the 5 columns of the toggle switch go on pins A1; A0; 15; 14; 16.

Simo_Bigs
Автор

How can i. Change the code as momentry switch instead off toggle on and off LED latch button momentary?❤❤hope you can help me..❤😂😂

SunbernSun
Автор

The advantage of Leonard is that it is configured as an HID, so it is simply a matter of plug in and configure as a joystick inside the simulator. But the problem is that, at least I haven't figured out how, you cannot take information out from the sim, such as reading HDG indicator to show in a 7 segment display, or switch on a light if the autopilot is engaged. To do that, FSUIPC and Mobiflight or arduino programming is needed.

fjgaspar
Автор

Hey mate, you didn't show how you got the 12v led lever to work. How did you do that?

marmitaa
Автор

do you plug it in and it just works or u gotta do some programming?

abredzio
Автор

way this code use arduino uno bord pls ?

quicklearner
Автор

Where are the links for the resistors? I see different wattages for 10k, like 0.5 and 0.25. which one should I get?

breno