filmov
tv
Router inlays | Who knew it could be that easy!?

Показать описание
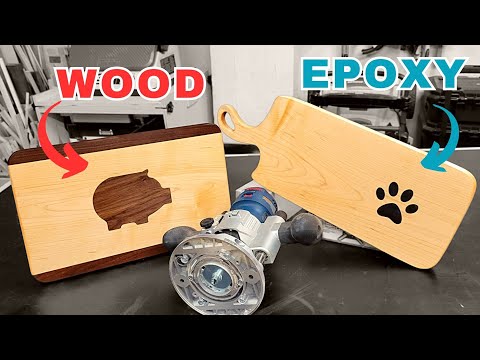
In this video, I’m sharing a foolproof method for creating perfect router inlays using templates. First an epoxy inlay of a paw print, then a wood on wood inlay using a ‘pig profile’ router inlay template. The secret is to use guide bushings or a router inlay kit. Plus, I’ll also do some router table template routing to create a curved charcuterie board handle.
►GET THE ROUTER TEMPLATES:
►TOOLS & MATERIALS USED (affiliate links):
►ALL MY TOOLS & GEAR
►PLANS & ONLINE STORE
►Sign up for my NEWSLETTER: project updates, plans, woodworking book of the month and more!
►SUPPORT ME ON PATREON
►Follow me on SOCIAL MEDIA
►CHAPTERS
0:00 Intro
0:11 Router guide bushings explained
1:02 Epoxy inlay - prep & cutting (PAW PRINT)
3:57 Epoxy inlay - filling
5:15 Charcuterie board handle template routing
7:30 Charcuterie board finishing process
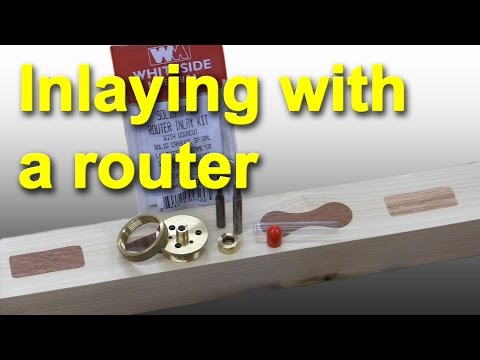
8:36 Router inlay kits explained
9:27 Wood on wood inlay (PIG PROFILE)
15:29 Pig cutting board - shaping & finishing
16:39 Get the router inlay templates
►GET THE ROUTER TEMPLATES:
►TOOLS & MATERIALS USED (affiliate links):
►ALL MY TOOLS & GEAR
►PLANS & ONLINE STORE
►Sign up for my NEWSLETTER: project updates, plans, woodworking book of the month and more!
►SUPPORT ME ON PATREON
►Follow me on SOCIAL MEDIA
►CHAPTERS
0:00 Intro
0:11 Router guide bushings explained
1:02 Epoxy inlay - prep & cutting (PAW PRINT)
3:57 Epoxy inlay - filling
5:15 Charcuterie board handle template routing
7:30 Charcuterie board finishing process
8:36 Router inlay kits explained
9:27 Wood on wood inlay (PIG PROFILE)
15:29 Pig cutting board - shaping & finishing
16:39 Get the router inlay templates
 0:16:55
Router inlays | Who knew it could be that easy!?
 0:37:51
Workshop Wednesday - Router Inlay Basics
 0:06:13
Make Beautiful Inlays with the MLIS Multi-Layer Inlay System
 0:00:37
The secret to perfect inlays
 0:05:53
You Can Create All These Inlays Only Router
 0:13:36
How to create inlays with your router
 0:10:18
How to Make a Plunge Router Inlay with Wood Router Bushings
 0:19:57
Routers - 7 Important Things You Should Know
 0:11:54
How to do wood inlays with a router
 0:12:58
Using Inlay Kits with a Router
 0:05:41
Router BUSHINGS vs BEARINGS - What you should know
 0:07:51
Wood Inlay For Beginners—How To Woodworking
 0:02:53
How to do Router Inlays
 0:01:38
How Router Based Inlays Work
 0:07:02
How to Create the Perfect Inlay from MLCS Woodworking
 0:06:39
Make Inlays the Easy Way - Perfect Fit Every Time
 0:10:01
How to Make Your Own Inlay Banding and Enhance Your Woodworking
 0:00:53
Everything You Need To Know About Inlays!
 0:04:44
Whiteside Router Inlay Kit
 0:25:25
6-IN-1 TRIM Router Jig - freehand routing, inlays, edge-banding, mortises, dados, circles & mor...
 0:10:40
How to make perfect inlays: Part 2 - Woodworking skills with CNC
 0:08:32
The WORST router flush trimming MISTAKES (You’re doing it WRONG)
 0:21:05
How to make custom wood inlays with your router
 0:04:44
How to. Hand made sign using a router, simple technique.
Комментарии