filmov
tv
Resolving the HTTP 404 Error When Deploying a Spring Boot REST API WAR File

Показать описание
Learn how to fix the `HTTP 404 Error` when deploying your Spring Boot REST API as a WAR file on Tomcat. This guide offers step-by-step troubleshooting tips to ensure your API runs smoothly.
---
Visit these links for original content and any more details, such as alternate solutions, latest updates/developments on topic, comments, revision history etc. For example, the original title of the Question was: Spring Boot REST API war file generating 404 error
If anything seems off to you, please feel free to write me at vlogize [AT] gmail [DOT] com.
---
Understanding the HTTP 404 Error in Spring Boot REST API Deployments
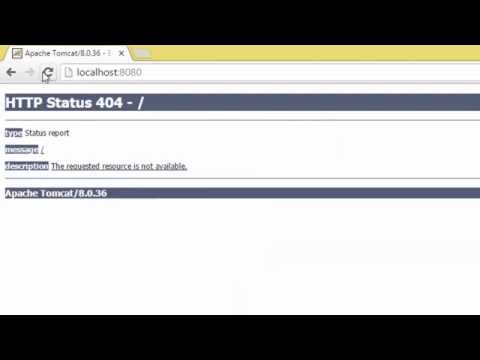
When deploying a Spring Boot REST API as a WAR file on Apache Tomcat, it's not uncommon to encounter an HTTP 404 Error. This issue typically occurs due to differences in how applications are accessed when running in an IDE versus a standalone server environment. In this guide, we'll explore the reasons behind this error and provide a step-by-step solution.
The Problem: Getting an HTTP 404 Error
You might be running into a situation where:
Upon deploying the WAR file to Tomcat and trying to access the same URL after starting Tomcat, you receive a 404 Not Found error.
What could possibly be going wrong? Let's unravel this issue!
The Reason Behind the 404 Error
The problem often arises because the structure of the URL for accessing the application deployed on Tomcat differs from that used during development. Here’s what you need to understand:
Deployment Behavior
WAR File Deployment: When you deploy a WAR file on Tomcat, after the deployment, Tomcat creates a directory with the same name as your WAR file under the webapps directory.
Example
[[See Video to Reveal this Text or Code Snippet]]
Solution: Accessing Your Spring Boot REST API Correctly
To resolve the HTTP 404 Error, follow these steps:
Step 1: Verify Deployment
Deploy the WAR File: Confirm that your WAR file is successfully deployed in the C:\apache-tomcat-9.0.43\webapps directory.
Check App Folder: After deployment, ensure that a folder matching your WAR file name (in this case myapp) is created in webapps.
Step 2: Use the Correct URL Format
Accessing the API: Instead of:
[[See Video to Reveal this Text or Code Snippet]]
Use:
[[See Video to Reveal this Text or Code Snippet]]
Step 3: Test Your API Again
After adjusting the URL, try accessing your API endpoint. You should now receive the correct JSON response without encountering the 404 error.
Conclusion
Deploying a Spring Boot REST API as a WAR file on Tomcat can be straightforward, but small discrepancies in URL structure can lead to confusion. By ensuring you access your API using the correct path format—incorporating the WAR file name—you can avoid the common HTTP 404 error and successfully run your application.
By following the outlined steps, not only will you resolve the issue, but you’ll also gain a better understanding of application deployment in Spring Boot and Tomcat. Happy coding!
---
Visit these links for original content and any more details, such as alternate solutions, latest updates/developments on topic, comments, revision history etc. For example, the original title of the Question was: Spring Boot REST API war file generating 404 error
If anything seems off to you, please feel free to write me at vlogize [AT] gmail [DOT] com.
---
Understanding the HTTP 404 Error in Spring Boot REST API Deployments
When deploying a Spring Boot REST API as a WAR file on Apache Tomcat, it's not uncommon to encounter an HTTP 404 Error. This issue typically occurs due to differences in how applications are accessed when running in an IDE versus a standalone server environment. In this guide, we'll explore the reasons behind this error and provide a step-by-step solution.
The Problem: Getting an HTTP 404 Error
You might be running into a situation where:
Upon deploying the WAR file to Tomcat and trying to access the same URL after starting Tomcat, you receive a 404 Not Found error.
What could possibly be going wrong? Let's unravel this issue!
The Reason Behind the 404 Error
The problem often arises because the structure of the URL for accessing the application deployed on Tomcat differs from that used during development. Here’s what you need to understand:
Deployment Behavior
WAR File Deployment: When you deploy a WAR file on Tomcat, after the deployment, Tomcat creates a directory with the same name as your WAR file under the webapps directory.
Example
[[See Video to Reveal this Text or Code Snippet]]
Solution: Accessing Your Spring Boot REST API Correctly
To resolve the HTTP 404 Error, follow these steps:
Step 1: Verify Deployment
Deploy the WAR File: Confirm that your WAR file is successfully deployed in the C:\apache-tomcat-9.0.43\webapps directory.
Check App Folder: After deployment, ensure that a folder matching your WAR file name (in this case myapp) is created in webapps.
Step 2: Use the Correct URL Format
Accessing the API: Instead of:
[[See Video to Reveal this Text or Code Snippet]]
Use:
[[See Video to Reveal this Text or Code Snippet]]
Step 3: Test Your API Again
After adjusting the URL, try accessing your API endpoint. You should now receive the correct JSON response without encountering the 404 error.
Conclusion
Deploying a Spring Boot REST API as a WAR file on Tomcat can be straightforward, but small discrepancies in URL structure can lead to confusion. By ensuring you access your API using the correct path format—incorporating the WAR file name—you can avoid the common HTTP 404 error and successfully run your application.
By following the outlined steps, not only will you resolve the issue, but you’ll also gain a better understanding of application deployment in Spring Boot and Tomcat. Happy coding!
 0:01:45
 0:03:08
 0:01:45
 0:01:39
 0:01:45
 0:00:19
 0:01:50
 0:05:45
 0:00:22
 0:00:53
 0:05:29
 0:04:32
 0:01:40
 0:00:29
 0:01:22
 0:03:55
 0:03:36
 0:03:50
 0:00:53
 0:03:28
 0:10:11
 0:01:39
 0:00:17
 0:03:15