filmov
tv
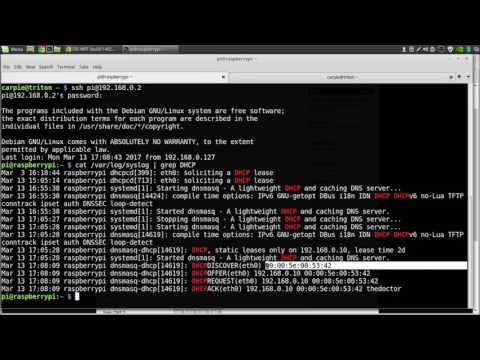
Setting up dnsmasq to help serve a PXE boot image

Показать описание
note: you may need to change the ownership of the tftpboot dir. You can do this with sudo (if not already root) chown -R nobody:nogroup /var/lib/tftpboot
use ls -l /var/lib/tftpboot to check if this was done successfully
These commands are used in the video if you get lost
install vm: 25 gb, 8gb ram, bridged adapter, shared clipboard, install guest additions after first boot/install
guest additions -
insert guest additions iso
sudo mount /dev/cdrom /mnt
reboot
sudo apt update
sudo su
mkdir /var/lib/tftpboot
cd /var/lib/tftpboot
tar -xzvf netboot
apt install dnsmasq
netstat -tulnep | grep 53
kill the process
systemctl start dnsmasq
systemctl stop systemd-resolved
ifconfig
apt install net-tools
ifconfig -a
ifconfig enp0s3 //whatever you want
Timestamps:
[00:00] - Intro and VM Setup
[03:50] - Dnsmasq and system configuration
Discover how to configure dnsmasq for PXE boot image serving in this step-by-step tutorial. Dive into the intricacies of network booting, explore the advantages of using dnsmasq, and master the setup process with ease. Perfect for IT professionals, network administrators, and enthusiasts looking to enhance their server capabilities. Don't forget to subscribe for more tech insights and tutorials! #dnsmasq #PXEboot #NetworkBoot #Tutorial
 0:16:39
Implementing DNS via dnsmasq
 0:17:59
Local DNS with Dnsmasq running in Ubuntu LXC - Proxmox tutorial series
 0:10:58
Setting up dnsmasq to help serve a PXE boot image
 0:13:12
Setting up a home network DHCP/DNS server with dnsmasq
 0:09:56
Configuring DNS With Dnsmasq and Ubuntu Server
 0:03:08
Setting up dnsmasq for a local network (2 Solutions!!)
 0:06:59
DHCP Server Setup with Dnsmasq
 0:18:37
WRT DNSMasq Setup and Local DNS
 0:04:54
How to use your Raspberry Pi as a DNS Server (DNSMasq) and speed up your Internet
 0:11:25
Install and Configure Dnscrypt/Dnsmasq
 0:05:19
How to Set Up a DNS Server with Dnsmasq
 0:08:48
07. Setup dnsmasq as DNS DHCP
 0:03:57
Easily add a new device to your dnsmasq-managed network - Outdated: See Description
 0:27:33
Setting up proxyDHCP / PXE boot with dnsmasq and Samba!
 0:19:11
Instalasi dan Konfigurasi DNSmasq di AlmaLinux 9, untuk local DNS dan Forwarder
 0:02:07
Set up DHCP Server Using Dnsmasq
 0:03:21
Using Pi-Hole for Local DNS - Fast, Simple, and Easy Guide
 0:02:16
DNS Explained in 100 Seconds
 0:07:52
Dnsmasq Setup Walkthrough for Domain Resolution
 0:32:31
You want a real Name Server at home? // DNS
 0:01:16
How to set up dnsmasq for static ip-address name resolving on OpenWrt?
 0:17:56
08. Setup dnsmasq as DNS DHCP - 2
 0:16:32
rocky 0.2 - Dnsmasq in Rocky Linux 9
 0:10:10
Block Social Media directly with Dnsmasq
Комментарии