filmov
tv
How to Remove Blank Rows in Excel

Показать описание
In this video I'll show you how to remove blank rows from your Excel spreadsheet.
Timestamps:
Introduction: 0:00
Steps to Remove Blank Rows From Excel Method #1: 0:49
Steps to Remove Blank Rows From Excel Method #2: 2:45
Conclusion: 3:27
Video Transcript:
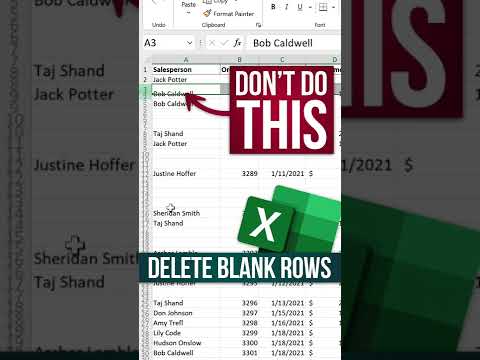
If you've got a spreadsheet you've managed over a long period of time, the odds are pretty good that it's got some blank rows in it that make it an eyesore and hard to navigate and look at. Thankfully, Microsoft does make it possible to quickly delete all of those annoying empty rows in your Excel spreadsheet. The only catch is that the functionality that does this finds all blank cells and not just the blank rows. So if you want this to be a clean process, you'll want to put some sort of text or indicator in any blank cells in any rows you want to keep. In this video I'll show you two methods to remove blank rows in Excel.
First let's look at the steps to delete blank rows in Excel in a spreadsheet where you don't have any blank cells in any of the rows you want to keep.
Step 1. Open the Excel spreadsheet you want to remove all of the blank rows from. Again, this solution only works if all of the columns in the non-blank rows have data entered into them. So if some of those fields are blank and you want to be able to cleanly remove blank rows in your Excel spreadsheet, I'd recommend putting some sort of text in those fields. In this example, you can see I've entered "N/A" where I don't have any data in a field.
Step 2. Make sure "Home" is selected in the menu at the top of the screen. From there, navigate to the Editing section in the ribbon, and then click "Find and Select." Find and Select will expand into a drop-down menu.
Step 3. Click "Go to Special" in this menu. The Go to Special window pops up.
Step 4. Click to place the selector next to "Blanks," and then click "OK." The window will close, and you'll see all of the blank rows in your Excel spreadsheet are highlighted. At this point you'll still want to do a quick check over the entire spreadsheet to make sure no blank cells outside of a fully blank row are highlighted. If they are you'll want to hold down the "Control" key and then click the row number to de-select that row so you don't delete it.
Step 5. Again, make sure "Home" is selected in the menu. Navigate to the Cells section in the ribbon, and then click "Delete" in this section. This will expand into a drop-down menu.
Step 6. Click "Delete Sheet Rows" in the drop-down menu. All of the blank rows in your Excel spreadsheet will be deleted, and all rows will be moved up.
Now let's talk through how to remove blank rows from your Excel spreadsheet if you have rows with data that you want to keep that have some blank cells.
Step 1. Open the Excel spreadsheet you want to remove all of the blank rows from.
Step 2. Hold down the "Control" key, and then click the row number associated with each blank row you want to remove from your Excel spreadsheet.
Step 3. After clicking to highlight all of the rows you want to remove, right-click any of the highlighted row numbers. A menu will be displayed.
Step 4. Click "Delete" in this menu. The selected blank rows in your Excel spreadsheet will be deleted.
Timestamps:
Introduction: 0:00
Steps to Remove Blank Rows From Excel Method #1: 0:49
Steps to Remove Blank Rows From Excel Method #2: 2:45
Conclusion: 3:27
Video Transcript:
If you've got a spreadsheet you've managed over a long period of time, the odds are pretty good that it's got some blank rows in it that make it an eyesore and hard to navigate and look at. Thankfully, Microsoft does make it possible to quickly delete all of those annoying empty rows in your Excel spreadsheet. The only catch is that the functionality that does this finds all blank cells and not just the blank rows. So if you want this to be a clean process, you'll want to put some sort of text or indicator in any blank cells in any rows you want to keep. In this video I'll show you two methods to remove blank rows in Excel.
First let's look at the steps to delete blank rows in Excel in a spreadsheet where you don't have any blank cells in any of the rows you want to keep.
Step 1. Open the Excel spreadsheet you want to remove all of the blank rows from. Again, this solution only works if all of the columns in the non-blank rows have data entered into them. So if some of those fields are blank and you want to be able to cleanly remove blank rows in your Excel spreadsheet, I'd recommend putting some sort of text in those fields. In this example, you can see I've entered "N/A" where I don't have any data in a field.
Step 2. Make sure "Home" is selected in the menu at the top of the screen. From there, navigate to the Editing section in the ribbon, and then click "Find and Select." Find and Select will expand into a drop-down menu.
Step 3. Click "Go to Special" in this menu. The Go to Special window pops up.
Step 4. Click to place the selector next to "Blanks," and then click "OK." The window will close, and you'll see all of the blank rows in your Excel spreadsheet are highlighted. At this point you'll still want to do a quick check over the entire spreadsheet to make sure no blank cells outside of a fully blank row are highlighted. If they are you'll want to hold down the "Control" key and then click the row number to de-select that row so you don't delete it.
Step 5. Again, make sure "Home" is selected in the menu. Navigate to the Cells section in the ribbon, and then click "Delete" in this section. This will expand into a drop-down menu.
Step 6. Click "Delete Sheet Rows" in the drop-down menu. All of the blank rows in your Excel spreadsheet will be deleted, and all rows will be moved up.
Now let's talk through how to remove blank rows from your Excel spreadsheet if you have rows with data that you want to keep that have some blank cells.
Step 1. Open the Excel spreadsheet you want to remove all of the blank rows from.
Step 2. Hold down the "Control" key, and then click the row number associated with each blank row you want to remove from your Excel spreadsheet.
Step 3. After clicking to highlight all of the rows you want to remove, right-click any of the highlighted row numbers. A menu will be displayed.
Step 4. Click "Delete" in this menu. The selected blank rows in your Excel spreadsheet will be deleted.
 0:01:56
 0:00:39
 0:00:26
 0:03:59
 0:00:40
 0:10:20
 0:05:33
 0:00:51
 0:00:20
 0:01:37
 0:00:40
 0:00:30
 0:01:00
 0:00:38
 0:03:06
 0:12:13
 0:00:50
 0:00:18
 0:01:00
 0:00:31
 0:00:29
 0:01:34
 0:00:27
 0:00:29