filmov
tv
Trowel and Error - How to Set Tile the Right Way
Показать описание
How to install tile the right way! Learn NTCA-approved, correct trowel techniques to set large format tile and how to create a stronger bond between the tile and the substrate. Prevent crack transmission, lippage, tile breakage and other costly tile installation repairs.
Tile and stone are very durable materials that can and should last a lifetime. When tiles break, more often than not, it’s due to issues with the substrate or the installation method.
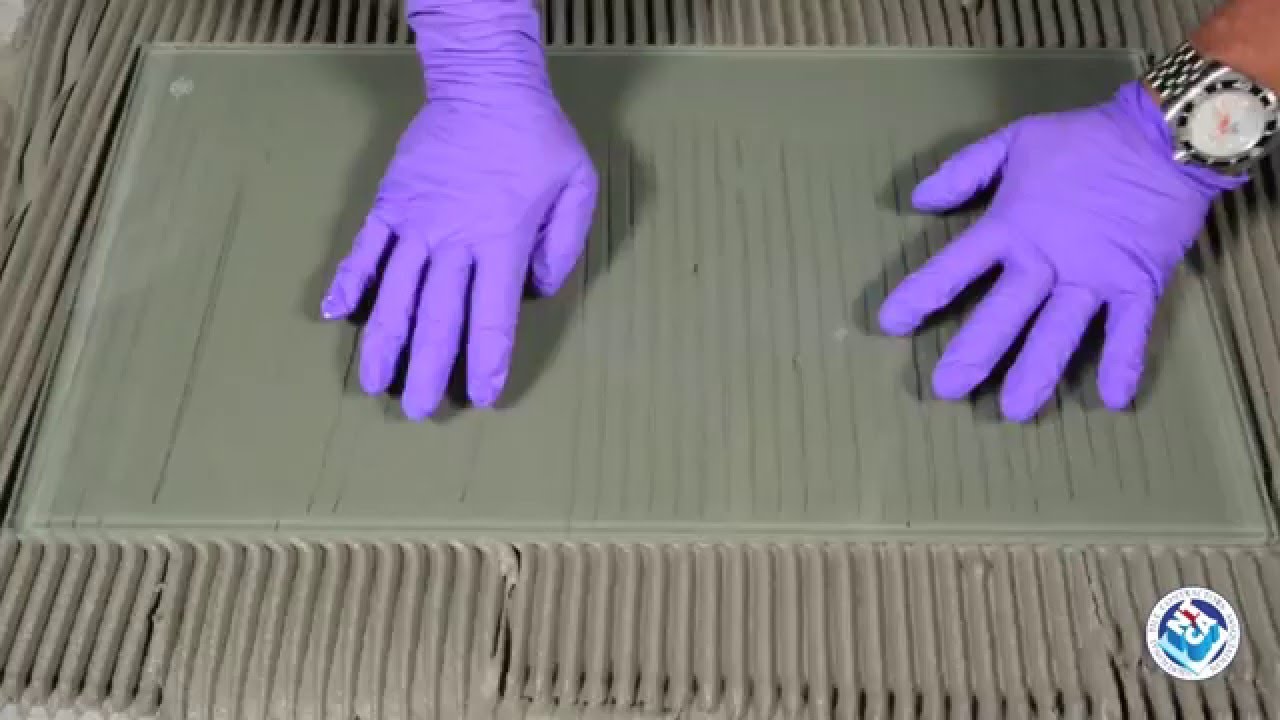
The way you trowel mortar for setting tile makes a big difference. Porcelain tiles, in particular, can withstand extra heavy service conditions. It takes a lot of impact or point load to cause bond loss when installed correctly over a sound substrate. The mortar under this tile was installed using the correct trowel technique. On the other hand, since tile is a hard and brittle finish or a veneer, unsupported space under the tiles actually creates weak spots. That same Porcelain tile may be easily damaged by the same impact, heavy loads and other causes.
Spot bonding with mortar is not recommended to set tile. It may be easier to set tiles flat to each other during the installation, but it’s only a matter of time before just the slightest force causes a failure! The first tile was installed using the NTCA-recommended ANSI Standard - the others were not.
Unfortunately, many tiles are being installed incorrectly, especially very large tiles, and this can result in costly breakage! You get the job done more quickly, but you can’t get proper mortar coverage. Air gets trapped with nowhere to go and leaves the tile unsupported. Swirling the mortar causes voids where the tile is not bonded to the substrate. These voids can result in cracked tile and bond failure under normal use but especially under point load or impact.
In addition to impact and heavy loading, tiles set without proper mortar coverage are more likely to fail under many conditions! To name a few - substrate deflection; shrinkage or creep; thermal expansion in high temperatures; and freeze/thaw applications.
A lack of perimeter and other movement joints affects well bonded tile so imagine when half - or even less - of a tile is adhered. According to the American National Standards Institute and the TCNA Handbook, tile requires a minimum of 80% mortar coverage in interior applications -- 95% for exteriors and wet environments. Natural stone tile requires 95% coverage in all areas.
During the manufacturing process of most large tiles, the center tends to dome or warp upward. This warpage requires more mortar to be used and air is even less likely to be removed when the mortar is swirled.
Flatter substrates are also required to successfully set large format tiles as they cover a much larger area. According to TCNA and ANSI guidelines, variations in floor flatness should not exceed 1/4” in 10 feet. When working with large format tile, a tile with any side 15 inches or longer, there is even less tolerance. Variation is limited to 1/8” in 10 feet and no more than 1/16” in 24 inches. The key to successful coverage is “Playing It Straight!” - combing the mortar in straight lines. Trowel ridges running in straight lines are much easier to collapse.
They assist with air removal to maximize mortar coverage and ensure a strong bond to the tile and substrate. The first is to “key in” a coat of mortar into the substrate with the flat side of the trowel. Then, add more mortar to the substrate and comb the mortar in straight lines, all going in one direction. Combing the trowel ridges in straight lines provides better distribution of the mortar. With rectangular tile, trowel ridges should go across the short direction of the tile. This allows better air release when you bed the tile. Be careful not to leave any voids along chalk lines or between tiles. Use a trowel that will help you achieve continuous minimum 3/32” coverage. Larger tiles most often require deeper trowels.
For large format tile, glass tile, natural stone or any tile set on exterior surfaces, “backbuttering” the tile is recommended. Use the flat side of the trowel to get an even coat of mortar and fill all the spaces in the surface. To finish, set the tile firmly, and move it backward and forward across the trowel ridges about 1/8 to ¼ inch. Move the tile only in one direction, perpendicular to the ridges, without moving in the opposite direction or twisting the tile. When you first start setting and then periodically through the installation, remove a tile and check for coverage. Ridges should be collapsed, and you don’t want the tile or the substrate to be missing mortar. Straight trowel ridges collapse with back and forth motion to eliminate voids. You will get a much stronger bond with complete mortar coverage. And remember - the larger the trowel, the more back and forth movement is needed. “Play it Straight!” and always use the NTCA-recommended tile setting method!
Tile and stone are very durable materials that can and should last a lifetime. When tiles break, more often than not, it’s due to issues with the substrate or the installation method.
The way you trowel mortar for setting tile makes a big difference. Porcelain tiles, in particular, can withstand extra heavy service conditions. It takes a lot of impact or point load to cause bond loss when installed correctly over a sound substrate. The mortar under this tile was installed using the correct trowel technique. On the other hand, since tile is a hard and brittle finish or a veneer, unsupported space under the tiles actually creates weak spots. That same Porcelain tile may be easily damaged by the same impact, heavy loads and other causes.
Spot bonding with mortar is not recommended to set tile. It may be easier to set tiles flat to each other during the installation, but it’s only a matter of time before just the slightest force causes a failure! The first tile was installed using the NTCA-recommended ANSI Standard - the others were not.
Unfortunately, many tiles are being installed incorrectly, especially very large tiles, and this can result in costly breakage! You get the job done more quickly, but you can’t get proper mortar coverage. Air gets trapped with nowhere to go and leaves the tile unsupported. Swirling the mortar causes voids where the tile is not bonded to the substrate. These voids can result in cracked tile and bond failure under normal use but especially under point load or impact.
In addition to impact and heavy loading, tiles set without proper mortar coverage are more likely to fail under many conditions! To name a few - substrate deflection; shrinkage or creep; thermal expansion in high temperatures; and freeze/thaw applications.
A lack of perimeter and other movement joints affects well bonded tile so imagine when half - or even less - of a tile is adhered. According to the American National Standards Institute and the TCNA Handbook, tile requires a minimum of 80% mortar coverage in interior applications -- 95% for exteriors and wet environments. Natural stone tile requires 95% coverage in all areas.
During the manufacturing process of most large tiles, the center tends to dome or warp upward. This warpage requires more mortar to be used and air is even less likely to be removed when the mortar is swirled.
Flatter substrates are also required to successfully set large format tiles as they cover a much larger area. According to TCNA and ANSI guidelines, variations in floor flatness should not exceed 1/4” in 10 feet. When working with large format tile, a tile with any side 15 inches or longer, there is even less tolerance. Variation is limited to 1/8” in 10 feet and no more than 1/16” in 24 inches. The key to successful coverage is “Playing It Straight!” - combing the mortar in straight lines. Trowel ridges running in straight lines are much easier to collapse.
They assist with air removal to maximize mortar coverage and ensure a strong bond to the tile and substrate. The first is to “key in” a coat of mortar into the substrate with the flat side of the trowel. Then, add more mortar to the substrate and comb the mortar in straight lines, all going in one direction. Combing the trowel ridges in straight lines provides better distribution of the mortar. With rectangular tile, trowel ridges should go across the short direction of the tile. This allows better air release when you bed the tile. Be careful not to leave any voids along chalk lines or between tiles. Use a trowel that will help you achieve continuous minimum 3/32” coverage. Larger tiles most often require deeper trowels.
For large format tile, glass tile, natural stone or any tile set on exterior surfaces, “backbuttering” the tile is recommended. Use the flat side of the trowel to get an even coat of mortar and fill all the spaces in the surface. To finish, set the tile firmly, and move it backward and forward across the trowel ridges about 1/8 to ¼ inch. Move the tile only in one direction, perpendicular to the ridges, without moving in the opposite direction or twisting the tile. When you first start setting and then periodically through the installation, remove a tile and check for coverage. Ridges should be collapsed, and you don’t want the tile or the substrate to be missing mortar. Straight trowel ridges collapse with back and forth motion to eliminate voids. You will get a much stronger bond with complete mortar coverage. And remember - the larger the trowel, the more back and forth movement is needed. “Play it Straight!” and always use the NTCA-recommended tile setting method!
 0:06:36
Trowel and Error - How to Set Tile the Right Way
 0:05:53
Trowel and Error: A guide to the perfect tile installation.
 0:00:26
Tile trowel tips! #youtubeshorts #shorts #tutorial #diy
 0:08:15
Learn to Tile --- THE 5 TROWELS YOU NEED
 0:02:28
Most Amazing Ceramic Tile Installation || Trowel and Error - How to Set Tile the Right Way
 0:13:47
🤔 How to select a trowel and does back buttering a tile really work?
 0:14:48
😠Bad tile job, only 3 days old and it has to come out.
 0:00:51
How to Finish Trowel and Error - Side Quest - Desert Ash - Granblue Fantasy Relink
 0:07:54
How to select the correct trowel
 0:00:30
Common trowel mistake 😕 #shorts #diy #tutorial #youtubeshorts
 0:04:36
Trowel and Error Lab 2
 0:06:46
Trowel and Error Lab 5
 0:06:17
Мастерок и ошибка (Trowel & Error in Russian 2021)
 0:07:53
Llana y Error (Trowel & Error in Spanish 2016-2021)
 0:01:00
How to Trowel Tile Adhesive (The Right Way)
 0:00:35
Side Quest: Trowel And Error - How to get DESERT ASH - Granblue Fantasy: Relink - Walkthrough
 0:01:00
How to... make a notched trowel
 1:10:34
Trowel and Error — The Science of Archaeology
 0:00:58
Tile setting pro tips #shorts #tile #homeimprovement
 0:00:16
Troweling #construction #satisfying #tile #trowel
 0:01:32
Meet Trowel and Error Farm
 0:00:31
Your trowel is a gauge #shorts #howtotile #tile
 0:00:17
'Trowel and Error: Learning the Garden Ropes'
 0:01:07
Trailer of My Summer: Trowel and Error
Комментарии