filmov
tv
Tutorial for Collar with Stand: A better, neater way to attach it.

Показать описание
Here is a tutorial for a different way to attach a collar with stand that will give you a neater result in the most visible areas with no hand sewing or trying to fold straight edges onto curved ones.
------------------------------------------------------
---
* Affiliate link.
------------------------------------------------------
---
* Affiliate link.
 0:22:03
Tutorial for Collar with Stand: A better, neater way to attach it.
 0:20:14
How to Draft and Sew a Collar ... to Perfection
 0:37:28
How to Sew a Collar and Collar Stand Easily by Sew Sew Live
 0:06:16
How to sew a standing collar
 0:11:13
How to Create a Pattern for a Shirt Collar with Stand
 0:06:38
Stand-up Collar Pattern tutorial/chinese collar/mandarin collar
 0:06:31
✅🌺The easiest way to sew a stand up collar with a clasp
 0:13:49
How to draft a stand collar pattern (Super Easy Collar Pattern)
 0:05:50
How to Make Shirt collar patterns _ Collar and Collar Stand Making [Pattern Making Tutorial]
 0:09:50
How to Make Perfect Stand Collar Neck? Easy steps for Collar neck design/ Collar Kurti
 0:04:42
Pattern Drafting Tutorial - Collar with Stand • Elewa
 0:34:59
AMAZINGLY NEAT collar & stand. 2 ways! Features: Aria (Love Notions), Mila (Itch to Stitch).
 0:11:24
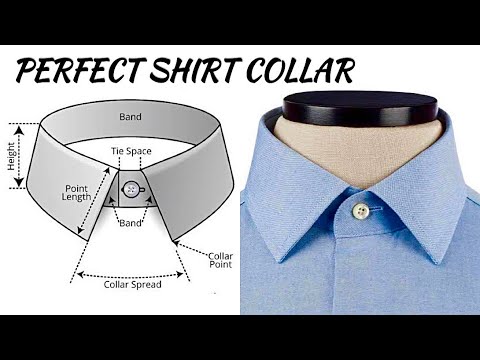
How to cut and sew a PERFECT SHIRT COLLAR (beginners guide)
 0:00:55
How to sew stand collar with ruffles (great for sewing shirts, blouses or dresses)
 0:18:27
Making A Simple Cut Together Collar and Collar Stand for Beginners
 0:08:01
⭐️ Stand Collar Design Tips for Beginners
 0:12:38
Collar and Collar Stand Stand Sewing Tutorial
 0:11:02
How To Pattern A Mandarin Collar
 0:11:17
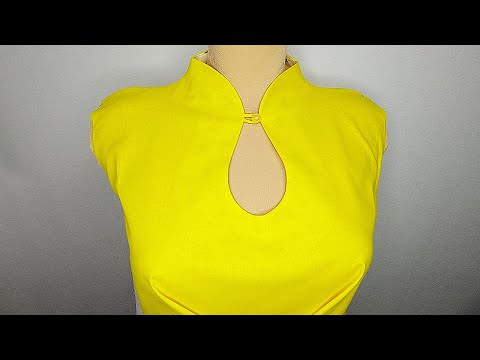
How to make a Built Up Collar / High Neck Collar / Neckline
 0:09:49
👉 You will have no difficulty sewing and designing this collar style/stand collar design
 0:02:47
Chinese Patti Collar Cutting | How To Cutting collar | Prince DIY #craft
 0:07:03
🌺✅A proven way to sew a stand collar that few people know
 0:08:50
How to Draft an All-in-One Stand-Up Collar
 0:07:01
Sewing a classic shirt Part 7: Sewing the collar stand
Комментарии