filmov
tv
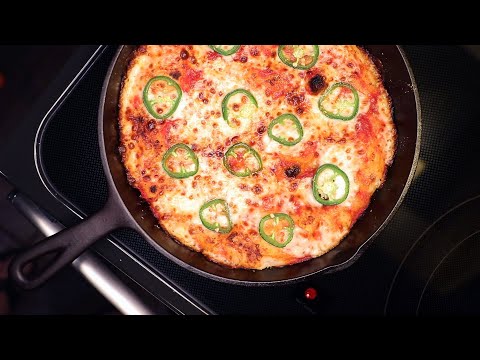
Easier pan pizza in a non-stick — browned base and crispy rim

Показать описание
***RECIPE, MAKES ONE 10-INCH PIZZA***
For the dough
1 cup (120g) bread flour + more for kneading (all-purpose is fine instead)
1/2 teaspoon (3g) salt
1/2 teaspoon (2-3g) sugar
1/2 teaspoon (1-2g) dried yeast
1/4 teaspoon (1g) garlic powder (very optional)
2 teaspoons (10mL) olive oil
1/2 cup (120mL) milk (water is fine instead)
For the sauce
1/3 cup (80mL) canned crushed tomatoes (I like Pastene "Kitchen Ready")
1 teaspoon (5g) tomato paste (I only use this when I can't get the Pastene tomatoes)
a small pinch of sugar
a few pinches of dried pizza herbs (oregano, basil, marjoram, chili flakes, etc)
For the rest
5-6 oz (140-170g) low-moisture mozzarella (ideally not pre-grated)
grated parmesan
additional olive oil and pizza herbs
Combine all the dough ingredients. If it's too wet to knead, add more flour, but try to keep the dough as sticky as you can handle. Knead until smooth and elastic. Cover and let it double in size, 1-2 hours. (You can also simply throw it in the refrigerator and let it rise slowly for 1-7 days.)
Get a 10-inch (25cm) non-stick skillet (you can use well-seasoned cast iron instead) and drop in just enough olive oil to coat the bottom. Put in some of your pizza herbs and a tiny pinch of salt, and coat the pan with oil and seasonings. Transfer your risen dough ball to the pan and flatten it into the pan with your finger tips, being sure to stretch it a little wider than you want it (it'll contract a bit). Rub the surface with a little more olive oil and let it rise again in the pan for at least 30 min.
Combine all the sauce ingredients and grate your cheese. Position an oven rack up close to the broiler (grill).
When you're ready to bake, turn a burner on medium heat under your dough, and get the broiler in your oven heating to maximum. Cook the dough on the stovetop until the bottom is browned to your liking, checking frequently by lifting it up with a soft spatula. You can shake the pan to make sure the dough isn't sticking. I like the bottom to be just starting to burn — this usually takes me 6-7 minutes.
When the bottom is cooked, take the pan off the heat. Spread on the sauce, edge to edge. Dust the sauce with parmesan, and spread on the mozzarella, edge to edge. Put on any other toppings you want.
Transfer the pan under the hot broiler, close the oven door, and cook until the cheese is brown to your liking. This usually takes me only two minutes, which in my experience isn't enough time to overheat the teflon pan and cause the release of hazardous fumes. If you need to be particularly cautious about such things (pet birds and people with respiratory diseases are at high risk), use a cast iron pan instead for this recipe.
Remove the pizza from the oven and allow it to cool just until it's solid enough that you can slide it out intact — no more than 5 minutes. (The sooner you get it out of the pan, the crispier the bottom will be.) Slide the pizza out to a cooling rack, and let cool to eating temperature. If the bottom is too soft or soggy, you can slide it back into the pan and fry over medium heat again for a minute until sizzling.
Slice and eat (duh).
 0:09:43
Easier pan pizza in a non-stick — browned base and crispy rim
 0:07:07
EASY Pan Pizza In 3 STEPS! How to make pizza in a pan |Homemade Pan Pizza |Pan style Pizza
 0:02:54
5 minute EASY PAN PIZZA | No Yeast, No Oven, Pepperoni Pizza Recipe
 0:05:37
No Oven Pizza | Jamie Oliver's £1 Wonders | Channel 4. Monday 8pm UK.
 0:00:31
Pan Pizza
 0:08:45
PAN PIZZA IN 1 HOUR (No Mixer)
 0:11:09
Easy Pan Pizza - Foolproof No Knead Crust - Make It Overnight or Same Day
 0:06:42
5 Minute NO OVEN , NO YEAST PIZZA! Lockdown Pizza Recipe
 0:05:58
Frying Pan Pizza | 1 Minute, No Yeast, No Oven | How Tasty Channel
 0:04:01
Pan Pizza in 15 Minutes [No Oven, No Yeast]
 0:11:27
Cheesy Cast Iron Pan Pizza
 0:32:15
Food Lab Basics: POV Foolproof No Knead Pan Pizza
 0:02:07
6 Minutes Pizza Recipe for Lunch Box ( Air Fryer & Frying Pan Methods ) by Food Fusion
 0:00:33
Domino's Pan Pizza
 0:09:40
Cast Iron Pan Pizza
 0:08:18
Cake pan pizza | deep-dish Sicilian/Detroit-style (kinda)
 0:05:04
Frying Pan Pizza Recipe || Quick & Easy Pizza || No Bake || No Knead
 0:06:28
Pan Pizza | Basics with Babish
 0:07:43
Giant Homemade Pizza For 6 Dollars | But Cheaper
 0:11:41
Recreating Pizza Hut Pan Pizza at Home Redux (is this the secret recipe?)
 0:05:24
FRYING PAN PIZZA | EASY YEAST FREE PIZZA BASE
 0:04:10
Pan Pizza Recipe On Fry Pan | Eggless Cheesy Pan Pizza | Easy Pizza Recipe Without Oven | N'Ove...
 0:10:55
Cast Iron Pan Pizza
 0:19:21
How To Make Pizza Hut Pan Pizza At Home | Tara the Foodie
Комментарии