filmov
tv
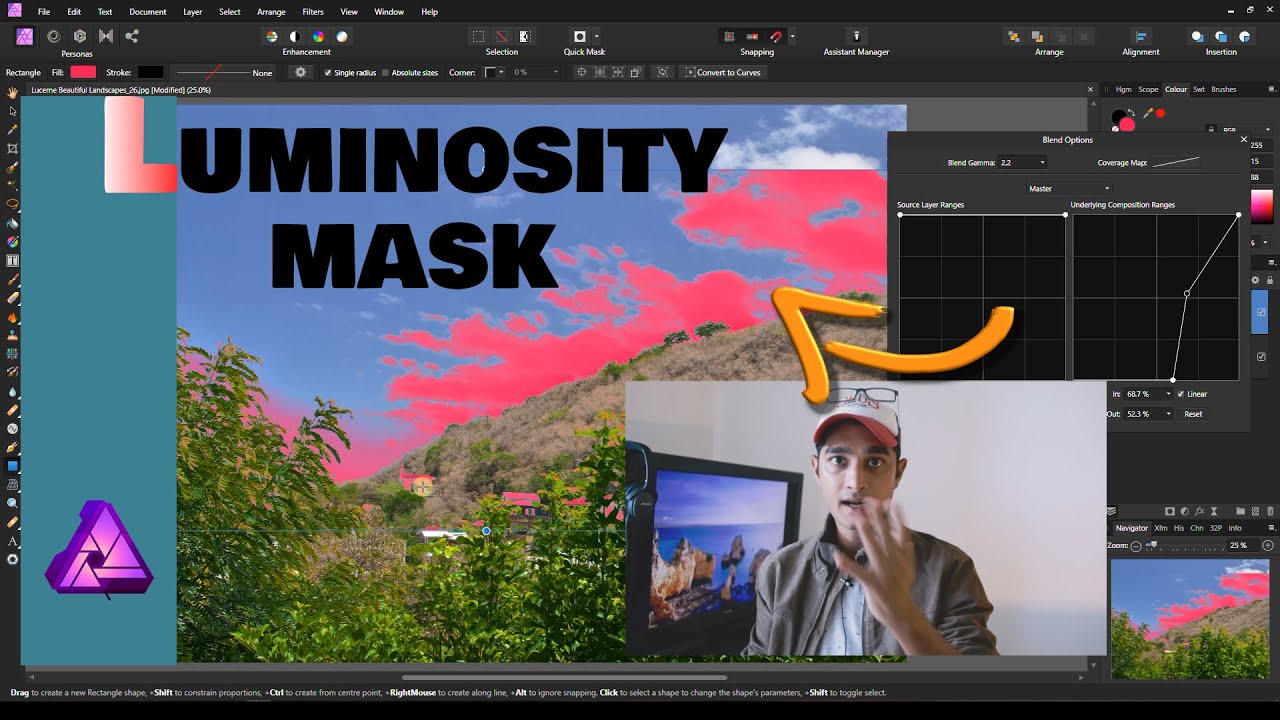
Take your Photo Editing to Next Level! Power of Luminosity Mask In Affinity Photo.
Показать описание
Hey guys, it is going to b a good day. In this video, I am going to show you how to use Luminosity mask in Affinity Photo. It is Very easy and quick.
Here is my typical editing Process and Why:
My Philosophy is simple. EVERYONE IS AN ARTIST. Anybody should be able to edit and create beautiful images even with a free softwares (I use Silkypix Developer Studio Pro 10 and Affinity Photo), as long as you have a vision and strong basic technical knowledges. Period!
Usually my Workflow is divided in to 2 important parts.
TECHNICAL EDITING
( I use Silkypix Developer Studio Pro 10. You can follow the similar steps using Any Photo editing Softwares you have you):
So, I start with Lens correction,
Basic Crop, Fringe Correction, CA Correction,
Color Correction (Perfect and Accurate RED, GREEN and BLUE, No color Clipping, Fix Luminance level of the Color channels), Histogram Correction ( 1.Highlight and Shadow Recovery, 2.Level Correction, 3. Stay within 4 to 245 inside Histogram),
More Highlight Recovery if Necessary with Highlight Controller,
Check inside Tone Control in Contrast Center, Dehaze, Clarity needs to be Changed,
Noise Reduction,
Basic Sharpness
[ Important: Take a Break. Walk away from your Computer. Take a walk. Send a message to your loved ones. Take a nice long relaxing shower. Eat some healthy food. Take a nap if required. A pause is important for creativity.]
CREATIVE EDITING :
[EVERYTIME DURING THIS PROCESS, I ALWAYS IMAGINE MY PHOTOS TO BE PRINTED FOR MY OWN HOME. A PHOTO IN MY HOME SHOULD REPRESENT HAPPINESS, RESPECT, VALUE, A DREAM, LOVE & WOW FACTOR.]
Then I transfer the Photo to the Affinity Photo (Follow similar steps in Photoshop or GIMP If you do not have Affinity Photo) as a Tiff file.
Why?
Silkypix is capable of doing every tasks that I could do in AP. But, for the creative part, Layer workflow is easier for me to follow. Although, there more that 40% of the time, I also do the creative in Silkypix DS Pro if, the photograph has right Color, Contrast and Mood.
Purpose of Creative Part?
Giving the Photograph a Depth, Draw light to the direction I want.
Therefore, Dominant light will be ONLY on Main Subject(s).
Use Shadow and Black as ROAD to main Subjects.
Also Use Light as a ROAD to main Subjects.
FOR LIGHTING PROCESS ALWAYS USE LUMINANCE BLEND MODE.
Reduce Light of the Less Important Subjects.
BUT Be aware!! Keep and Eye on the histogram. Do not go beyond "4" and "250" if possible.
FOR COLOR process
Modify Hues of different areas to give a color separation or Contrast;
Make the main Subjects VIVID and Colorful.
Also Increase the Luminance Level of Colors of main Subjects (without clipping)
FOR LIGHTING PROCESS ALWAYS USE COLOR BLEND MODE.
CHANGE COLOR IN SHADOW, MID-TONE AND HIGHLIGHT
Blend Mode: Normal.
Adjustment Layer : Curves (R, G, B) but not necessarily all of them
These are the minimum steps I follow. After that, I usually follow to
Sharpness with Unsharp masking ( Bland mode Luminance) or Highpass Sharpening ( Blend mode Softlight).
Check Dust Spots. Remove Unwanted Objects.
Crop again if Necessary
Final Check. Ask Yourself, "Are you Satisfied?"
Take a Break. Walk away from your Computer. Take a walk. Send a message to your loved ones. Take a nice long relaxing shower. Eat some healthy food. Take a nap if required. Workout. Then take a moment and Think, You just have created a masterpiece. BRAVO!!
#LuminosityMask #AffinityPhoto #Photography
 0:23:56
 0:17:04
 0:02:54
 0:15:19
 0:02:21
 0:10:43
 0:13:10
 0:19:40
 0:00:43
 0:06:40
 0:09:23
 0:13:42
 0:09:09
 0:16:09
 0:17:54
 0:15:51
 0:17:10
 0:12:08
 0:13:34
 0:08:43
 0:00:40
 0:26:59
 0:05:55
 0:08:34