filmov
tv
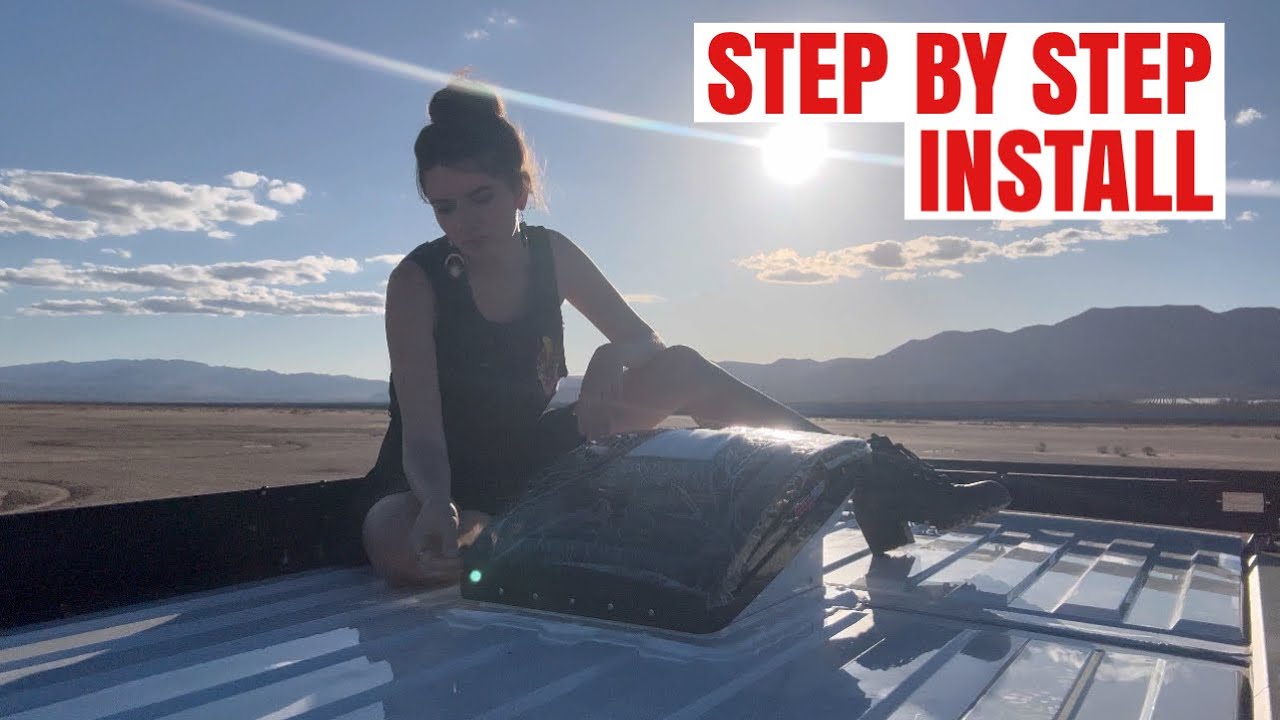
ULTIMATE Guide To Installing A Maxxair Fan | Van Build Series Day 15
Показать описание
Everything you need to know all in one place to install your Maxxair Fan perfectly! Simple Tutorial for Beginners! Van Build Series - Day 15!
Part 3: COMING SOON
My Maxxair Fan was provided to me by RVPARTSGO.com in exchange for the ad in part 1 of this video series.
CHECK OUT RVPARTSTOGO HERE ⬇️
Materials List:
🩵 Maxxair Fan
🩵 Marker & Scissors
🩵 Jigsaw
🩵 Jigsaw Blades for Metal
🩵 Metal File
🩵 Clean Metal Primer Spray / Paint
🩵 Painter’s Tape
🩵 Trash Bag
🩵 Drill & Drill Bits
🩵 Butyl Tape
🩵 Isopropyl Alcohol & Wipes
🩵 Self Leveling Lap Sealant
🩵 Caulk Gun
🩵 Magnet or Vaccum To Clean Up Metal
🩵 A Plane Ticket To Hawaii
Link to Aluminum Strip to Distribute Weight For Flange:
Smart Van Upgrade Video About Universal Remote for Maxxair Fan:
Table of Contents:
0:01 - Making The Template (Recap of Part 1)
0:33 - Drill a Hole Into the Template & Roof
1:07 - Verify the Location From Above
1:58 - Tape The Area You Will Be Cutting
2:15 - Trace The Flange Onto The Tape
2:34 - Hang Up Something To Catch The Metal
2:53 - Drill 4 Small Holes In The 4 Corners
3:20 - Cut Out The Hole
3:57 - Tape It Up
4:15 - Place In Your Flange
5:00 - Cleaning Up To Avoid Rust
5:51 - Smooth The Edges With A Metal File
6:19 - Clean The Area & ReTape
6:28 - Paint The Raw Edges
6:50 - Clone Yourself...
7:30 - Remove The Bag & Tape
7:44 - Apply Butyl Tape
9:09 - Reinsert Flange
9:18 - Pre-drill For the Screws
9:36 - Screw In The Flange
9:40 - Aluminum Strip To Distribute Load?!?
12:06 - Remove Excess Butyl Tape
12:22 - Self Leveling Lap Sealant & TIPS
14:00 - Return The Ring Of Power
14:48 - Pop Up The Metal Circles
14:55 - Place In The Fan
15:05 - Screw In The Fan & Lap Sealant On Screws
15:26 - Final Steps, Tips & Advice
------------------------------------------------------------------
My Links:
🌼 Patreon -
🌼 VANLIFE ACADEMY Affiliate Link- 50% OFF NOW!!
🌟 ETSY SHOP for Van Life & Travel Inspired Clothes, Bags, & More :)
🌼 VanLife Unfiltered Podcast -
🌼 FREE Project VanLife Maintenance E-book -
 0:24:11
How To Install WordPress 2024 ~ Ultimate Guide to Installing WordPress
 0:19:36
Ultimate Guide to Installing PVC Ceiling Panels | Complete Step-by-Step Tutorial | The Panel Company
 0:17:45
ULTIMATE Guide To Installing A Maxxair Fan | Van Build Series Day 15
 0:07:19
🚀𝐔𝐥𝐭𝐢𝐦𝐚𝐭𝐞 𝐆𝐮𝐢𝐝𝐞: 𝐈𝐧𝐬𝐭𝐚𝐥𝐥𝐢𝐧𝐠 & 𝐑𝐮𝐧𝐧𝐢𝐧𝐠 𝐉𝐚𝐯𝐚 𝟐𝟐 𝐨𝐧 𝐖𝐢𝐧𝐝𝐨𝐰𝐬 𝟏𝟏 – 𝐒𝐭𝐞𝐩-𝐛𝐲-𝐒𝐭𝐞𝐩 𝐓𝐮𝐭𝐨𝐫𝐢𝐚𝐥! [𝟐𝟎𝟐𝟒]🚀...
 0:43:13
The Ultimate Guide to Installing Engineered Hardwood Flooring
 0:38:59
MOST COMPLETE GUIDE to Installing macOS on a Windows PC!
 0:02:25
The Ultimate Guide to Installing a MONOBLOCK Wastewater Treatment Plant - Step-by-Step Tutorial
 0:20:02
Ultimate Guide to Installing GitBash on Windows | Step-by-Step Tutorial for Beginners.
 0:40:52
The ULTIMATE Guide To Installing a BMW Transmission In Your Miata For HIGH HORSEPOWER!
 2:14:21
Ultimate guide to installing Gentoo Linux for new users
 0:56:57
The Ultimate Guide To Installing An Epoxy Countertop | Step By Step Explained | Leggari Stone Kit
 0:42:17
Ultimate Guide to Installing Pokémon Infinite Fusion for PC
 0:04:30
The Complete Guide to Installing Your Flume.
 0:52:25
The Ultimate Guide to INSTALLING & Setting a JET BOAT Pump INTAKE
 0:15:24
The Ultimate Guide: Installing College Football Revamped 2024
 0:11:42
Ultimate Guide To Installing VST/AU/AAX Plugins
 0:04:07
Ultimate Guide to Installing FL Studio 2023 | Step-by-Step Installation Process
 0:07:20
DIY Aquarium 🐟 | The Ultimate Guide To Installing An Aquarium 🐟
 0:04:26
The Ultimate Guide to Installing Your Weather Station
 0:00:45
The ultimate guide to installing and registering our App: A step-by-step tutorial.
 0:03:31
Installing Python Completely: Your Ultimate Guide for Beginners
 0:36:41
The Complete Guide to Installing Tile on Shower or Bathtub Walls
 0:03:43
The Ultimate Guide to Installing Non-HP Cartridges for Your Printer
 0:05:14
Sims 4 Power-Up: Ultimate Guide to Installing Mods on PC 🚀🎮
Комментарии