filmov
tv
EEVblog #224 - Lab Power Supply Design - Part 3

Показать описание
Part 3 of the Open Hardware lab power supply design. This time the prototype build on a breadboard and some basic measurements, checks, and playing around.
 0:44:48
EEVblog #224 - Lab Power Supply Design - Part 3
 0:40:14
EEVblog #225 - Lab Power Supply Design Part 4 - PWM Control
 0:37:41
EEVblog #221 - Lab Power Supply Design - Part 1
 0:38:24
EEVblog #222 - Lab Power Supply Design - Part 2
 0:51:30
EEVblog #232 - Lab Power Supply Design Part 5
 0:17:42
EEVblog #233 - Lab Power Supply Design Part 6 - LT3080 Testing
 0:31:50
EEVblog #828 - Siglent SPD3303X Precision Lab PSU Teardown
 0:39:44
EEVblog 1606 - $45 AlienTek DP100 100W USB-C PSU REVIEW
 0:48:24
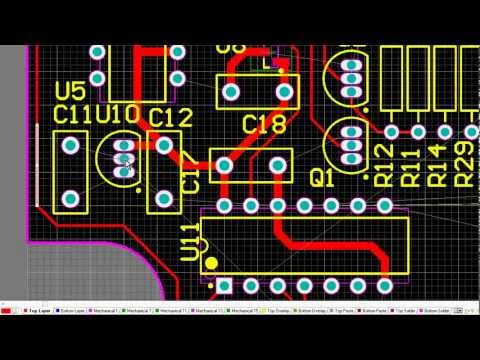
EEVblog #244 - How To Lay Out A PCB - PSU Design Part 9
 0:14:34
EEVblog 1526 - I put 283 Double Adapters in Series with a 2kW Load!
 0:28:40
EEVblog #245 - PSU Design Part 10 - PCB Layout Editing
 0:26:47
EEVblog #511 - Rigol DP832 Power Supply Teardown
 0:28:56
EEVblog 1383 - Human Battery Energy Harvesting BUSTED
 0:27:00
EEVblog #238 - Power Supply Design Part 7
 0:23:26
EEVblog 1448 - Convert a Fluke 77 IV to True RMS for 10 CENTS!*
 0:31:05
Extreme PCB Repair, E3611A Power Supply
 0:10:33
Lab Power Supply Teardown - Takasago TMO18-2.2
 0:14:04
EEVblog #191 - Mouse Trap Triggering
 0:27:14
EEVBlog 1436 - The TOP 5 Jellybean OPAMP's
 1:02:13
EEVblog #259 - PSU Rev C Schematic - Part 12
 0:31:43
EEVblog #226 - Kindle Touch Review
 0:27:02
EEVblog 1481 - Dodgy Dangerous Heater REPAIR
 0:00:54
High Definition Oscilloscopes - Explained
 0:27:06
nTOOBE #17 (1/3) Unboxing Conrad Basetech BT-153 linear laboratory power supply
Комментарии