My Biggest Creality K1 Max Complaint (And Current Fix)

preview_player
Показать описание
Love the channel? Consider supporting me on Patreon:

Get Great Filament From PolyMaker & Help Support The Channel:

Springs I Used (AFF):

K1 Klipper Installer Script:

NeedItMakeIt's video on fixing from the bottom:

Leveling Knobs model:

Screw Tilt Adjust documentation:

D3vil Burner Stream:

Find out more or pick up the Enderwire kit here (AFF):

ModBot Merch Store is now live! Get yours here:

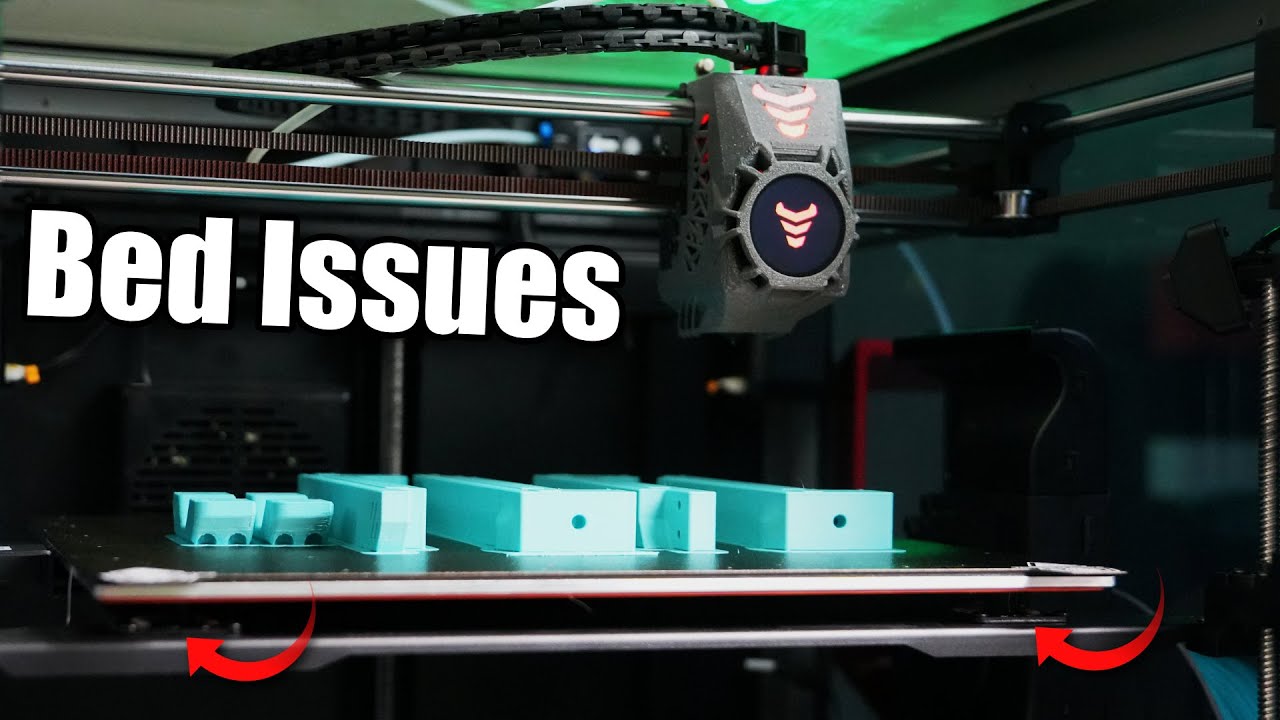
In this video we dive into the Creality K1 Max. There is a lot that has been done well on this printer but the large and commonly warped bed can be problematic. I went down a bit of a rabbit hole with this and will share what I found and what worked to give me much better results.

(´∀`)♡ As an Amazon Associate I earn from qualifying purchases:

Lets Get Social!
Рекомендации по теме
Комментарии
Автор

Oh man, I wish you had done this a month ago..I've already been so far down this rabbit hole on my Max. Phew, it is just not good that the bed is so far off. At any rate the silicon spacers are perfect, so definitely check that out and avoid the negatives with springs. Literally everything you covered I went thru - Hopefully you save everyone else the hassle!

mahmga
Автор

I had to mechanically level the bed on my K1 and I did it by skipping teeth first, which got the 4 corners within 0.4 of one another. And then I took the thinnest shims I had at home and put one shim in a corner between the bed and the nylon standoff, then ran the bed leveling again. I repeated this for each shim I added or moved until I finally got the result I wanted. Now the automatic bed mesh barely needs to compensate for anything, in fact, I can't even see the Z axis move when I print. The difference between the highest and lowest point is for me now is about 0.1 mm.

FuttFel
Автор

Despite me buying many Creality machines in the past, when it came to buying a new fast enclosed printer I did not even consider the K1 Max, I just knew there would be issues with any Creality machine and this video is just one of many issues this printer came with.
I bought the X1 Carbon and AMS and although not perfect it is an amazing printer!

AndrewAHayes
Автор

I love that I pointed these issues out when the printer launched and I got the whole community telling me I was wrong. Pulled the video and now everyone else has videos out showing the same thing lol.

TheFilamentFrontier
Автор

I'm going to say it. These issues are inexcusable on a $800 printer. Creality owes everyone who bought one of these a recall to fix their screwup.

OmegaGamingNetwork
Автор

I have been through the same issue over the last 3 months. TPU suffers from compression set so will only be useful for a short period of time. Also the sheer speed and acceleration of the K1 Max results in the bed hitting resonance really easily. You will notice more ringing and waves on the prints due to the use of any flexible spacers. The orange springs are better but not ideal as there is clearance between the inner diameter of the spring and the M4 screw, again resulting in resonance and movement in the areas that aren't fully compressed. The standoffs need to be solid/rigid for this printer to achieve its maximum printing speed and so a combination of shims and solid spacers are ideal (without the ability to fine tune less than 0.1mm).

michaelcalvert
Автор

Mine is working pretty good so far. I chose the K1 Max so I didn't have to mess with it all the time. I built my last printer and it worked out pretty well but I got a little burned out on tinkering with it. I almost fell into the rabbit hole of fixing what was not broken ( At least in my case) with the K1 Max after reading all of the complaints. I have been away from 3 d printing for a little while and I'm amazed how tribal the 3d printer world has become. I guess it's competition or just a sign of the times.

timpatton
Автор

Thanks for this video. I especially like that you have a Kingroon KP3S because I have two of them myself and they've been printing great for several years and have been very reliable. The bed level on those stay adjusted and never have to be touched unless I do major PM work on the printer.
One tip when using springs and adjustment knobs for bed leveling: before doing the bed leveling, tighten the knobs until the springs are coil bound (fully compressed), then back off one full turn. This will provide enough tension to the knob to prevent unwanted movement once final adjustment is done. I've been doing this on all my printers and have not had to touch the bed leveling once set.

Waltkat
Автор

Started with an ender 3v2 and am super grateful for learning with machine, but I absolutely love my Bambu P1S and not having to worry about leveling etc

ZeroAnkoku
Автор

When I first saw the topo of my bed upon first calibration, I thought Creality had tapped into Hubble Space Telescope and I was looking at a crater on Mars. But, after looking at the numbers, it’s only 0.41mm of delta.

mikestewart
Автор

Upon further review with my 1 week old K1 Max I got the bed mesh to .4719. I just did the klipper upgrade to find out what I needed to know. 1st when the programed bed mesh is done it takes 4 points on the corners which happen to be on the embossed "caution hot" triangles and other embossments on the front and back sides of the Creality smooth (A sheet) pei sheet. The included metal scraper tool was good for "smoothing" those areas for .2mm more "flat" on the mesh. 2nd I did the piece of paper level and lose z belt click tooth method. I calibrated the front screws to the back screw. The front screw adjustments effect a tilt to the back of plate. That got me under .5mm. Now as far as I can tell Creapity in it's wisdom ships the unit with a lot of weight ON TOP of the build plate. My Ghost 6 had the weight packed under the bed. I believe that weight caused the remaining .5 mm of sag in my mesh. I already ordered a 1/4" Mic 6 plate so I'm going to remove the stock bed and "unbend" it in a controlled manner. I don't think I'm going to need the springs. Hope this info/theory helps.

nickvee
Автор

Yep same issue, in addition to a constantly clogging extruder(despite being the updated one). Stock bed is ridiculous. I just talked to my local machine shop and put in an order for a machined bed plate, it'll be 6mm thick out of 6061. It's a good thing i like to tinker. I wouldn't even consider a Creality printer for any kind of frequent or professional use, they're just not reliable. Not bad products for the price, but kind of "unfinished" by design. I hope they put some more effort into the K2...

MySkullzDented
Автор

I went through this process yesterday. My bed was out 1mm with the center being low. The front was about 1mm high and rear being about .75mm high I tried all of the methods besides skipping teeth. I ended up using rubber faucet washers like you did with the tpu to get the front and rear at the same height. then I used aluminum duct tape to build up the center of the bed. Its practically level now but not perfect by any means. I'm printing a abs chain riser right now so we will see how it holds up to 100deg c bed temps. This printer kicks ass compared to the Slovol sv01 I upgraded from but the bed is an issue that should be dealt with by Creality.

Horsenb
Автор

When you remove the belt the screws you used on the initial setup must be installed. Then take the Slack out from behind the 2 front z axis belt drives. When the Slack is removed replace the belt back onto the 3rd drive, but you have to make sure it's exactly in the center. Then the tension can not rotate any of the z axis because there is no Slack to rotate with and you are in the center, so it's impossible. My bed is now as close as it's going to get unless its removed ground flat and reinstalled. My printer prints flat so I won't bother.

sethalbert
Автор

The last firmware update appears to have broken the Z-Offset. The previous version had been working perfectly, but you had to know where to get it, and you had to install it manually.

P.S. Those front 2 screws are attached to the front 2 load cells. Making any change to them will permanently damage them, so NOBODY should make any changes that affects them. The third load cell is connected to the center back assembly. You need to ensure that NOTHING affects any of these load cells, as it will permanently damage the load cells. Hitting the build plate, dropping something heavy on the build plate, or the print head pressing into the build plate with force, will all permanently damage the load cells, requiring them to be replaced.

cnc-maker
Автор

I haven't taken my K1 Max out of the box to set it up yet, but I'm hoping it will print well. I know someone with seven of them in a print farm and he hasn't had any issues yet. My feeling is that Creality should have increased the thickness of the bed given it's size. Although a little expensive, Funssor makes a 6mm thick bed (vs 3mm stock) that has built-in neodymium magnets to hold the build plate down. They also have a kit that includes said bed plus a silicone 120/240VAC, 750W bed heater, and a PEI build plate. The kit is expensive, but since I print a lot of ABS and ASA, it should be very beneficial, in particular that bed heater. Should allow the bed to get up to 100-110 C faster than it takes my beard to grow. It should also raise the temperature within the enclosure too, which is a good thing for ABS and other high temperature filaments.

Waltkat
Автор

As a wise man once said, when ModBot uploads, it's a good day

rafaelguida
Автор

I went and bought a K1 max and can not believe for top of a range printer there are these kind of issues ? I thought Lidar and software was sorting these type of problems out. I use a mirror on my older printers and have absolutely no issues with the old printers beds. Pity I did not watch a ton of videos and reviews first before placing my order as I like to print ABS & PETG etc . Well lets see what happens Thanks for a great channel.

vaughanza
Автор

Warped beds have always been the bane of Creality printers. I would love a 6mm milled aluminum bed for my K1 Max.

reprintedD
Автор

Having this exact trouble... Over Xmass and live in a rural area and I don't have the needed bolts/nuts to make my own knobs... so I just used paper shims to level the bed.
I got the bed deviation down to 0.4mm but it still wont print first layers properly on parts of the bed, to the point functional prints such as small 10mm solid wheels in TPU fail due to the first layer errors.
Need the wheels for fixing window runners that no longer have runners made for them...

I am effectively limited to 15cm-10cm bed space where i can print functional prints.

My bed isn't all that wraped, deleting the bed mesh before a print and not doing calibration actually results in better prints...
So not only is it a bed problem, its a programming problem ontop.

wasted 2-3kg of filament on failed prints I was trying to print people for xmass... could work out why they would fail... benchy would print fine... but as soon as I go over that bed area they have first layer problems which mess up everything after.

I will say, for a printer that is suppose to be PLUG AND PLAY, having all these problems and likely needing to replace the bed myself(first time with a 3d printer) is quite annoying... I have reached the point I feel like sending it back and getting a Bambu with AMS.

givemeanameman
welcome to shbcf.ru