filmov
tv
How To Install AMD AM4 Ryzen CPU For Beginners
Показать описание
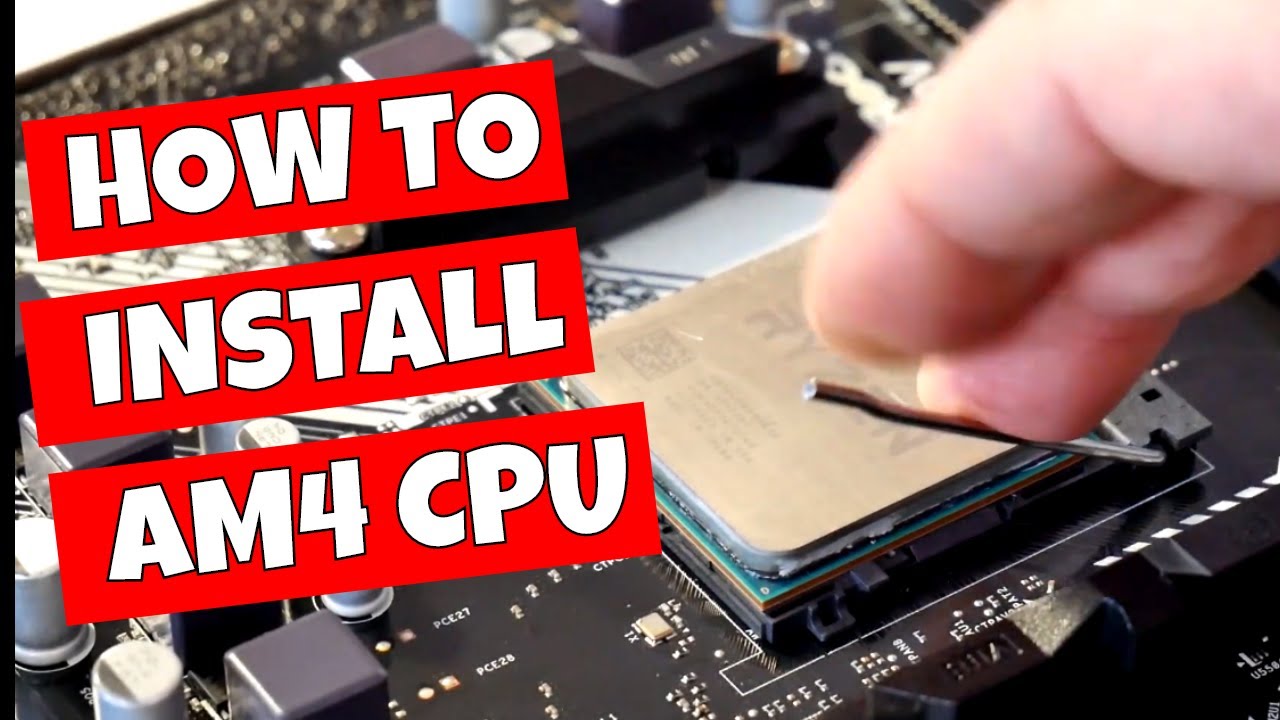
How To Install AMD AM4 Ryzen CPU For Beginners!
Building your first computer can be scary, but with some research and some guidance you can do it easily!
In this guide I will be walking you through how install a AMD AM4 based processor, The Ryzen 5 1400 into the ASRock B450m-HDV r4.0 motherboard which supports the AM4 Ryzen and Athlon processors.
Available from affiliate links:
Ryzen 5 R5 3600
ASRock B450M-HDV Motherboard
Pay Monthly on Abunda:
First we will be checking the processor and looking for any bent or mis-aligned pins, then preparing the motherboard for the stock AMD cooler the Wraith Stealth model.
We need to release the CPU clamping arm from the clip and raise the arm fully to allow the ZIF (Zero Insertion Force) socket to open.
Next we will align the arrow or triangle on the corner of the processor and motherboard. Gentle lower the cpu onto the socket and it should fall into the socket and sit flush or level with the socket.
If it doesn't gently remove it and carefully check for bent or damaged pins on the CPU.
Sometimes a very slight wiggle can help the CPU fall into the socket, but really shouldn't be necessary on a BNIB CPU. Second hand or used CPU's may have slightly mis-aligned pins.
Now that the CPU is installed we can now lower the socket tension arm and push it past the retaining clip. You may feel or hear a click as it locks into place.
Next we can apply our cooling solution. This will consist of the stock AMD cooler or cooler of your choice and possibly some thermal interface material or compound (T.I.M.)
The choice of cooler and compound is a very polarising subject, but essentially as long as you apply the chosen compound correctly and fix the cooler as the manufacturer recommends you can't go far wrong.
So now we will apply a small amount of TIM, In our build we will be using Arctic MX4 as it is both great value and gives great results thermally and is not electrically conductive so is safer to use than some other more conductive materials or compounds.
The amount used should be enough to cover the majority of the CPU so as to make the largest surface area contact with the CPU cooler. Any gaps or uneven areas will reduce the coolers ability to do it's job!
With the paste applied, we can now install the cooler. Our cooler is the AMD Wraith Stealth model but you can use any cooler you wish as long as it has at least the same TDP or higher than the CPU you are installing. The Higher the TDP of the Cooler the better is can be at cooling (subject to case design , airflow etc)
To install the Wraith cooler, first align the four mounti screws with the motherboards CPU back plate and use a little pressure to get the screw started and screw a few turns on each screw in a criss cross method to allow even distribution of mounting force or pressure.
Next plug in the fan 4 pin connector to the CPU fan header on the motherboard, and that is your CPU and CPU cooler installed.
Affiliate links:
Get in touch with us:
Follow us on:
 0:00:48
How to Install a CPU | AMD AM4
 0:11:17
How To Install AMD AM4 Ryzen CPU For Beginners
 0:01:49
MSI® HOW-TO install AMD AM4 CPU
 0:01:01
pc tips for beginners : installing an AMD AM4 CPU
 0:04:20
How to Upgrade an AMD Ryzen CPU (AM4 Socket)
 0:00:58
How to install a Ryzen AM4 CPU For Beginners!
 0:04:18
How to install a Ryzen CPU and its Wraith Stealth Cooler | AM4 socket | AMD
 0:00:16
How to install AMD processor for AM4 socket
 0:01:01
amd am4 standard cpu cooler install.
 0:03:34
How To Install AMD AM4 CPU onto a motherboard. Basics
 0:01:00
AMD Launching Even More AM4 CPUs
 0:00:54
AM4 or AM5 for a Gaming PC?
![[How to] Install](https://i.ytimg.com/vi/tEN0ElrGkag/hqdefault.jpg) 0:01:25
0:01:25
[How to] Install SE-224-XTS on AM4 (AM5 see notes)
 0:00:20
AM4 CPU install Turtorial #amd #ryzen #pcbuilding
 0:01:56
How to install a Ryzen/AM4 & AM5 Wraith CPU Cooler
 0:00:36
Tuto installation processeur AMD Ryzen (Socket AM4) #5600x #pcgaming #asusrog #cpu #amd
 0:25:13
How To Install AMD AM4 Ryzen CPU For Beginners 3 Different Mounting Options
 0:00:54
Should You Still Buy an AM4 CPU?
![[How To] Install](https://i.ytimg.com/vi/MaRxLwQnqfg/hqdefault.jpg) 0:02:09
0:02:09
[How To] Install SE-226-XT ARGB on AMD AM4
 0:07:55
Installing AMD AM4 Socket Corsair Liquid Cooler
 0:01:28
Installing Hydro Series PRO On AMD AM4
 0:01:51
MSI® HOW-TO install MAG CORELIQUID Series for AMD AM4 CPU
![[How to] Install](https://i.ytimg.com/vi/jR0Wn9nTnZU/hqdefault.jpg) 0:01:15
0:01:15
[How to] Install SE-214-XT ARGB on AMD AM4/5 (Type B)
 0:00:14
3d printed AM4 Heatsink mounting bracket
Комментарии