filmov
tv
These Make The BEST WORKSHOP TABLES / WORKBENCH!! (Tips, Tricks, Secrets--Workshop Table Full Build)

Показать описание
Check Out Our FREE GUIDE: *25 Must-Have Carpentry Tools...Under $25 Each!*
AFFILIATE TOOL LINKS:
Porter Cable 20V Max Cordless Brad Nailer:
Bosch 12" 15-Amp Miter Saw:
Dewalt 10" Table Saw + Stand:
Occidental Tool Belt:
Occidental Stronghold Suspension Harness:
Kreg R3 Jr. Pocket Hole Jig:
Kreg Premium Face Clamp:
Estwing 16 oz. Straight Rip Hammer:
Swanson Speed Square/Combo Square:
(These are affiliate links. When you shop through these links, we receive a small commission at NO EXTRA CHARGE TO YOU. We greatly appreciate the support!)
FOLLOW US ON INSTAGRAM:
FOLLOW US ON LINKEDIN:
CHECK OUT OUR OTHER BUILD VIDEOS!:
3 Tips--Best Nail/Screw Storage:
Truck Cab Shelves:
Table Saw Station:
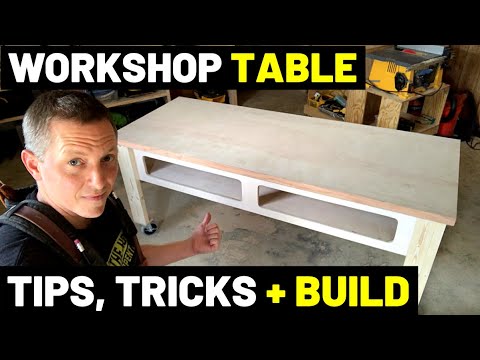
These Make The BEST WORKSHOP TABLES / WORKBENCH!! (Tips, Tricks, Secrets--Workshop Table Full Build)
Every good worshop needs a great workshop table or workbench! These stations give you a great surface to cut on, assemble parts on, and get projects up off the floor. This short video from The Honest Carpenter will show you some of the BEST workshop table/workbench tips, tricks and secrets out there...plus, it includes a full build!
The best trick I learned a long time ago for building workshop tables and workbenches is to make the table top out of a FLAT SOLID CORE DOOR!
These doors are heavy and dense, and completely flat. They made of layered up material. The edges are often solid wood. The surfaces are plywood veneers. And the cores are either MDF or masonite, or possible glued-up solid pieces of wood.
The one in this video runs about $80 at local big box stores.
It's best to purchase these doors without mortises or lockset holes already cut into them. This makes them better suited for flat, solid workshop tables and workbenches.
Really, it's like you get two table tops out of a flat solid core door, because when one side gets badly damaged, you can just flip it over and start fresh with the other side!
They're also the perfect size for a workshop table or workbench--32" or 36" wide, and 80" tall (height).
The other tip or trick that I like to employ when make a workshop table or workbench is a TOOL SHELF.
This is a narrow shelf just beneath the table top. Mine has several 5-1/2" windows spread around the various sides of the table that allow you to pull tools off the table top, and keep them just below on the flush-top shelf where you can easily reach them.
The walls of the shelf are similar to a normal table skirt. I leave 3" of material at the top to support the work table surface, and 2" of material at the bottom to support the tool shelf.
The legs of the table are made of 2x4s with the coped edges ripped off. This makes them look more finished, and gives them more flat surface for a better glue connection when I make long L's out of the 2x4's
I set the legs and the tool shelf skirt in 1-2" from the edge of the table. This gives me a CLAMPABLE EDGE around the full perimeter of the table.
The total overall height of my workshop table or workbench is just shy of 36". For someone like me, who is 5'7", this is a good workshop table height.
I also put my workshop table/workbench on rolling, lockable 5" casters that are heavy duty. This makes it mobile around the shop--though I could create custom chock blocks later to make it stationary.
For the full workshop table / workbench build, plus all the other tips, tricks and secrets I used, check out the full video!
Thanks for watching! Be sure to visit us at The Honest Carpenter Website:
AFFILIATE TOOL LINKS:
Porter Cable 20V Max Cordless Brad Nailer:
Bosch 12" 15-Amp Miter Saw:
Dewalt 10" Table Saw + Stand:
Occidental Tool Belt:
Occidental Stronghold Suspension Harness:
Kreg R3 Jr. Pocket Hole Jig:
Kreg Premium Face Clamp:
Estwing 16 oz. Straight Rip Hammer:
Swanson Speed Square/Combo Square:
(These are affiliate links. When you shop through these links, we receive a small commission at NO EXTRA CHARGE TO YOU. We greatly appreciate the support!)
FOLLOW US ON INSTAGRAM:
FOLLOW US ON LINKEDIN:
CHECK OUT OUR OTHER BUILD VIDEOS!:
3 Tips--Best Nail/Screw Storage:
Truck Cab Shelves:
Table Saw Station:
These Make The BEST WORKSHOP TABLES / WORKBENCH!! (Tips, Tricks, Secrets--Workshop Table Full Build)
Every good worshop needs a great workshop table or workbench! These stations give you a great surface to cut on, assemble parts on, and get projects up off the floor. This short video from The Honest Carpenter will show you some of the BEST workshop table/workbench tips, tricks and secrets out there...plus, it includes a full build!
The best trick I learned a long time ago for building workshop tables and workbenches is to make the table top out of a FLAT SOLID CORE DOOR!
These doors are heavy and dense, and completely flat. They made of layered up material. The edges are often solid wood. The surfaces are plywood veneers. And the cores are either MDF or masonite, or possible glued-up solid pieces of wood.
The one in this video runs about $80 at local big box stores.
It's best to purchase these doors without mortises or lockset holes already cut into them. This makes them better suited for flat, solid workshop tables and workbenches.
Really, it's like you get two table tops out of a flat solid core door, because when one side gets badly damaged, you can just flip it over and start fresh with the other side!
They're also the perfect size for a workshop table or workbench--32" or 36" wide, and 80" tall (height).
The other tip or trick that I like to employ when make a workshop table or workbench is a TOOL SHELF.
This is a narrow shelf just beneath the table top. Mine has several 5-1/2" windows spread around the various sides of the table that allow you to pull tools off the table top, and keep them just below on the flush-top shelf where you can easily reach them.
The walls of the shelf are similar to a normal table skirt. I leave 3" of material at the top to support the work table surface, and 2" of material at the bottom to support the tool shelf.
The legs of the table are made of 2x4s with the coped edges ripped off. This makes them look more finished, and gives them more flat surface for a better glue connection when I make long L's out of the 2x4's
I set the legs and the tool shelf skirt in 1-2" from the edge of the table. This gives me a CLAMPABLE EDGE around the full perimeter of the table.
The total overall height of my workshop table or workbench is just shy of 36". For someone like me, who is 5'7", this is a good workshop table height.
I also put my workshop table/workbench on rolling, lockable 5" casters that are heavy duty. This makes it mobile around the shop--though I could create custom chock blocks later to make it stationary.
For the full workshop table / workbench build, plus all the other tips, tricks and secrets I used, check out the full video!
Thanks for watching! Be sure to visit us at The Honest Carpenter Website:
 0:10:09
These Make The BEST WORKSHOP TABLES / WORKBENCH!! (Tips, Tricks, Secrets--Workshop Table Full Build)
 0:13:24
5 top brilliant ideas for every workshop // #woodworking #jig #workshop #top
 0:08:21
Making The Best Wooden Clamps - Woodworking - Workshop
 0:07:23
The Perfect Workshop
 0:10:56
11 Simple Ways to Organize Any Workshop
 0:41:51
Make Professional Push Sticks for Workshop Safety
 0:25:02
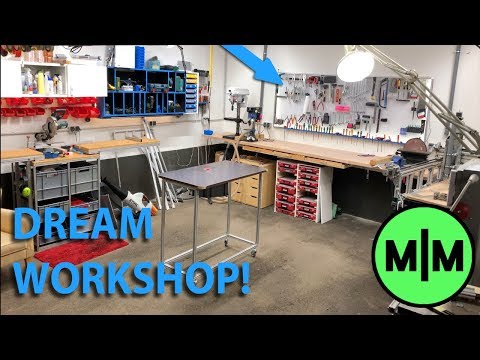
BUILDING THE DREAM WORKSHOP
 0:12:30
Making Furniture In A Small Workshop - The Best Layout For A Single Car Garage
 0:14:05
Glow Up | How to make a glow in the dark glaze | Ceramic Materials Workshop
 0:15:44
a better way to layout your workshop
 0:19:52
5 Woodworking Jigs, Easy to Make, Accurate and Essential to Any Workshop
 0:12:39
My Small and Efficient workshop (2 x 3 meter) - 2019 Shop tour
 0:20:04
Very useful ideas for the workshop! TOP-3
 0:18:20
Builing the Dream Workshop! (Workshop Build and Tour)
 0:11:58
6 Awesome Shop Storage Systems to Organize Your Workshop (or Garage)
 0:12:30
Building The Dream Workshop!
 0:21:57
I Searched 'Nomad' on the Workshop for the Best Mobile Bases! - Scrap Mechanic Gameplay
 0:27:00
Small Workshop Workbench Build - Part 1
 0:25:33
The perfect barstool for your workshop. Made with $2.75 studs.
 0:13:13
Small Workshop Organization and Layout Idea
 0:12:06
German Creates the PERFECT Workshop/Lab?!.....And So Can You!
 0:09:31
5 Workshop Upgrades that Make a HUGE Difference!
 0:15:22
How to Build an Easy Workshop Cabinet
 0:36:51
why is everyone afraid to make this?
Комментарии