filmov
tv
Driving a Processing sketch with an Arduino LED button pad

Показать описание
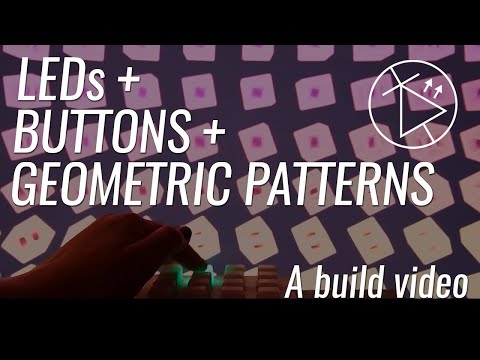
LEDs are cool. Buttons are fun to push. Animated geometric patterns are nice. I wanted to combine all three!
How it works: I'm using this Arduino Mega controlled pad of LED buttons to drive a Processing sketch. When a button is pushed, it sends a message over a serial connection, which the Processing sketch picks up. The sketch is drawing an array of spinning cubes and it changes variables related to what it's drawing, depending on which button was pushed. The kind of things it changes are the size of the cubes, the range of colours and the number of cubes. I've been amazed at the amount of variety this brings, as you'll see near the end of the video!
I'll be adding an Instructable soon as well as uploading a couple more in depth videos on the coding/electronics.
Subscribe to my channel if you want to see those videos when they arrive, or if you want to know when I have new projects!
I learnt a lot from this tutorial:
I'm online at:
Music in this video is from Epidemic Sound:
Albatross - Christian Nanzell
Youth Is Wasted On The Young (Chez Remix) (Instrumental Version) - Tellow
 0:08:22
Driving a Processing sketch with an Arduino LED button pad
 0:00:42
Darkrun - Outrun like driving Processing sketch,
 0:00:30
Processing Sketch : Pixels : Circle grid mannequins
 0:02:02
Deep Level Processing While Driving
 0:00:28
Driving test fails - traffic lights! #drivingtest #drivingfails #drivinglessons #learningtodrive
 0:00:17
How to start driving an automatic vehicle #driving #automobile #car #tips #cartok #drive
 0:00:12
manually writing data to a HDD...kinda #shorts
 0:00:23
Processing Sketch : Pixels : Squarevolta Mannequin
 1:48:15
DELL Inspiron 15 3535 Touch Laptop Ryzen 7 7730U PTM7950 SSD Upgrade Teardown Review #wisebuyreviews
 0:00:12
Learn this parking trick and parking is easy!#car #shorts #driving #tips #tutorial
 0:00:05
Real code 💥 Indian bike driving 3d all new cheat code update + plugin cheat code
 0:00:11
Tips for smooth gear shifting step by step guide to shifting gears. #cars #driving #training #shorts
 0:00:15
Hulk cheat code 🤩 || new update | Indian bike driving 3D game || #indianbikesdriving3dnewtodayupdate...
 0:00:19
Turn ascii characters into an image with Processing
 0:00:32
Safety Tips before Driving - Gulf Driving School Qatar
 0:00:14
How to change gears in a manual car, did you learn?#driving #skills #howto
 0:00:11
How to start a manual car #car #drive #drivngschool #drivingtest #drivingtips #adnaan_altaher
 0:00:29
How to synchronize stepper motor and encoder? #steppers #stepper_motor
 0:00:11
The car starts on a steep slope, very simple!#shortsvideo #car #driving #tips
 0:00:08
The most correct way to shift gears for an automatic car!#car#driving #tips #tutorial#driving#fyp
 0:00:06
Indian Bikes Driving 3D || All NEW CHEATS CODES #shorts #short
 0:00:33
How to Make a U-Turn ✅ In Dubai 🇦🇪 #driving #drive #drivinglessonsforbeginners #automatic
 0:00:16
Driving Test RTO Test #shorts
 0:00:18
The right way to turn the steering wheel!#car
Комментарии