filmov
tv
How to paint unfinished cabinets from home depot or lowes
Показать описание
What's up guys/gals,
I am starting a mud room project that calls for several cabinets to be installed. I thought long and hard whether I should attempt to build the cabinets or purchase them. I haven't built cabinets before, so that option was out, plus I didn't have the proper setup and tools yet. The 2nd option was to purchase finished cabinets that I can install right away. Two problems arose from the second option: Cost and color. The cost for this setup which calls for 7 cabinets was over $2500!! And we would have to stick with a stock color; otherwise, the cost would be even higher and lead time would be weeks if not months!
I have painted many cabinets before, so the idea of painting cabinets was not new or scary to me; however, I have not done unfinished cabinets before. The idea of saving 100s of dollars, make that thousands of dollars and the challenge got me interested. So, I decided to take on painting the unfinished cabinets, which cost me just about $600. Here is the list of materials used:
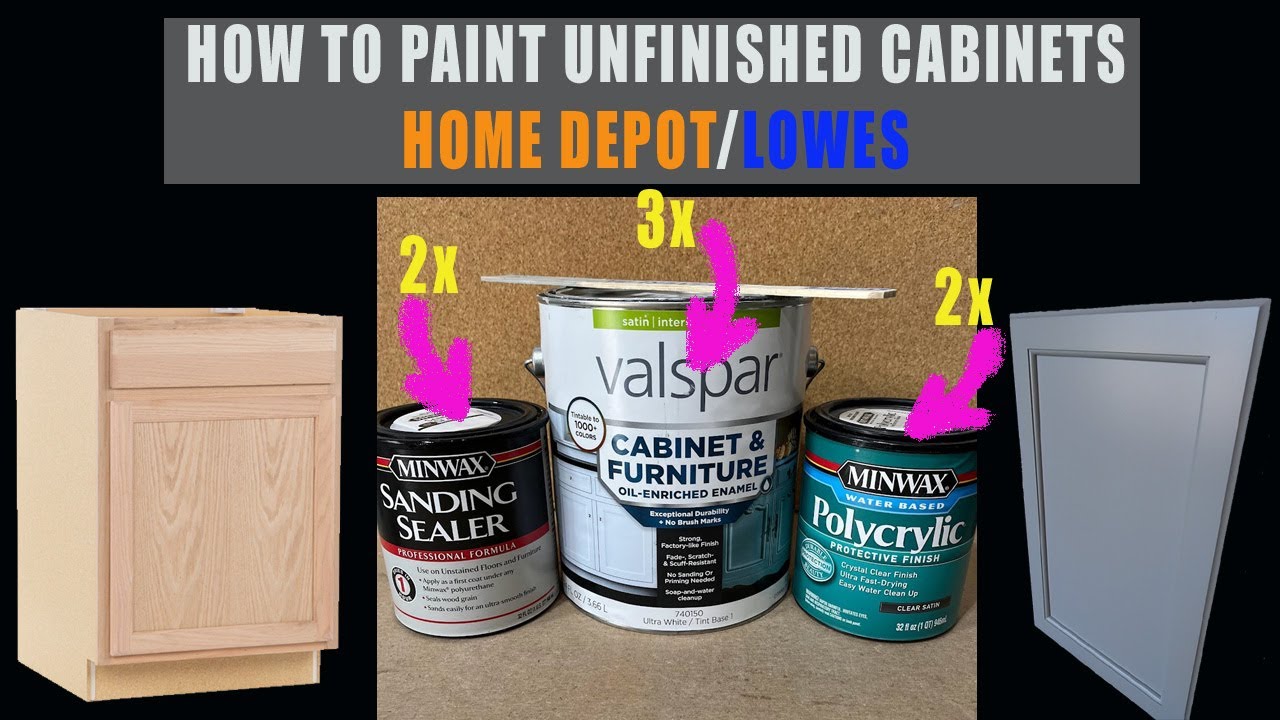
- Cabinet paint from Valspar $55/gal (I used only 1 gal)
- Sanding sealer $20/qrt (I used 1 quart)
- Polycrylic top finish $18/qrt (I used 1 quart)
- Couple of extra fine sanding blocks and a steel wool pad (not sure what cost is since I had those in my shop already, but probaby $2-$3
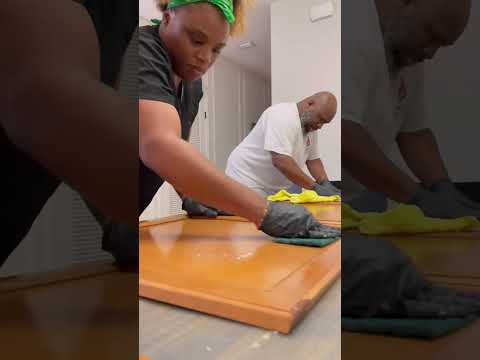
In this video I walk you though the process of painting these unfinished cabinets I purchased from Lowes. These are OSB boxes with a solid Oak trim and cabinet door frame with a 1/4" door insert.
BTW the finished cabinets from Lowes were veneered, so you can't really sand or paint them! Another reason I went with the unfinished solid wood door frames
For painting these unfinished cabinets I used my Critter cyphon gun. I spray paint whenever I have routed edges such as cabinet doors and trim.
Whenever you are working with unfinished wood it's a good idea to start with a sanding sealer to seal the wood and create a surface that paint can adhere too much better than an unsealed surface. Trust me, this step is crucial, you would not believe the difference.
Here is the breakdown to paint unfinished cabinets:
- 2 coats of sanding sealer
- 3 coats of paint
- 2 coats of Polycrylic
You will want to lightly sand between coats for an ultimate smooth finish. I hope this video helps you with your future projects.
Disclaimer: these videos are for information purposes only. They are not meant to induce action; therefore, you agree and understand that you make your own decisions and absorb all risks associated with said decisions/actions. You further agree to hold True Grit Development, LLC, it’s members and anyone affiliated with True Grit Development, LLC harmless from any damage or loss.
Credit:
I am starting a mud room project that calls for several cabinets to be installed. I thought long and hard whether I should attempt to build the cabinets or purchase them. I haven't built cabinets before, so that option was out, plus I didn't have the proper setup and tools yet. The 2nd option was to purchase finished cabinets that I can install right away. Two problems arose from the second option: Cost and color. The cost for this setup which calls for 7 cabinets was over $2500!! And we would have to stick with a stock color; otherwise, the cost would be even higher and lead time would be weeks if not months!
I have painted many cabinets before, so the idea of painting cabinets was not new or scary to me; however, I have not done unfinished cabinets before. The idea of saving 100s of dollars, make that thousands of dollars and the challenge got me interested. So, I decided to take on painting the unfinished cabinets, which cost me just about $600. Here is the list of materials used:
- Cabinet paint from Valspar $55/gal (I used only 1 gal)
- Sanding sealer $20/qrt (I used 1 quart)
- Polycrylic top finish $18/qrt (I used 1 quart)
- Couple of extra fine sanding blocks and a steel wool pad (not sure what cost is since I had those in my shop already, but probaby $2-$3
In this video I walk you though the process of painting these unfinished cabinets I purchased from Lowes. These are OSB boxes with a solid Oak trim and cabinet door frame with a 1/4" door insert.
BTW the finished cabinets from Lowes were veneered, so you can't really sand or paint them! Another reason I went with the unfinished solid wood door frames
For painting these unfinished cabinets I used my Critter cyphon gun. I spray paint whenever I have routed edges such as cabinet doors and trim.
Whenever you are working with unfinished wood it's a good idea to start with a sanding sealer to seal the wood and create a surface that paint can adhere too much better than an unsealed surface. Trust me, this step is crucial, you would not believe the difference.
Here is the breakdown to paint unfinished cabinets:
- 2 coats of sanding sealer
- 3 coats of paint
- 2 coats of Polycrylic
You will want to lightly sand between coats for an ultimate smooth finish. I hope this video helps you with your future projects.
Disclaimer: these videos are for information purposes only. They are not meant to induce action; therefore, you agree and understand that you make your own decisions and absorb all risks associated with said decisions/actions. You further agree to hold True Grit Development, LLC, it’s members and anyone affiliated with True Grit Development, LLC harmless from any damage or loss.
Credit:
 0:12:57
How to paint unfinished cabinets from home depot or lowes
 0:11:07
KITCHEN REMODEL - How To Paint Unfinished Lowes Stock Cabinets
 0:06:30
How to paint unfinished cabinets & save money
 0:09:56
How to Paint Kitchen Cabinets with a Sprayer and get a Professional Finish | DIY Project
 0:02:15
How to Paint or Stain Unfinished Cabinets
 0:12:40
DIY Kitchen Cabinet Painting | the CHEAP & EASY way!
 0:12:36
Get A Factory Finish On Your Painted Cabinets |Step By Step | THE HANDYMAN |
 0:02:44
How to Paint Kitchen Cabinets | The Home Depot
 0:06:23
How to Prep & Paint Unpainted Furniture
 0:06:47
How to Properly Paint Your Kitchen Cabinets | Ask This Old House
 0:05:21
How To Paint Cabinets | A Step-by-Step Guide
 0:20:15
I Hand Painted An Unfinished Cabinet
 0:12:20
The Absolute Best Paint for Cabinets
 0:00:14
Buy unfinished cabinets from Home Depot and paint them or stain them to the color of your choice
 0:08:58
Spray Painting The Perfect White Finish For Cabinets
 0:06:24
How to Paint Kitchen Cabinets with a Paint Sprayer
 0:04:53
The Secret To Painting Raw Wood and MDF!
 0:11:33
Painting Cabinets With a Pro Finish WITHOUT a Sprayer | How to Paint Kitchen Cabinets, DIY Style
 0:14:26
How to Paint Kitchen Cabinets without a Sprayer
 0:14:02
HVLP vs Airless? // How to paint kitchen cabinets the right way!
 0:01:16
Sanding your unfinished cabinets
 0:01:01
The Best Way To Paint Kitchen Cabinets
 0:11:09
DIY Unfinished Cabinets Sealed for Natural Look Easy
 0:06:39
How To Paint Cabinets with a Paint Sprayer
Комментарии