filmov
tv
How to Resolve Xcode's Missing Provisioning Profile Error When Building Flutter for iOS?
Показать описание
Disclaimer/Disclosure: Some of the content was synthetically produced using various Generative AI (artificial intelligence) tools; so, there may be inaccuracies or misleading information present in the video. Please consider this before relying on the content to make any decisions or take any actions etc. If you still have any concerns, please feel free to write them in a comment. Thank you.
---
Summary: Learn how to fix the 'Missing Provisioning Profile' error in Xcode when building a Flutter application for iOS by setting up the right development profiles.
---
How to Resolve Xcode's Missing Provisioning Profile Error When Building Flutter for iOS?
Building Flutter applications for iOS can sometimes present unique challenges, one of the most common being the infamous Missing Provisioning Profile error in Xcode. If you've ever experienced this, you know it can be quite frustrating. Here’s how to navigate and resolve this issue efficiently.
Understanding the Problem
When Xcode throws the "Missing Provisioning Profile" error, it’s essentially telling you that it can't find a valid development provisioning profile for your app ID. Provisioning profiles are critical as they link your iOS devices to your Apple Developer account and are necessary for code-signing your app.
Step-by-Step Solution
Ensure Apple Developer Account Integration
The first step is to make sure you have an active Apple Developer account and that it is integrated with Xcode correctly.
Open Xcode.
Navigate to Xcode > Preferences > Accounts.
Ensure your Apple Developer account is listed here. If not, add it by clicking the + button.
Create an iOS App ID
You need an App ID registered in the Apple Developer portal.
Log in to your [Apple Developer Account].
Go to Certificates, Identifiers & Profiles > Identifiers.
Click the + to add a new App ID and fill in the necessary details.
Generate a Provisioning Profile
Next, create a provisioning profile that matches this App ID.
In the Apple Developer portal, go to Certificates, Identifiers & Profiles > Profiles.
Click the + to create a new profile.
Choose the type (iOS App Development), select your App ID, and follow the steps to generate it.
Download the provisioning profile to your machine and double-click it to add it to Xcode.
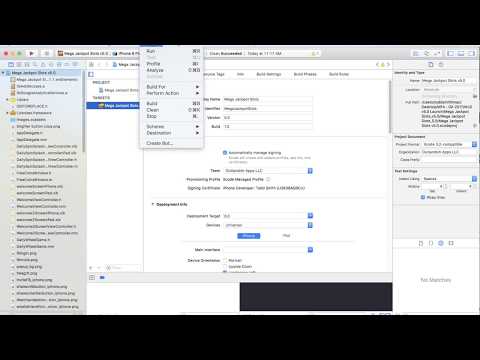
Configure Xcode Build Settings
Back in Xcode, ensure the right provisioning profiles are selected:
Open your project in Xcode.
Select the project file in the Navigator.
Under Targets, select your app target.
Go to the Signing & Capabilities tab.
Ensure Automatically manage signing is checked, and select your development team.
Sync Your Development Certificate
Make sure Xcode is using the correct development certificate:
Navigate to Keychain Access on your Mac.
Ensure that your development certificate is valid and trusted. If not, regenerate it from the Apple Developer portal and install it.
Build Your Flutter Project
Return to your Flutter project and clean the build cache just to be sure:
[[See Video to Reveal this Text or Code Snippet]]
Then build your project again:
[[See Video to Reveal this Text or Code Snippet]]
Xcode should now recognize the valid provisioning profile and proceed without errors.
Conclusion
Provisioning profiles can be tricky to manage, but once set up properly, they pave the way for seamless iOS app development. By following these steps, you should be able to resolve the Missing Provisioning Profile error in Xcode and get back to focusing on what you love—building great Flutter applications.
Happy coding!
---
Summary: Learn how to fix the 'Missing Provisioning Profile' error in Xcode when building a Flutter application for iOS by setting up the right development profiles.
---
How to Resolve Xcode's Missing Provisioning Profile Error When Building Flutter for iOS?
Building Flutter applications for iOS can sometimes present unique challenges, one of the most common being the infamous Missing Provisioning Profile error in Xcode. If you've ever experienced this, you know it can be quite frustrating. Here’s how to navigate and resolve this issue efficiently.
Understanding the Problem
When Xcode throws the "Missing Provisioning Profile" error, it’s essentially telling you that it can't find a valid development provisioning profile for your app ID. Provisioning profiles are critical as they link your iOS devices to your Apple Developer account and are necessary for code-signing your app.
Step-by-Step Solution
Ensure Apple Developer Account Integration
The first step is to make sure you have an active Apple Developer account and that it is integrated with Xcode correctly.
Open Xcode.
Navigate to Xcode > Preferences > Accounts.
Ensure your Apple Developer account is listed here. If not, add it by clicking the + button.
Create an iOS App ID
You need an App ID registered in the Apple Developer portal.
Log in to your [Apple Developer Account].
Go to Certificates, Identifiers & Profiles > Identifiers.
Click the + to add a new App ID and fill in the necessary details.
Generate a Provisioning Profile
Next, create a provisioning profile that matches this App ID.
In the Apple Developer portal, go to Certificates, Identifiers & Profiles > Profiles.
Click the + to create a new profile.
Choose the type (iOS App Development), select your App ID, and follow the steps to generate it.
Download the provisioning profile to your machine and double-click it to add it to Xcode.
Configure Xcode Build Settings
Back in Xcode, ensure the right provisioning profiles are selected:
Open your project in Xcode.
Select the project file in the Navigator.
Under Targets, select your app target.
Go to the Signing & Capabilities tab.
Ensure Automatically manage signing is checked, and select your development team.
Sync Your Development Certificate
Make sure Xcode is using the correct development certificate:
Navigate to Keychain Access on your Mac.
Ensure that your development certificate is valid and trusted. If not, regenerate it from the Apple Developer portal and install it.
Build Your Flutter Project
Return to your Flutter project and clean the build cache just to be sure:
[[See Video to Reveal this Text or Code Snippet]]
Then build your project again:
[[See Video to Reveal this Text or Code Snippet]]
Xcode should now recognize the valid provisioning profile and proceed without errors.
Conclusion
Provisioning profiles can be tricky to manage, but once set up properly, they pave the way for seamless iOS app development. By following these steps, you should be able to resolve the Missing Provisioning Profile error in Xcode and get back to focusing on what you love—building great Flutter applications.
Happy coding!
 0:01:41
 0:04:50
 0:00:41
 0:01:45
 0:00:59
 0:05:43
 0:02:08
 0:08:00
 0:04:32
 0:02:58
 0:01:07
 0:04:14
 0:02:31
 0:02:13
 0:00:25
![[Solved] iOS Simulators](https://i.ytimg.com/vi/H0gEZu0Vu2A/hqdefault.jpg) 0:01:11
0:01:11
 0:03:52
 0:00:37
 0:01:39
 0:01:09
 0:04:19
 0:04:18
 0:00:19
 0:02:09