filmov
tv
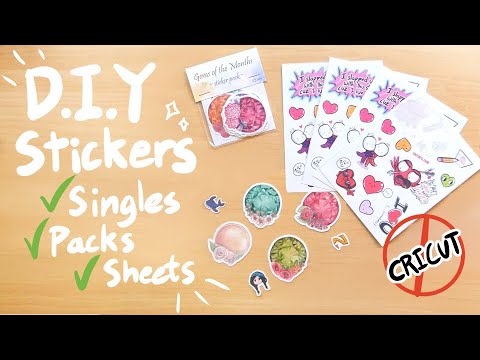
DIY Stickers (Singles, Packs, and Sheets!) | NO CRICUT NEEDED!

Показать описание
Everything you need to know to start making swaggin' beautiful stickers at home, using sticker paper, a regular printer, and a couple other tools you'll already have at home!
~FREE Valentine's Sticker Sheet Print-out~
~Birthstone stickers~
~Check out my shop for more stickers, prints, books & more!
------------------------------
MATERIALS USED IN VIDEO*
(^^note: I got mine in-store at Walmart, but this is where you can buy it on Amazon)
------------------------------
LEARN MORE ABOUT STICKER MAKING
-------------------------------
My Socials
-----------
Music Cred
Whale Fly intro music - 'Easy Stroll'
by Our Music Box
-----------
*Some links are Amazon affiliate codes, if you purchase through these links, I may make a small commission, which helps support this channel, at no extra cost to you.
 0:17:30
DIY Stickers (Singles, Packs, and Sheets!) | NO CRICUT NEEDED!
 0:00:21
Easy Sticker Pack Tutorial | Sticker Tutorial | DIY Projects #homemade #diy #sticker #smallbusiness
 0:00:59
Making mystery sticker pack envelopes | diy #stickers #smallbusiness
 0:08:44
How I Make, Pack, & Ship Stickers (From Home)
 0:10:02
HOW TO MAKE STICKERS! (3 EASY DIY METHODS) | Easy and Cheap!
 0:00:10
Make your own Fallout sticker pack with sticker singles in 3 finishes!☢️✨️
 0:00:10
How I make sticker packs. #stickers #art #howto #diy #graphicdesign
 0:00:37
pack $100 wholesale order with me #packwithme #wholesalestickers #wholesalegreetingcards #stickers
 0:06:59
SCRUBZZ Rinse Free 105pc Bath Single Use Shower Sponges on QVC
 0:00:30
let's pack orders! | cute sticker business | packing asmr | no music | no talking
 0:01:00
Pack an order with me! Gorgeous selection of sticker books and die cut stickers! #stationeryshop
 0:00:35
Cute & Colorful Planner Stickers (1054 pcs Value Pack) by Vladi Creative®
 0:05:33
❤️how to make a single sticker pack
 0:00:18
Mom life sticker pack
 0:00:25
Create Your Own Sticker Pack!
 0:00:44
#SinglePackShort Opening another Pack of Panini NFL 2022 stickers #shorts
 0:00:45
#SinglePackShort Opening another Pack of Panini World Cup 2022 stickers #shorts
 0:00:49
Melissa & Doug Make-A-Face Reusable Sticker Pad Bundle 3-Pack
 0:08:54
How I make Stickers for my small business- Sticker packs & die cut stickers with Silhouette
 0:00:25
#SinglePackShort Opening another WWE 2022 Sticker Collection pack #shorts
 0:00:16
SIMNO stickers pack cute world #SIMNO#foryou #stickers
 0:00:39
#SinglePackShort Opening another Pack of Panini World Cup 2022 stickers #shorts
 0:00:29
One of my favorite sticker-pack designs yet!!🦌🌳🍄🥰✨ #mushroomart #stickerart #etsyshop
 0:00:14
let's pack orders! | cute sticker business | packing asmr | no talking
Комментарии