How To Reseal RV Corner Molding

preview_player
Показать описание
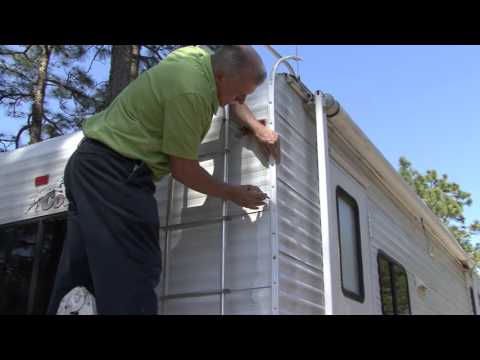
In this RV DIY video host Mark Polk, with RV Education 101, demonstrates how to reseal RV corner molding using Seal-Tite™ Corner Seal.

Since filming this video there is a new Corner Seal Kit available with everything you need to repair and reseal RV corners. For information on where to purchase the Corner Seal Kit visit

Happy Camping,


Travel Trailer & 5th Wheel Trailer RV Orientation Video Training Course

Tow Your Travel Trailer Like a Pro Video Training Course

Tow Your 5th Wheel Like a Pro Complete Online Video Training Course

Motorhome RV Orientation Video Training Course

Drive Your Motorhome Like A Pro Complete Online Video Training Course

RV Essential Items Video Training Course

Winterizing and Storing Your RV Video Training Course

Travel Trailer 4 Video Bargain Set Plus Free RV Checklist ebook

5th Wheel 4 Video Bargain Set Plus Free RV Checklist ebook

Motorhome 4 Video Bargain Set Plus Free RV Checklist ebook

-----------------------

A Collection of RV Education 101 E-Books - 9 RV E-BOOK BUNDLE SET

An Introduction to RVs E-book Training Course

Insider's Guide to Buying an RV E-Book Training Course

Owning & Operating an RV E-Book Training Course

The Original Checklists for RVers E-Book Training Course

RV Campground Basics E-Book Training Course

RV Safety Features, Tips & Tricks E-book Training Course

RV Care & Maintenance E-Book Training Course

Winterizing & Storing Your RV E-Book Training Course

RV Battery Care & Maintenance E-Book Training Course

Trailer Towing Basics E-Book Training Course
Рекомендации по теме
Комментарии
Автор

Thanks @DICOR and @RV Education 101! I just used the Dicor Corner Seal Tape and same CRL 777 Butyl Rubber Sealant Caulk shown in the video to re-seal the corner rails of our 5 year old travel trailer w/ fiberglass walls. I had to pause the video and take a screenshot to figure out which butyl sealant you used. Aside from using Dicor products on the roof, re-sealing the corners is one of the best DIY projects to ensure your travel trailer stays free from any future water damage.

Dicor Corner Seal Tape is STICKY! The proper prep work is KEY when cleaning the side walls where the tape adheres to.

Don't rush and allocate double the time of your original estimate it will take to do the job. The prep takes the longest but will ensure 100% adhesion of the tape and get you a waterproof seal.

Using the DICOR Corner Seal Tape + CRL's Butyl Sealant caulk will give you a better than factory weatherproofing of your travel trailers corners. Many manufacturers only use regular butyl tape on the inside of the j-rail then use a clear silicone to caulk the outside edge of the corner rail. Using the method described in this video is better than what many manufacturers use in my opinion.

Thanks again DICOR !

Andrew-frbp
Автор

I just bought a 20' class C for 450.00. The previous owner used duct tape and tar tape directly over the channel! As you may have guessed it doesn't work. I now have to remove all of that which is going to be really fun! (sarcasm) Thank you for not overcomplicating the solution with a brief and concise video. I cant wait to get my 1981 Chevy Lindy back into shape. It only has 83K and came with everything including the Onan Generator. Luckily the inside is in bad shape from people trying to improvise without knowledge. I am a carpenter and had every intention of gutting it anyway to give it an updated appearance. First and foremost I thought it a good idea to weatherproof the exterior and this is just the ticket. Thank You!

chizl
Автор

Funny. I just ran across 2 rolls of this tape. I wondered why I bought it but used it to seal a small crack in my RV roof before coating it. Worked really well. Just ran across this video again and now I remember why I bought it two years ago! LOL!😀

22 November 2019 Thought I'd update this just in case anyone else is interested. It's now a year later and I just recoated my roof and this stuff is still holding strong on a roof that's always outside. Used it to repair a couple more spots.
Next week, I'm going to use it for it's intended purpose. It should hold forever!😀

martyrose
Автор

I bought an old sea can (shipping container) once and it had a repair done on it when it probably got bashed by another can when it was being loaded on a ship. It has a clear sealant that sort of looked like Goop, except it was real tough and rubbery. It was amazingly tough. I originally thought it was Goop and layed a strip of it beside this sealant. within 2 years this marine grade uv Goop had turned hard and brittle from the sun exposure, yet the stuff that was used was still clear and rubbery. That was back in 1994 and that stuff is still in reasonably good shape today. That is the stuff to use. I wish I knew what product that was. It was vastly superior to the crap they sell us today with planned short life expectancy to keep us buying more.

Flightstar
Автор

THANK YOU!!
Our 1983 Honey I had just started to rebuild the rear wall on due to a "little" leak (videos out and in production LOL!) went for a swim last month in the flash floods here in Springfield and we have decided that a clean slate on a floor plan to our liking is in order!
The tape I KNOW I'll be getting to go with the nice big roll of putty tape waiting to be used I had just bought! It's a PITA to remove all that old white sealant they used about 15 years ago after someones attempt to repair after an accident! TUBES of it!

May I add a tip?
Before reinstalling the screws into the corner posts or on any wood rebuild project, if you still have a wood framed rig use tooth picks and wood glue. Dip 2 or 3 toothpicks in the glue or enough to fill the old hole and tapping them in with a hammer does not hurt, put them in the old screw holes before mounting the trim channel and clip them with your side cutters (wire cutters) flush with the surface then put in the screws. Almost like virgin wood to screw the screws into. This adds more "meat" to the old screw hole making for a more solid set.

Thanks for this much needed tip for our old Honey rebuild!

Blue Sky's and Safe Journeys!


PS: Have you ever seen what water and old particle board in an RV looks like after 24 hours under water?
Pictures soon! It's a NIGHTMARE!!! :0

rolloverriderpgr
Автор

Since filming this video there is a new Corner Seal Kit available with everything you need to repair and reseal RV corners. For information on where to purchase the Corner Seal Kit visit

rveducation
Автор

I thought you had a great idea with the coated screws, that makes a lot of sense, thank you for that idea.

houladog
Автор

Thank you for posting these videos. I take my laptop out to the camper just in case I get stuck. Much appreciated.

michellestaley
Автор

Great video- informative and no fluff extra self promoting. Just good information that takes my time spent watching it as something to value. You got my sub- wish more video producers valued my time like you. Thank you.

handlebarsandhandkerchiefs
Автор

Keep covered when not in use. Never understood why people drop 30.000 on camper but say screw the 200$ cover .helps alot

justinvernal
Автор

The first step is not buy an aluminum sided RV. Its made of wood which is heavier than most RV's. It also gets a nice salvage title if you get hit with Pea size hail and its a complete loss (meaning you are un-insurable). You also have to deal with seams like this but only because the manufacture uses the wrong adhesive. If you use Sika Flex 221 along the seams you won't have to remove anything. However, if water damage is evident, you need to replace your wood. If you don't want to replace your wood, you need to treat your water damaged wood with Bleach to kill the mold. Something I found interesting about this video that was never mentioned. If all said is good so far given you taken time to do all this, you need to replace your screws with stainless steel screws ( you know, to prevent rusting). Problem with coated screws is the paint WILL come off while screwing in. Finally your "Quality RV Repair Shop" will be LESS than the Factory.

brotherbonesx
Автор

Thank-you for sharing this . I just bought an older motor home that needs to have this done ( as well as other things ). Now I am able to do it right and it will last many more years .

canadianman
Автор

I'll need the wrap my whole camper 😁😁😂

subarutime
Автор

To remove the old sealant you can also use a plastic paint scrapper, works well. :3

agentnuget
Автор

A big branch fell on top corner of mine and split it a bit open. Hopefully after this vid it will help

MexhomieXlll
Автор

I subscribed before he finished his first sentence.

Name-elps
Автор

Love the transfer of information. From one RV tech to another well done.

thecanadianrvrepairguy
Автор

Thank you for info on seal design, the kit comes with plenty of material and sealant to do
A large fifth wheel trailer . Just did mine and have leftovers.

stevea
Автор

Is it my imagination or have they built these rigs so that we constantly have to be repairing something??

alive-awake
Автор

thanks for sharing you knowledge i just bought my first used rv and it needs a lot of TLC

dariomendoza
welcome to shbcf.ru