filmov
tv
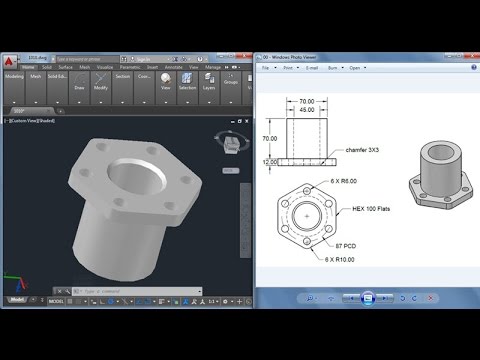
AutoCAD 3D practice drawing: Pipe Joint

Показать описание
In this practice drawing, I have explained the method of making a simplified pipe joint drawing in AutoCAD.
 0:14:15
AutoCAD 3D practice drawing: Pipe Joint
 0:12:50
AutoCAD 2020 3D Practice Drawing: Pipe Joint Valve
 0:10:31
AutoCAD 3D practice drawing : Pipe Joint
 0:05:03
AutoCAD 3D Pipe Design Tutorial | How to Create 3D Pipe in AutoCAD
 0:00:23
Shell Command in AutoCAD 3D || Pipe in AutoCAD 3D #autocad
 0:22:43
Autocad 3D practice drawing : SourceCAD
 0:00:11
AutoCAD 3d tutorial for beginners.Full video on channel | Autocad drawing
 0:00:58
AutoCAD 3D practice drawing Pipe Joint#eangsopheann
 0:09:35
AutoCAD 3D Practice drawing
 0:08:28
Drawing a 3D pipe model using AutoCAD 2023
 0:16:07
3D AutoCAD practice drawing
 0:01:00
Create 3D PIPE Line Using AutoCAD #autocad #tutorial #autocadtips
 0:00:58
3D AUTOCAD PRACTISE DRAWING | AutoCAD Drawing, Elbow
 0:01:52
Guide to draw a 3D Pipe in autocad - Autocad Tutorial
 0:12:38
AutoCAD 3D practice drawing - SourceCAD
 0:00:47
Pipe 3d drawing autocad | mechanical drawing | practice tutorial | 3d exercise drawing #drawing
 0:10:57
3D practice drawing in AutoCAD
 0:00:59
Practice Drawing | Membuat Clamp Pipe
 0:08:50
AutoCAD 3D, How to drawing piping T connection
 0:04:10
3D autocad practice drawing - How to make 3D Pipe in autoCAD 3D
 0:08:01
AUTOCAD 3ds pipe fitting, pipe flange & elbow pipe -Guide for Beginner Midland Fabrication #flan...
 0:05:54
AutoCAD 3d Pipe | Creating 3d pipe in Autocad | Sweep along 3D Polyline | Autocad 3d Modeling
 0:07:00
#054 I AutoCAD 3D Mechanical Pipe Practice (Malay) I Nazmi Ismail
 0:00:15
Quick Tip for Efficient Dimensioning in AutoCAD
Комментарии