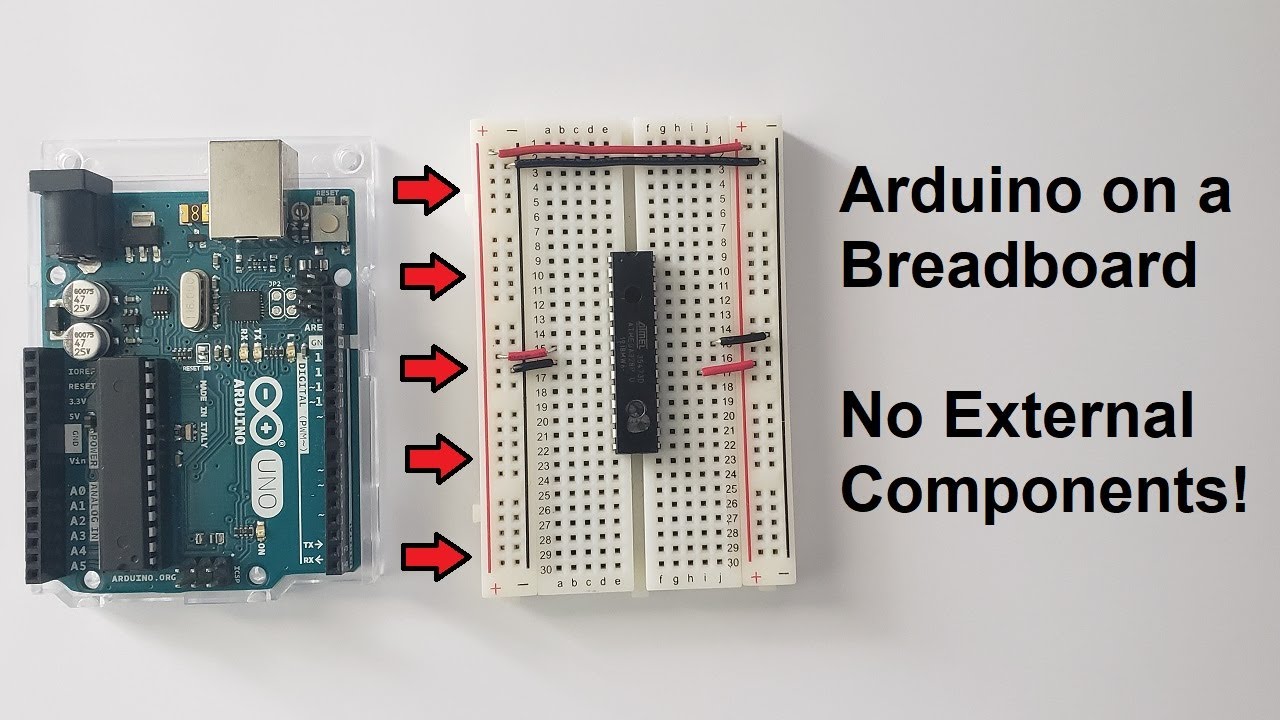
Running an Arduino on a breadboard with NO EXTERNAL COMPONENTS / How to FLASH an Arduino BOOTLOADER

preview_player
Показать описание
In this video, we discuss how to run an Arduino on a breadboard with no external components, and how to flash an Arduino bootloader onto an ATmega chip.

Bootloader files per IDE version:

How to burn an 8MHz bootloader onto an ATmega chip: 4:47
How to use the Arduino as a programmer for a breadboard chip: 15:24
How to burn a 16MHz bootloader onto an ATmega chip: 23:25

Рекомендации по теме
Комментарии
Автор

Like someone else said this is exactly what I was looking for, though I don’t know if they’re a newbie like myself. Clear, concise, simple language that even I understood. Thank you.

markharrisllb
Автор

You also can upload sketches to your standalone avr.chips in the same configuration you used to burn the bootloader. just select your target chip in the menu and then choose sketch -> "upload using programmer" (ctrl+shift+u), in this case your "arduino as isp" will send your sketch to your target chip ;)

MrChrissieleinchen
Автор

this was insanely well explained and the only tutorial which is still up to date i cant thank u much enough

kallgakr
Автор

Wow, you explanation is so good! This is exceptional. Seems like no word is wasted. Thank you!

erikderuiter
Автор

RESPECT absolutely the folers containing the standalone files!!! I lost 3 hours of my life before see that. There was the "containing" archive folder to remove... (Breadboard1-6-x)

MrZindozs
Автор

Well done! Just what i was looking for! the video could have been named "from one bootloader to another and "vice-versa""! Thank you!

margmargou
Автор

I have an AVR ISP ZIF shield so no wires needed.. Great video. This video is a great help. Thanks.

Richie_
Автор

best explanation available! Thanks mate!

mrkripi
Автор

Thanks for helping me doing this because I was in a big trouble.Thanks very very very very very very

dulamahathantila
Автор

This guy deserves more likes. Absolutely well explained and detailed GG WP

drakaguo
Автор

Thank you for this tutorial. You have done a good job of clearly explaining all the necessary details. I will probably try this so that I can simplify my project which is to create a remote 3V battery-powered sensor. I am actually using the 16 mHz 5V option which requires a lot of additional components and additional battery. Well done!!

billglass
Автор

I have two GM328 transistor testers (from Aliexpress), based on ATMEGA328P (28 pin DIP).
During brightness adjustment (through the menus) they became dark (one after the other).
The consumption is fine, the clock is running (8 MHz crystal), the LCD control pins are active (transitions seen by scope) i.e. the hardware is fine.
I presume the manufacturer locked the code. A soldered wires from the board pins 1(RST), 2(RXD), 3(TXD), 7(+5V), 8 (GND) and terminated them with a header, fitting my FTDI (GND, CTS, Vcc, TX, RX, DTR), taking care to cross link TX, RX (of the baord) to RX, TX on the FTDI.
I also inserted a 0.1uF cap in the DTR to RST line. On the board there is just a 10k pull up on RST.
When trying to load a sketch via FTDI, it cannot open the port.
I guess there is no boot-loader either. How do I determine if there is a boot-loader and if the code is locked?
Do I buy new chips or somehow unlock the present ones. Apart of FTDI, I have several NANOs if that is of help.
Thanks Plamen

plamenpetkov
Автор

I noticed that you're using an ATmega168, will this work with the ATmega328p?

davids
Автор

Pro tip: Disconnect your power supply while wiring and connecting a cirquit. Very pedagogical and informative video though!

christianeriksson
Автор

Very useful video sir thank you for the good explanation

rajitheenbro
Автор

I have one question
What if I burn bootloader of the Atmega328 on arduino Board and then use it on breadboard after removing it from the arduino board onto the breadboard? Pls reply I need for my Project

vallabhair
Автор

Hello. Is it possible for me to upload the sketch to the external atmega328 (attach on the breadboard) without removing the stand-alone or orginal atmega328p from the arduino uno? Cuz I heard that removing it from the arduino will ruin it. Thank you for your response

aalaz
Автор

Hi
Can you show me where I can download the bootloader files.
I can not find them.
Thanks

abbn
Автор

Thank you for this Tutorial. It helped me a lot :)

phenomen
Автор

You help me in loading bootloader into a Atmega328 u . I use your procedure but getting following error
Arduino: 1.8.19 (Windows 10), Board: "ATmega328 on a breadboard (8 MHz internal clock)"

Error while burning bootloader.

avrdude: Expected signature for ATmega328P is 1E 95 0F

Double check chip, or use -F to override this check.

Invalid library found in no headers files (.h) found in


This report would have more information with
"Show verbose output during compilation"
option enabled in File -> Preferences.
Please help

aleemuddinkhan