filmov
tv
Measuring Temperature with Arduino - 5 Sensors

Показать описание
Today I’ll show you five different temperature sensors that you can easily use with an Arduino.
We have measured temperature in previous Arduino projects, usually using the trusty DHT11 temperature and humidity sensor. For non-critical applications, it certainly works and has the added advantage of also reading humidity.
But there are many other temperature sensors you can use with an Arduino, all of them fairly inexpensive. Many of these sensors offer improved performance over the DHT22 (and its cousin the DHT11).
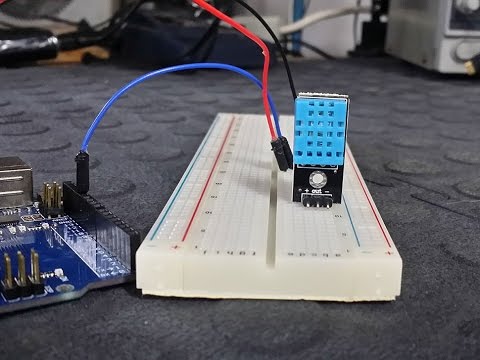
Today we'll start with the DHT22 and use an Adafruit library to get it working quickly. Then we’ll move on to some other temperature sensors:
The AM2320, a similar device to the DHT22 that uses the I2C bus to communicate.
The TMP36 and LM35 precision temperature sensors. These devices output a calibrated linear analog voltage to represent temperature.
And a real high-precision sensor, the MCP9808 module from Adafruit.
Here is what you can expect to see today:
00:00 - Introduction
02:18 - DHT22
08:37 - AM2320
13:27- TMP36 & LM35
21:09 - MCP9808
There is an article on the website with the schematics and the code I used, although most of the examples are included with the Adafruit libraries.
You’ll also find a vibrant community to chat about these sensors and pretty well anything robotic or electronic on the DroneBot Workshop Forums. Why don’t you join us? While you're there you can make suggestions for any other video or articles you’d like to see.
I hope you enjoy the video!
We have measured temperature in previous Arduino projects, usually using the trusty DHT11 temperature and humidity sensor. For non-critical applications, it certainly works and has the added advantage of also reading humidity.
But there are many other temperature sensors you can use with an Arduino, all of them fairly inexpensive. Many of these sensors offer improved performance over the DHT22 (and its cousin the DHT11).
Today we'll start with the DHT22 and use an Adafruit library to get it working quickly. Then we’ll move on to some other temperature sensors:
The AM2320, a similar device to the DHT22 that uses the I2C bus to communicate.
The TMP36 and LM35 precision temperature sensors. These devices output a calibrated linear analog voltage to represent temperature.
And a real high-precision sensor, the MCP9808 module from Adafruit.
Here is what you can expect to see today:
00:00 - Introduction
02:18 - DHT22
08:37 - AM2320
13:27- TMP36 & LM35
21:09 - MCP9808
There is an article on the website with the schematics and the code I used, although most of the examples are included with the Adafruit libraries.
You’ll also find a vibrant community to chat about these sensors and pretty well anything robotic or electronic on the DroneBot Workshop Forums. Why don’t you join us? While you're there you can make suggestions for any other video or articles you’d like to see.
I hope you enjoy the video!
 0:04:04
Measure body temperature with arduino
 0:07:54
How to measure temperature using arduino
 0:05:17
DHT11 Temperature & Humidity sensor with Arduino - Tutorial
 0:29:55
Measuring Temperature with Arduino - 5 Sensors
 0:29:28
Arduino Uno Tutorial analog inputs and measuring temperature
 0:06:36
Make an Arduino Temperature Sensor (Thermistor Tutorial)
 0:05:40
Arduino Weather Station || dht11 Temperature & Humidity sensor
 0:04:50
Measure Water Temperature Using Arduino - Tutorial
 0:01:47
Arduino Project : Body Temperature and Pulse measurement.
 0:04:18
Arduino Tutorial: Temperature Sensors (Thermometer)
 0:06:26
Electronic Basics #15: Temperature Measurement (Part 1) || NTC, PT100, Wheatstone Bridge
 0:03:28
Arduino Tutorial 5# Measure humidity & temperature with arduino / DHT22
 0:15:15
Arduino Coolant Sensor | Thermistor
 0:10:24
Arduino for Beginners 23 Measuring temperature & humidity with your Arduino
 0:04:11
DHT11 temperature and humidity sensor with Arduino [code explained] | Arduino tutorial 15
 0:00:13
temperature and humidity measuring device with Arduino and dht11 sensor. #sensors #arduino #lcd
 0:07:11
3 Great Arduino Temperature Sensors // LM34, DS18B20, and DS3231 Real Time Clock
 0:16:34
5 temperature sensors for arduino projects
 0:07:37
DHT11 Tutorial - Humidity & Temperature Measurement with Arduino
 0:13:40
Measuring Temperatures with Arduino and STM32
 0:20:49
Measuring supply-voltage & temperature with ATMega or Arduino
 0:02:58
Temperature Measuring Using Thermal Diode - Arduino Project
 0:07:31
Temperature Measurement and Display on LCD Using LM35 Sensor and Arduino
 0:13:14
Arduino Tutorial For Beginners | Arduino Temperature Sensor With LED Project
Комментарии