filmov
tv
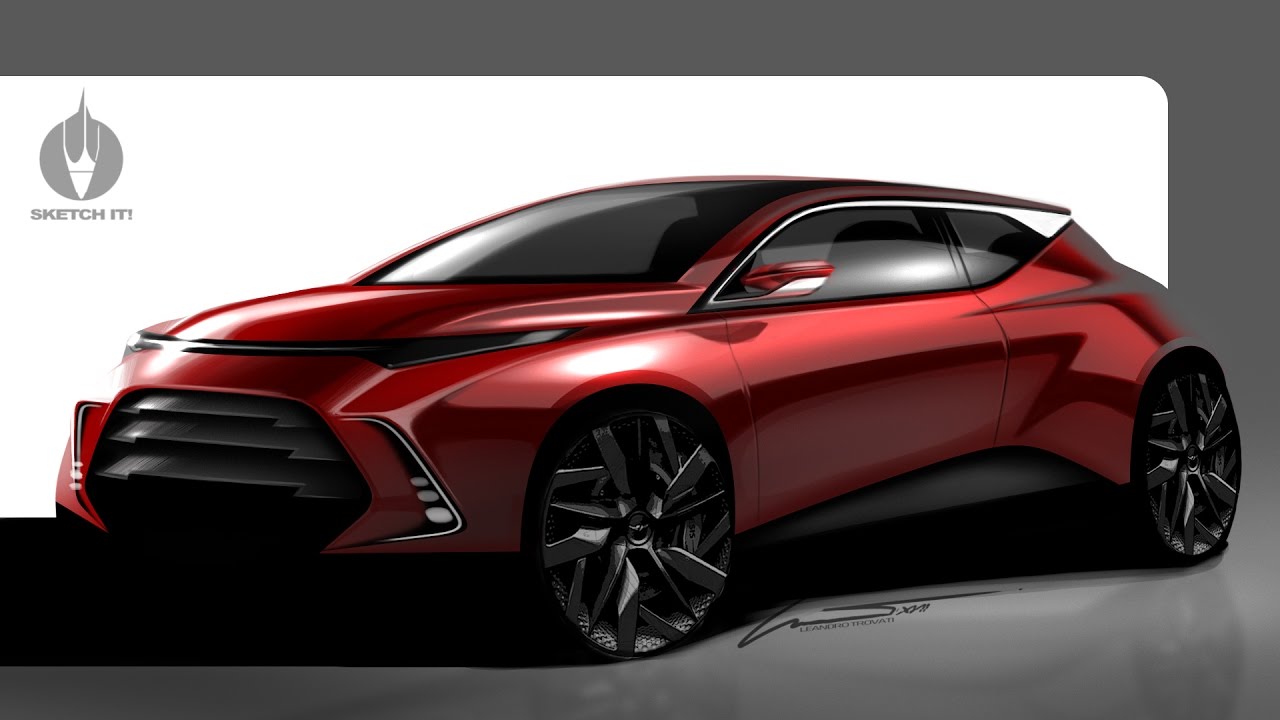
SKETCH-IT! #17 • Automotive rendering
Показать описание
INFO ABOUT COURSES AND TUTORIALS
INSTAGRAM
Featured Hardware & Software :
• MacBookPro 15” Retina Display
• Wacom Cintiq13HD
• Adobe Photoshop ®
••••••••
• Track Info:
Creative Commons — Attribution 3.0 Unported— CC BY 3.0
Featured Hardware & Software :
• MacBookPro 15” Retina Display
• Wacom Cintiq13HD
• Adobe Photoshop ®
••••••••
• Track Info:
Creative Commons — Attribution 3.0 Unported— CC BY 3.0
 0:10:20
SKETCH-IT! #17 • Automotive rendering
 0:00:16
Car sketch rendering tutorial
 0:10:29
Car Design Sketch & Render by Swaroop Roy
 0:00:15
Automotive Sketch. Rendering process
 0:08:16
Car Sketch# Rendering Photoshop 2D - 01
 0:00:19
【How to】car sketch rendering 【Tutorial】
 0:00:50
Car sketch and rendering 20221229
 0:09:32
How To Render/Sketch Cars In Photoshop (Commentary)
 1:14:40
GRAP1024(17) Mercedes Car Rendering Demo
 0:26:57
Car Sketch Render Tutorial.
 0:05:21
Renault Car Design Photoshop Rendering Tutorial
 0:05:30
Car Sketch Rendering (Photoshop + Sketchbook Pro)
 0:07:02
Car Sketch# Rendering Photoshop 2D - 02
 0:09:41
Car rendering Photoshop #11 - LudeDesign
 0:03:38
Interior Sketch | Car Design Photoshop render Demo #9
 0:06:27
Car Design 101- Vehicle Rendering Basics
 0:10:12
JUST SKETCHING!!#4 Car Sketching & Automotive Rendering in Photoshop
 0:17:14
Car Design Tutorial: Photoshop Render Side View for CAD
 0:00:19
sketch of the day | how to render a car in😱🔥🥰 Photoshop #sketch #viral #trending
 0:20:19
Design, Sketch, Render: 1.1 - Side View Microcar by Bruce Thomson
 0:00:21
CAN'T BELEIVE ON THIS DRAWING😳😳😳|| WAIT FOR END💀|| SUBSCRIBE🫶🏻|| TROLL HUNTER💀||#trending #vira...
 0:01:17
Car Design Tutorial: Linedrawing and Multi Colour Rendering - Timelapse
 0:00:16
2023 Renault Austral 7 Seater - Is this the new Renault Escape? | #SRKdesigns #Shorts #Renault
 0:00:59
221228 sketch to rendering
Комментарии