Arduino Five Sensor PID Line Following Robot

preview_player
Показать описание
PLEASE READ THE VIDEO DESCRIPTION.
WEBSITE URL HAS BEEN TAKEN DOWN. ARDUINO SKETCH POSTED IN MY COMMENT.

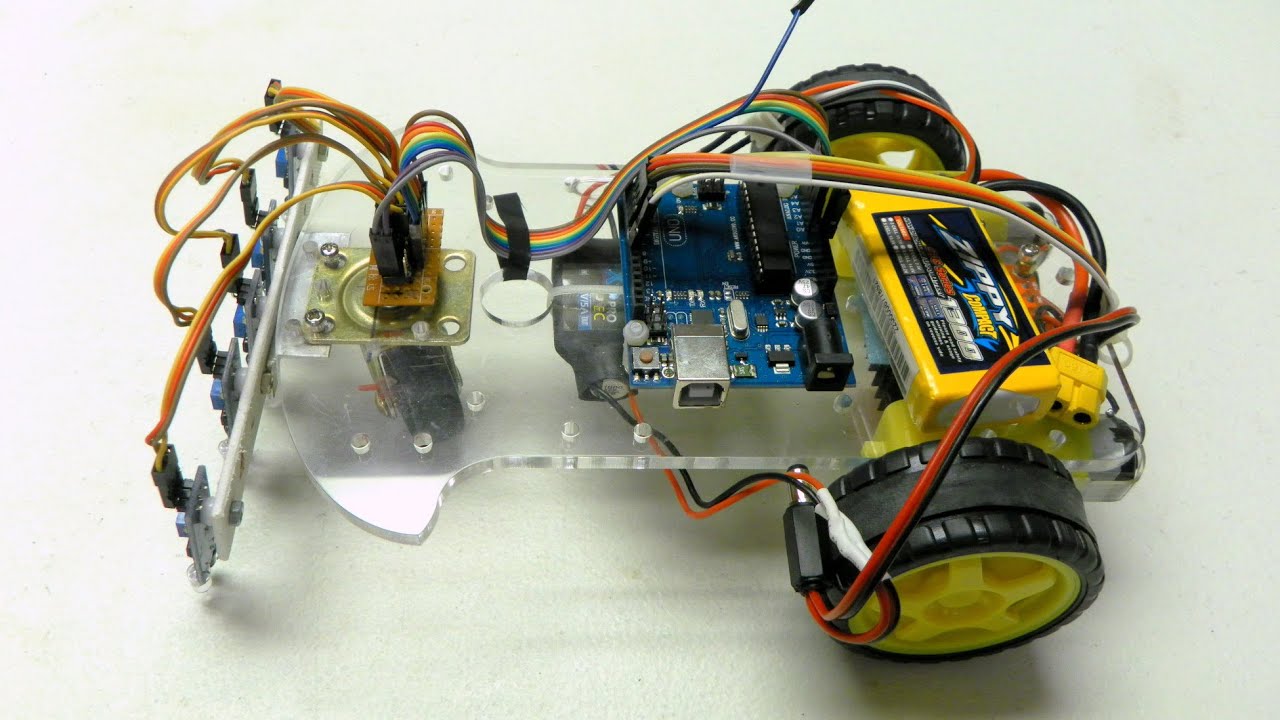
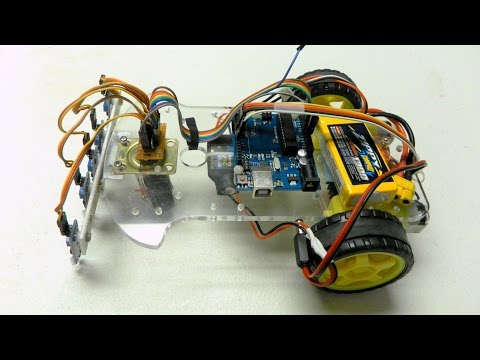
Built the third version of a line following robot using five sensors and PID based code. This is the best line following robot so far as it a) travels the fastests and b) tracks the best even if the sensors go beyond the black line.
Рекомендации по теме
Комментарии
Автор

Great ! Thanks !!!
And I appreciate your patient replies, please continue !!!
ALL THE BEST

SidK
Автор

With 5 sensors you have nice smooth turning, not like with only 2 sensors. Some people are cheap!

Berghiker
Автор

i found the code 😁


float Kp=0, Ki=0, Kd=0;
float error=0, P=0, I=0, D=0, PID_value=0;
float previous_error=0, previous_I=0;
int sensor[5]={0, 0, 0, 0, 0};
int initial_motor_speed=100;

void read_sensor_values(void);
void calculate_pid(void);
void motor_control(void);

void setup()
{
pinMode(9, OUTPUT); //PWM Pin 1
pinMode(10, OUTPUT); //PWM Pin 2
pinMode(4, OUTPUT); //Left Motor Pin 1
pinMode(5, OUTPUT); //Left Motor Pin 2
pinMode(6, OUTPUT); //Right Motor Pin 1
pinMode(7, OUTPUT); //Right Motor Pin 2
Serial.begin(9600); //Enable Serial Communications
}

void loop()
{
read_sensor_values();
calculate_pid();
motor_control();
}

void read_sensor_values()
{
sensor[0]=digitalRead(A0);
sensor[1]=digitalRead(A1);
sensor[2]=digitalRead(A2);
sensor[3]=digitalRead(A3);
sensor[4]=digitalRead(A4);


error=4;
else
error=3;
else
error=2;
else
error=1;
else
error=0;
else
error=-1;
else
error=-2;
else
error=-3;
else
error=-4;
else
if(error==-4) error=-5;
else error=5;

}

void calculate_pid()
{
P = error;
I = I + previous_I;
D = error-previous_error;

PID_value = (Kp*P) + (Ki*I) + (Kd*D);

previous_I=I;
previous_error=error;
}

void motor_control()
{
// Calculating the effective motor speed:
int left_motor_speed =
int right_motor_speed =

// The motor speed should not exceed the max PWM value
constrain(left_motor_speed, 0, 255);
constrain(right_motor_speed, 0, 255);

analogWrite(9, initial_motor_speed-PID_value); //Left Motor Speed
analogWrite(10, initial_motor_speed+PID_value); //Right Motor Speed
//following lines of code are to make the bot move forward
/*The pin numbers and high, low values might be different
depending on your connections */
digitalWrite(4, HIGH);
digitalWrite(5, LOW);
digitalWrite(6, LOW);
digitalWrite(7, HIGH);
}

maximoff
Автор

With 5 sensors you have nice smooth turning, not like with only 2 sensors. Some people are cheap!!

Berghiker
Автор

This is his code. note that constrain is not the correct for constrain(). check arduino references
float Kp=0, Ki=0, Kd=0;
float error=0, P=0, I=0, D=0, PID_value=0;
float previous_error=0, previous_I=0;
int sensor[5]={0, 0, 0, 0, 0};
int initial_motor_speed=100;

void read_sensor_values(void);
void calculate_pid(void);
void motor_control(void);

void setup()
{
pinMode(9, OUTPUT); //PWM Pin 1
pinMode(10, OUTPUT); //PWM Pin 2
pinMode(4, OUTPUT); //Left Motor Pin 1
pinMode(5, OUTPUT); //Left Motor Pin 2
pinMode(6, OUTPUT); //Right Motor Pin 1
pinMode(7, OUTPUT); //Right Motor Pin 2
Serial.begin(9600); //Enable Serial Communications
}

void loop()
{
read_sensor_values();
calculate_pid();
motor_control();
}

void read_sensor_values()
{
sensor[0]=digitalRead(A0);
sensor[1]=digitalRead(A1);
sensor[2]=digitalRead(A2);
sensor[3]=digitalRead(A3);
sensor[4]=digitalRead(A4);


error=4;
else
error=3;
else
error=2;
else
error=1;
else
error=0;
else
error=-1;
else
error=-2;
else
error=-3;
else
error=-4;
else
if(error==-4) error=-5;
else error=5;

}

void calculate_pid()
{
P = error;
I = I + previous_I;
D = error-previous_error;

PID_value = (Kp*P) + (Ki*I) + (Kd*D);

previous_I=I;
previous_error=error;
}

void motor_control()
{
// Calculating the effective motor speed:
int left_motor_speed =
int right_motor_speed =

// The motor speed should not exceed the max PWM value
constrain(left_motor_speed, 0, 255);
constrain(right_motor_speed, 0, 255);

analogWrite(9, initial_motor_speed-PID_value); //Left Motor Speed
analogWrite(10, initial_motor_speed+PID_value); //Right Motor Speed
//following lines of code are to make the bot move forward
/*The pin numbers and high, low values might be different
depending on your connections */
digitalWrite(4, HIGH);
digitalWrite(5, LOW);
digitalWrite(6, LOW);
digitalWrite(7, HIGH);
}

Zypher_desu
Автор

The code is awesome! Is everything I was searching for.

crisiberny
Автор

Very good!!! Thank you for help.
I am from Brasil.
=)

CidaLunacorteecostura
Автор

With 5 sensors you have nice smooth turning, not like with only 2 sensors. Some epeople are cheap!!

Berghiker
Автор

in your code I remains zero
you have written I =I+prev_I and both are initialised to zero

yuvrajprabhakar
Автор

Can I make a line follower without geared motors? Please answer.

simontilstedhansen
Автор

very nice, informative and soothing music makes it easy to watch :-)

pkalia
Автор

great job sir but i have a question please
what are the values that you have used for Kp Kd and Ki ?
what's the maximum of each one ?

nethirkh
Автор

wat to do if we want to make dis robo move at a faster speed??....coz it works pretty ...how to change d constants???like varying d constants w.r.t speed??

abhinavsawant
Автор

I use l298n, can you tell me how much power use the 2 dc motors work normally? please ...

uchuytran
Автор

Your PID line follower robot code was not there in your website 🤷🏻‍♂️

viswanath
Автор

You're the man bro !! Thanks a lot

SykikXO
Автор

Friend excuse my ignorance because when I leave the pure pile of 9 VOLT. the square the cart pulls different k when I have it connected to my computer

pedrocuellar
Автор

Hi very nice project, could I please know the connections of motor driver's 'power' section? Waiting for your answer.

bloonstd
Автор

How do you use a motor speed (.... rpm.) In the video running full speed 255 (PWM)?

yotsakorntanheng
Автор

Where did you get that yellow geared motor on the wheels?

AndrewCubacub