filmov
tv
ADC blocks and REGISTERS | Internal Reference | Internal Temperature Sensor Arduino101

Показать описание
🔥Another class for the Arduino 101 series. This time we take a look at the ADC. Registers we need to control, how to make a read, the internal referecne and the temperature sensor we have onboard.
🔀LINKS
-------------------------------------
🤝SUPPORT
-------------------------------------
00:00 Intro
01:48 ADC blocks
03:54 Select the INPUT
04:44 Voltage Reference
08:17 Conversion
09:33 Why Use Internal Reference
12:14 Internal Temperature Sensor
13:17 The Prescalar
18:20 Thank you
Like share and subscribe to motivate me. Thank you
#Arduino101
#tutorial
#ADC
 0:14:41
ADC blocks and REGISTERS | Internal Reference | Internal Temperature Sensor Arduino101
 0:08:55
Successive Approximation ADC Explained
 0:10:13
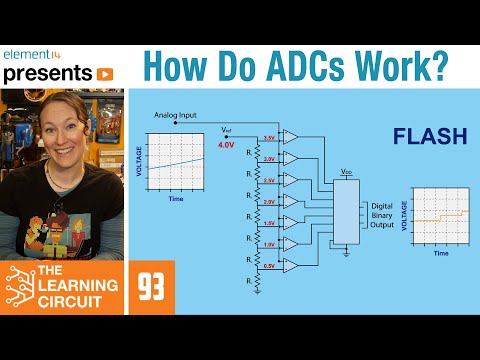
How Do ADCs Work? - The Learning Circuit
 0:14:37
Analog-to-Digital Converters (ADC) - Flash ADC and Successive Approximation Register ADC
 0:23:04
Comparators: The Building Blocks of Analog to Digital Converters (ADC)
 0:14:42
ADC (Analog to Digital Converter) in AVR Microcontroller: Complete Guide
 0:26:01
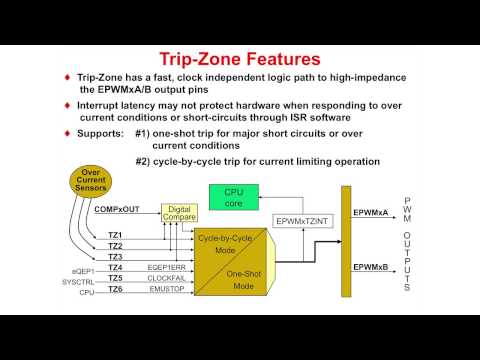
C2000 One-Day Workshop Module 06: Control Peripherals
 0:24:38
AVR Bare Metal Programming - Episode 10: ADC (Part 1)
 0:12:19
Successive Approximation Register ADC
 0:10:09
Assembly via Arduino - ADS1115 16 bit ADC
 0:18:11
#5. STM32F4 ADC using Registers || Multi Channel Polling
 0:10:58
ADC Register Configuration in Arduino | Register Level Programming in Arduino | T - 31
 0:10:09
ADC IN PIC 18F
 0:09:57
LPC2148 ADC REGISTERS
 0:24:16
Part 1 | TMS320F28379D ADC Tutorial | Understanding the Analog-to-Digital Converter (Features)
 0:48:59
#26 - ADC on PIC32 for helicopter lab [F21]
 0:06:33
Registers of ADC
 0:08:59
Flag Register of 8051 Microcontroller Explained: Status Register and PSW Register | 8051
 0:12:11
Arduino Tutorial: Register Programming | Analog to Digital Conversion | Multiple Channels
 0:17:57
ADC (Analog to Digital Converter) working with Atmega328P in Arduino
 1:20:16
PIC (PIC18F4550) ADC, Microprocessor based Systems Lec 14/28
 0:23:08
How to setup the ADC on PIC24HJ128GP502 PART #1
 0:29:05
Analog to Digital Converter (ADC) 🔴 ATmega328P Programming #8 AVR microcontroller with Atmel Studio...
 0:30:02
STM32 Guide #2: Registers + HAL (Blink example)
Комментарии