filmov
tv
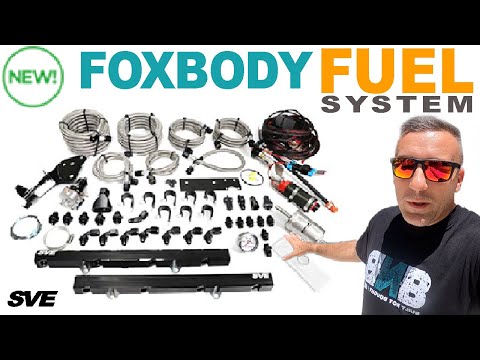
SVE Fuel System Underbody Install For Fox Body Mustangs

Показать описание
In this video, LMR covers the steps needed to install the underbody portion of our two different SVE Fuel System Kits for Fox Body Mustangs. With this install, we would recommend above-average mechanical ability, a good selection of tools, and an extra set of hands.
LMR carries two SVE Fuel System Kits that are applicable to either Coyote Swap or Pushrod 5.0 & 5.8 Fox Body applications. Forget the daunting task of individually sourcing fuel system components to piece together a fuel system for your high-performance Pushrod or Coyote Swap project. This simple yet effective fuel system from industry leader SVE will eliminate all guesswork when you need to increase the amount of fuel your specific engine application craves.
______________________________________________________
______________________________________________________
0:00 | Intro
0:53 | Getting Started
1:00 | Ensure Fuel Tank, Hoses, & Fittings Are Free Of Foreign Material & Debris
1:12 | Remove Protected Cap From The Bottom Of The Fuel Pump & Install Fuel Sock
1:24 | Place Seal Into Fuel Tank Groove
1:31 | Insert Pump Assy Into The Tank
1:41 | Install Black Corrugated Hose
2:07 | Install Lock Ring & Tap In Place
2:22 | Remove Protective Fuel Pump Assy Caps
2:28 | Lubricate O-Rings On Fittings & Install Into Outlet & Return Ports
3:03 | Install 90 Degree Fittings
3:14 | Lift Vehicle & Disconnect Battery
3:24 | Depress Stem From Schrader Valve To Relieve Fuel Pressure
3:35 | Remove Both 8mm or 5/16" Screws Securing The Filter Bracket
3:43 | Remove Fuel Filter & Bracket
3:49 | Remove Passenger Front Wheel & Splash Shield
3:57 | Separate Supply Hose From Hard Line
4:06 | Separate Return Hose From Hard Line
4:11 | Remove Screws, Rivets, Push Pins, Metal Clamps
4:58 | Remove Factory Hard Lines
5:10 | Assemble Provided Filter & Filter Bracket
6:00 | Install Filter Assembly
6:10 | Place Fuel Tank Shield & Fuel Tank On Trans Or Floor Jacks
6:17 | Connect Fuel Tank Sending Unit & Install 36" Hose On Outlet Fitting
6:25 | Install 192" Return Hose On The Return Fitting
6:32 | Place A Piece Of Tape On One Of The Hoses To Differentiate
6:51 | Position Fuel Tank Into Place To Test & Lower Back Down
7:01 | Clock Fittings & Tighten
7:15 | Position Fuel Tank Into Place & Install
8:05 | Route Supply & Return Hoses
8:13 | Thread Short Supply Hose To Fuel Filter
8:19 | Feed 144" Hose & Return Over The Axle & Install
8:38 | Secure Hoses To Factory Attaching Points
9:13 | Install Engine Bay Portion Of Fuel System Then Will Dial In The Hoses Underneath
9:40 | Tighten Hoses & Fittings On Fuel Filter
9:48 | Final Thoughts
______________________________________________________
#LMR #foxbody #fuelsystem
______________________________________________________
 0:10:28
SVE Fuel System Underbody Install For Fox Body Mustangs
 0:20:05
FEEDING THE FOX! / SVE High Performance Fuel System Install
 0:23:22
fox body lmr sve fuel system install
 0:04:10
SVE Fuel System For Coyote Swapped Fox Body Mustangs | Complete Overview
 0:04:14
SVE Fuel System For Pushrod Fox Body Mustangs | Complete Overview
 0:05:40
SVE Fuel System Engine Bay Install For Coyote Swap Fox Body Mustangs
 0:13:24
SVE Fuel System Engine Bay Install For Pushrod Fox Body Mustangs
 0:10:45
Foxbody On3 Fuel System Install - Yes it's big...
 0:10:00
The POOP COUPE Gets A Legit Fuel System!
 0:03:15
AFM Fox Body Level 1 Fuel System Overview
 0:08:10
SVE High Performance FOX BODY Fuel System!! OVERVIEW
 0:25:31
Coyote Swap Fuel System Install: The Ultimate Breakdown!
 0:00:09
Holley fuel pump in a fox body mustang gas tank
 0:14:14
Fox Body Fuel System Install Part 1
 0:10:39
Fox Body Fuel System Install Part 2
 0:15:43
How To Build Your Own Budget AN Fuel System
 0:00:23
Fuel pump replacement on classic 1990 Ford Mustang . #modified #reliableperformance #tech
 0:00:32
Fox body fuel line from tank to the carb part 1
 0:00:44
Upgrade your 1981 to 1986 Fox Body Mustang's Fuel System With Scott Drake's Replacement Fu...
 0:01:26
Sump fuel system conversion
 0:01:51
MAIL-IN REBATE: 18638 Foxbody Hanger
 0:03:57
Foxbody Fuel Pump Bracket Upgrade - Pro-m
 0:18:51
LMR Fuel Tank Kit overview & install PT1
 0:11:50
Running AN Fuel Lines in my Coyote Swapped Foxbody Mustang
Комментарии