filmov
tv
How to enable Recent Folders in Windows 11 including the Save As and File Open dialog boxes!
Показать описание
Instructions for enabling Recent Folders functionality in Windows 11
The 3 lines of text I refer to in the video that you need to copy and paste when instructed are:
shell:::{22877a6d-37a1-461a-91b0-dbda5aaebc99}
HKEY_CLASSES_ROOT\CLSID\{22877a6d-37a1-461a-91b0-dbda5aaebc99}\ShellFolder
HKEY_CLASSES_ROOT\Wow6432Node\CLSID\{22877a6d-37a1-461a-91b0-dbda5aaebc99}\ShellFolder
Detailed Steps:
1) Open "File Explorer" on the bottom Start Bar. Click the dots ... , then Options, then View tab, then scroll down and tick "Show All Folders". Click OK
2) Right-click the Windows Start icon, then click Run, then paste the following line then click OK:
shell:::{22877a6d-37a1-461a-91b0-dbda5aaebc99}
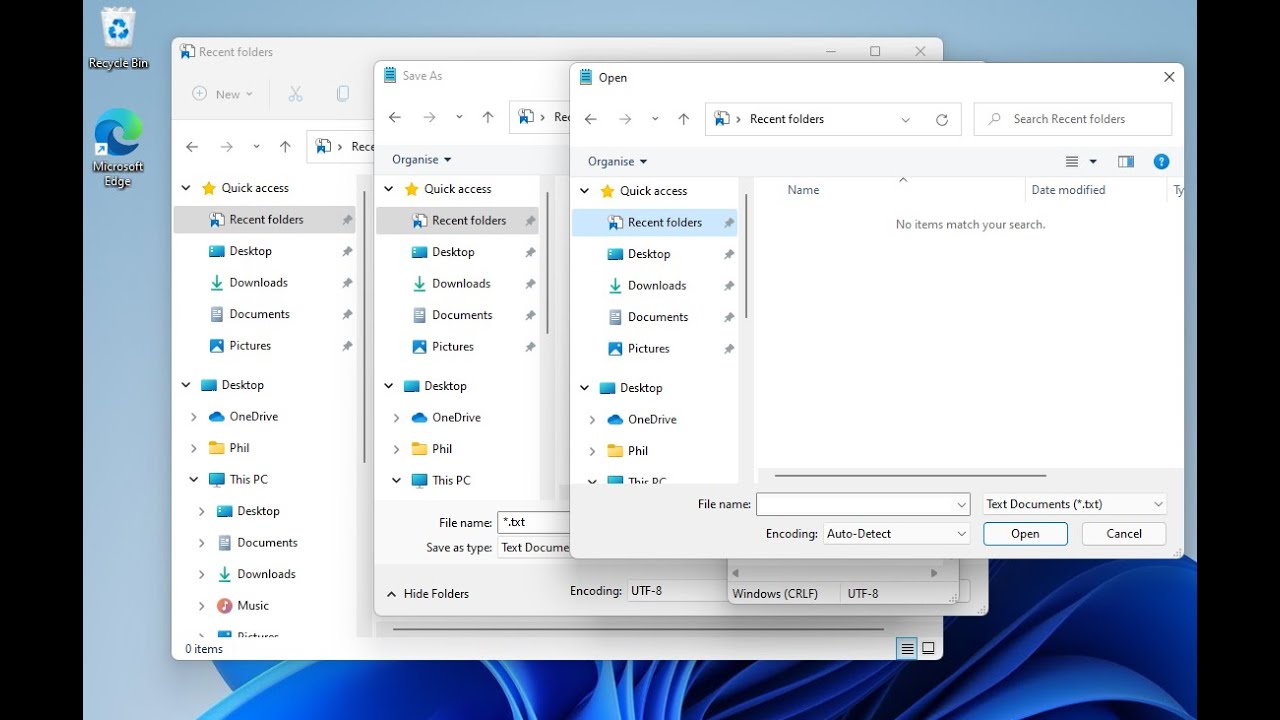
3) Recent Folders will appear in File Explorer (at the bottom left). Right Click the Recent Folders and select "Pin To Quick Access"
4) Relocate the Recent Folders under Quick Access to the top or elsewhere in the list to suit your preference. (2023 Update: Windows 11 has since been updated to 2H22. One change is that Quick Access has been renamed to be Home, which doesn't allow reordering its subfolders easily. There is a way to still reorder which involves temporarily turning off "Show all folders" to do the folder reorder and then re-enable "Show all folders". But if in doubt just skip this whole step).
6) At the top of the Registry Editor just below File menu is a white bar that shows your currently selected registry folder. It currently says Computer. Overwrite that with the following line by copying and pasting it and then press Enter:
HKEY_CLASSES_ROOT\CLSID\{22877a6d-37a1-461a-91b0-dbda5aaebc99}\ShellFolder
7) Right-click ShellFolder and select Permissions
8) Click Advanced
9) At the top, click Change
10) Type in ADMINISTRATORS and then click Check Names
11) Click Ok and then Ok
12) Within the "Group or user names:" section, select Administrators so that it is highlighted blue
13) Tick the box corresponding to Allow Full Control
14) Click Ok to close the Permissions box
15) On the right side of the Registry Editor, now double-click "Attributes"
16) Replace the existing Hexadecimal number of 20040000 with 30040000 and then press Ok
17) Replace the current top white bar registry folder location (like you did in step 6) by copying the following line and pasting over it, and then press Enter:
HKEY_CLASSES_ROOT\Wow6432Node\CLSID\{22877a6d-37a1-461a-91b0-dbda5aaebc99}\ShellFolder
18) Now repeat steps 7 to 16 but with this second registry key.
19) Close the Registry Editor
That's it. Now Recent Folders appears in Windows 11 both in File Explorer and within all dialog boxes of software allowing you to Open and Save As in the "Recent Folders".
Note, that these steps may need to be repeated from scratch when Microsoft release their annual major version update to Windows 11 (like they do with Windows 10), which seem to reset many Windows registry settings back to their defaults.
The 3 lines of text I refer to in the video that you need to copy and paste when instructed are:
shell:::{22877a6d-37a1-461a-91b0-dbda5aaebc99}
HKEY_CLASSES_ROOT\CLSID\{22877a6d-37a1-461a-91b0-dbda5aaebc99}\ShellFolder
HKEY_CLASSES_ROOT\Wow6432Node\CLSID\{22877a6d-37a1-461a-91b0-dbda5aaebc99}\ShellFolder
Detailed Steps:
1) Open "File Explorer" on the bottom Start Bar. Click the dots ... , then Options, then View tab, then scroll down and tick "Show All Folders". Click OK
2) Right-click the Windows Start icon, then click Run, then paste the following line then click OK:
shell:::{22877a6d-37a1-461a-91b0-dbda5aaebc99}
3) Recent Folders will appear in File Explorer (at the bottom left). Right Click the Recent Folders and select "Pin To Quick Access"
4) Relocate the Recent Folders under Quick Access to the top or elsewhere in the list to suit your preference. (2023 Update: Windows 11 has since been updated to 2H22. One change is that Quick Access has been renamed to be Home, which doesn't allow reordering its subfolders easily. There is a way to still reorder which involves temporarily turning off "Show all folders" to do the folder reorder and then re-enable "Show all folders". But if in doubt just skip this whole step).
6) At the top of the Registry Editor just below File menu is a white bar that shows your currently selected registry folder. It currently says Computer. Overwrite that with the following line by copying and pasting it and then press Enter:
HKEY_CLASSES_ROOT\CLSID\{22877a6d-37a1-461a-91b0-dbda5aaebc99}\ShellFolder
7) Right-click ShellFolder and select Permissions
8) Click Advanced
9) At the top, click Change
10) Type in ADMINISTRATORS and then click Check Names
11) Click Ok and then Ok
12) Within the "Group or user names:" section, select Administrators so that it is highlighted blue
13) Tick the box corresponding to Allow Full Control
14) Click Ok to close the Permissions box
15) On the right side of the Registry Editor, now double-click "Attributes"
16) Replace the existing Hexadecimal number of 20040000 with 30040000 and then press Ok
17) Replace the current top white bar registry folder location (like you did in step 6) by copying the following line and pasting over it, and then press Enter:
HKEY_CLASSES_ROOT\Wow6432Node\CLSID\{22877a6d-37a1-461a-91b0-dbda5aaebc99}\ShellFolder
18) Now repeat steps 7 to 16 but with this second registry key.
19) Close the Registry Editor
That's it. Now Recent Folders appears in Windows 11 both in File Explorer and within all dialog boxes of software allowing you to Open and Save As in the "Recent Folders".
Note, that these steps may need to be repeated from scratch when Microsoft release their annual major version update to Windows 11 (like they do with Windows 10), which seem to reset many Windows registry settings back to their defaults.
 0:05:23
How to enable Recent Folders in Windows 11 including the Save As and File Open dialog boxes!
 0:04:59
How to Enable Recent Folders Including the Save As and File Open Dialog Boxes In Windows 11
 0:00:54
Quick Access not Showing Recent Files & Frequent Folders in File Explorer Windows 10 & 11 ...
 0:00:53
How to view recent files and folders in Windows 10
 0:05:30
How to Enable Recent Folders In Quick Access Including the Save As and File Open Dialog Box
 0:05:44
How to enable Recent Folders/Places in Windows 10 Save As dialog boxes!
 0:04:26
How to Enable Recent Folders In Windows 11/10 Save As and Save Dialog Boxes!!
 0:03:51
How To Hide Frequent Folders And Recent Files In Quick Access On Windows 10
 0:42:14
How to Use Google Docs Mobile App on iPhone - Full Guide
 0:01:32
How to Create a Recent Folders Shortcut in Windows 10 (Tutorial)
 0:01:06
How to add recent folders in quick access of windows 10 - Windows customization
 0:04:02
How to hide recent files, folders in Windows 11 File Explorer - 3 Methods
 0:02:14
Quick Access In Windows 10/11: Clearing Recent Files And Folders Made Easy! How to Clear Your File
 0:01:16
How to exclude files and folders from Recent files on Windows 10
 0:00:33
Use Recent places option in MS Windows
 0:01:16
Fix Recent Folders Not Showing on Quick Access In Windows 11/10
 0:01:00
Windows 10 remove recent folders and files list in the file explorer
 0:01:17
How To Pin Recent Folders to Quick Access in Windows 10
 0:05:16
How To Permanently Hide Recent Files & Unpinned Folders Lists In Microsoft Word, PowerPoint, &am...
 0:00:55
How to stop Quick Access from Displaying Recent Files and Folders in Windows 11
 0:04:08
How to disable recent files and frequent folders in windows 11
 0:01:16
How To Turn Off Recent Items & Frequent Places In Windows 10
 0:01:59
Windows 10 Tip Add Frequent Folders Recent Folders Back to Quick Links
 0:01:24
Show/Hide Recent Files and Folders in Quick Access | Windows 10
Комментарии