filmov
tv
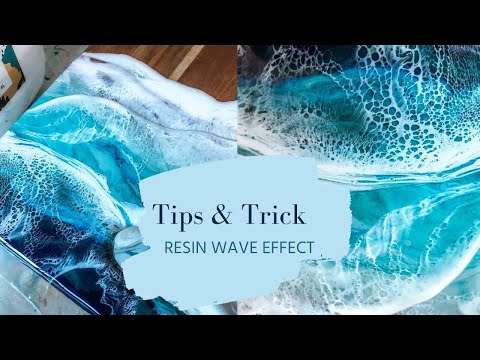
Ocean Resin Tray - tutorial by ResinAsYouWish

Показать описание
This tray is so beautiful and glassy your guests wont know if they can sit anything in it or not! The style being used ends with the tray being completely level on the inside with no bumps or potential for the items to fall over, Additionally when you set anything on it, it gives the impression that it's floating Note: I wait 12 - 24 hours between each layer
I am an Amazon associate, I receive commissions from the qualifying links to amazon listed below:
Colors used:
Combined to make this soft hue of teal:
WHITE (mixture of Castin’ craft with a couple drops of the alcohol ink):
Typical Tools I use:
Heat Guns:
Heat gun tips and nozzles:
Safety Recommended: Carefully read your product labels and warnings, make healthy choices based on your research and craft safely!
Signature pens:
Gelly Roll Pens – Stardust set
My Shop:
Pinterest: To see more of my designs and videos (Check it out)
 0:07:59
Ocean Resin Tray Tutorial (White and Black Rock Beach)
 0:27:17
Ocean Resin Tray - tutorial by ResinAsYouWish
 0:01:00
DIY $600 3D Ocean Tray #shorts #woodworking
 0:08:40
Making an ocean waves tray with resin
 0:05:01
Resin Beach Tray with Mixed Media Girl Artist Resin
 0:14:33
Epoxy Resin Ocean Wave Tutorial #resinwaves #resinocean #howtoresin
 0:07:32
How to Make a Beautiful Resin Beach Tray From a Mold
 0:08:07
Serene Resin Beach Tray Tutorial
 0:08:59
Ocean Collaboration @intoresin Cluster Tray Mold with Sea glass TLP
 0:09:16
How to Achieve Depth in Resin Beach Trays: Resin Art Tutorial for Beginners
 0:12:34
Beach Resin Art Tutorial Uses Sand And Rocks (Voice-over)
 0:06:19
HOW TO MAKE A PINK RESIN TRAY Using A Mold ! PINK SEA WAVES ,STEP BY STEP!
 0:08:13
How To Get The Prefect RESIN WAVES Every Single Time (Tips and Tricks)
 0:10:01
Making Two Beautiful Resin Beach Trays
 0:13:43
How to make an EPOXY OCEAN TABLE / resin art
 0:09:45
DIY Epoxy Resin Ocean Art Serving Tray
 0:12:18
Beach Ocean Waves Resin Tray Tutorial / DIY Summer Decor / How to Resin Waves With Alcohol Inks
 0:09:09
Complete Resin Beach Coaster Tutorial: Resin Art for Beginners
 0:04:40
DON'T Do This | Resin Waves Tutorial (Voice Over)
 0:05:48
How to Make a Beautiful Resin Beach Tray From a Mold
 0:02:56
DIY Handmade Resin Ocean Table | Epoxy Resin Crafts | Resin Art
 0:00:33
Ocean Resin Platter #Short
 0:30:00
#70 Large Resin Tray Inlaid With Shells, Shark Teeth And Starfish!
 0:09:13
OCEAN WAVE TRAY AND COASTER SET! Using resin in silicone molds!
Комментарии