filmov
tv
Arduino Timer Interrupt Example

Показать описание
Don't be afraid to use interrupts in your Arduino sketches. Interrupts enable you to do so much more with your Arduino that it's well worth taking the trouble to learn a few simple rules.
This video demonstrates the use of the timer 1 hardware timer of the Arduino Uno to provide precisely timed processing. Both simple interrupts and reentrant interrupts are covered to show the benefits of allowing your interrupt service routines to interrupt themselves.
Transcript:
The Arduino Uno has 3 hardware timers that you can use to run tasks at precise intervals. If you call an interrupt service routine when the timer triggers you can achieve accurate timing irrespective of what the other code in your sketch or programme is doing.
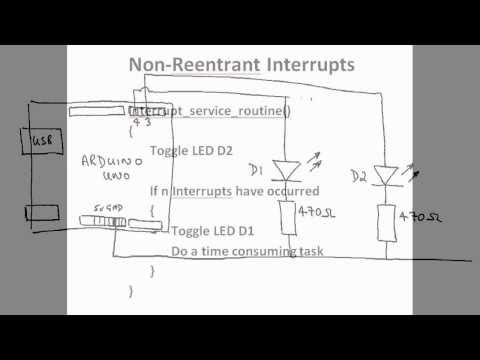
I'm going to demonstrate the use of interrupts by using them to trigger 2 LEDs from within the service routine. LED D2 is toggled on each interrupt and LED D1 is toggled after a number of interrupts are counted.
When D1 is toggled the service routine executes a long task to demonstrate the effect that this has on the behaviour of your circuit.
Here's a pseudo-code version of the sketch I used. As you can see it is very simple and it isn't that different to the real code that I used.
This is what happens when you load and run the sketch on your Arduino. D2 flashes quickly when toggled by the interrupt. D1 flashes slower but notice that D2 pauses each time that D1 changes state. This is because the time consuming task takes longer than the time between the timer interrupts. Interrupts are disabled as soon as you go into an interrupt service routine. SO D2 has to wait.
If you want to schedule tasks to run at precise intervals then this isn't going to work because the long routine holds up the timing. So what if you could enable interrupts while the long routine is running and allow it to be interrupted by the fast interrupt?
Well you can. It's called a reentrant interrupt service routine and it's very easy to code. See the additions to the pseudo-code in red. All you have to do is enable interrupts while it is in the long routine and disable them again afterwards. Provided that the long task is not allowed to interrupt itself then all is well.
This is what happens when you make the interrupt service routine reentrant. Now the fast LED D2 is flashing at regular intervals without any pause. The long routine is no longer holding it up.
There's lots of other stuff on the web site too. Go and have a look.
This video demonstrates the use of the timer 1 hardware timer of the Arduino Uno to provide precisely timed processing. Both simple interrupts and reentrant interrupts are covered to show the benefits of allowing your interrupt service routines to interrupt themselves.
Transcript:
The Arduino Uno has 3 hardware timers that you can use to run tasks at precise intervals. If you call an interrupt service routine when the timer triggers you can achieve accurate timing irrespective of what the other code in your sketch or programme is doing.
I'm going to demonstrate the use of interrupts by using them to trigger 2 LEDs from within the service routine. LED D2 is toggled on each interrupt and LED D1 is toggled after a number of interrupts are counted.
When D1 is toggled the service routine executes a long task to demonstrate the effect that this has on the behaviour of your circuit.
Here's a pseudo-code version of the sketch I used. As you can see it is very simple and it isn't that different to the real code that I used.
This is what happens when you load and run the sketch on your Arduino. D2 flashes quickly when toggled by the interrupt. D1 flashes slower but notice that D2 pauses each time that D1 changes state. This is because the time consuming task takes longer than the time between the timer interrupts. Interrupts are disabled as soon as you go into an interrupt service routine. SO D2 has to wait.
If you want to schedule tasks to run at precise intervals then this isn't going to work because the long routine holds up the timing. So what if you could enable interrupts while the long routine is running and allow it to be interrupted by the fast interrupt?
Well you can. It's called a reentrant interrupt service routine and it's very easy to code. See the additions to the pseudo-code in red. All you have to do is enable interrupts while it is in the long routine and disable them again afterwards. Provided that the long task is not allowed to interrupt itself then all is well.
This is what happens when you make the interrupt service routine reentrant. Now the fast LED D2 is flashing at regular intervals without any pause. The long routine is no longer holding it up.
There's lots of other stuff on the web site too. Go and have a look.
 0:16:13
Timer Interrupt ISR + Examples | Arduino101 | Set Registers & Modes
 0:33:28
How to Use Arduino Interrupts The Easy Way
 0:02:55
Arduino Timer Interrupt Example
 0:19:05
Arduino Timer Interrupts tutorial
 0:17:22
Level Up Your Arduino Code: Timer Interrupts
 0:48:17
Understanding Arduino Interrupts | Hardware, Pin Change & Timer Interrupts
 0:09:19
Electronic Basics #30: Microcontroller (Arduino) Timers
 0:12:42
Timer Interrupts - Arduino Tutorial (German)
 0:00:15
STM32 Timer Interrupts LED toggle example #stm32 #arduino
 0:01:52
Using Timer Interrupt of Arduino Uno
 0:13:48
Arduino für 'Experten' 4: Timer - Interrupts
 0:00:42
Arduino Timer Interrupt
 0:00:57
Arduino VGA Output Using Timer Interrupts
 0:15:31
Arduino Hardware and Timer Interrupts Tutorial
 0:09:03
Arduino for beginners. Part 10: Timer Interrupts
 0:05:17
Timer Interrupts for Non Blocking Code Execution
 0:30:39
#209 Arduino Timer Interrupts - Overflow & Comparator. Easy Peasy.
 0:25:14
LESSON 28: Tutorial for Programming Software Interrupts on Arduino
 0:10:39
Stop Wasting Time, Use AVR Timer Interrupts | Baremetal AVR Programming Tutorial
 0:04:01
Arduino Timer Interrupts Calculator
 0:04:42
Timer Overflow Interrupt in Arduino
 0:03:16
Arduino Sleep and Interrupts - Electronics with Becky Stern | DigiKey
 0:08:13
Usare le Interrupt con Arduino - #59
 0:00:10
Using the timer interrupt in Arduino uno
Комментарии