filmov
tv
How to Mount a TV Using a Tilting Mount

Показать описание
Here’s how to install your SANUS Tilting TV Mount in 3 easy steps.
First, you want to make sure you have everything you’ll need and be sure to follow your installation manual.
Have any questions or need help along the way, our U.S.-based install experts are here to help 7-days a week: 1-800-359-5520.
To install your SANUS mount, you’ll need the following tools:
- Electric drill
- Phillip’s head screwdriver
- Tape measure
- Level
- Pencil
- Drill bit
- Stud finder
- Hammer (concrete installations only)
And here’s everything that will come in your SANUS box:
- Installation manual
- Wall plate template
- Hardware packs
- TV brackets
- Wall plate
Now that we know everything that we’ll need, let’s get to mounting the TV.
Step 1: Attach TV Brackets to Your TV
To get started with the first step, chose bolts that fit your TV. And don’t be overwhelmed, you won’t use all of the hardware that’s included. We just want to be sure you have all the hardware you could possibly need.
If your TV doesn’t have a flat back or you need extra space to accommodate cables, you’ll want to use the included spacers. Put the spacers between your TV and the TV brackets and insert screws using a screw driver.
If your TV has a flat back, you won’t need the spacers. You can attach the TV brackets directly to the back of your TV. Just thread the appropriate length screw through the TV bracket and into your TV. Be sure not to overtighten so you don’t cause damage to your TV. Repeat this step for the remaining TV holes.
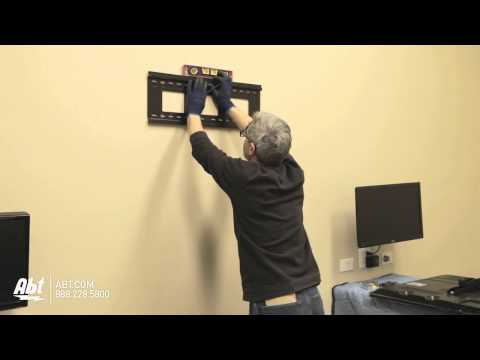
Step 2: Attach Wall Plate to the Wall:
Simply enter the height of where you want your TV on the wall, and HeightFinder will tell you exactly where to drill your holes.
Now that you know how high you want your TV, let’s find your wall studs. Use a stud finder – generally most wall studs are either 16 or 24 inches apart.
Next grab the SANUS wall plate template and make sure the opening on the template overlap with your stud markings.
Now it’s time to drill. Grab your drill and drill four pilot holes through the wall plate template openings into your studs.
Next, grab your wall plate and align openings with where you drilled your pilot holes. Use your lag bolts to attach your wall plate to the wall using a socket wrench or a drill.
Step 3: Attach the TV
Now it’s the moment you’ve been waiting for, it’s time to put the TV on the wall. Depending on the size and weight of your TV, you may need a friend to help.
Lift your TV onto the wall plate. Once your TV is hanging on the mount, lock it into place. Refer to your installation manual for specific details for your mount.
And that’s it, with a SANUS tilting TV mount you tilt your TV without tools to the best picture and eliminate glare. Need to level your TV, no problem. You can easily make adjustments after your TV is on the wall.
All SANUS mounts are safety-tested, UL-certified and come with a warranty.
Questions? Our U.S.-based customer care team is available 7-days a week to help: 1-800-359-5520.
First, you want to make sure you have everything you’ll need and be sure to follow your installation manual.
Have any questions or need help along the way, our U.S.-based install experts are here to help 7-days a week: 1-800-359-5520.
To install your SANUS mount, you’ll need the following tools:
- Electric drill
- Phillip’s head screwdriver
- Tape measure
- Level
- Pencil
- Drill bit
- Stud finder
- Hammer (concrete installations only)
And here’s everything that will come in your SANUS box:
- Installation manual
- Wall plate template
- Hardware packs
- TV brackets
- Wall plate
Now that we know everything that we’ll need, let’s get to mounting the TV.
Step 1: Attach TV Brackets to Your TV
To get started with the first step, chose bolts that fit your TV. And don’t be overwhelmed, you won’t use all of the hardware that’s included. We just want to be sure you have all the hardware you could possibly need.
If your TV doesn’t have a flat back or you need extra space to accommodate cables, you’ll want to use the included spacers. Put the spacers between your TV and the TV brackets and insert screws using a screw driver.
If your TV has a flat back, you won’t need the spacers. You can attach the TV brackets directly to the back of your TV. Just thread the appropriate length screw through the TV bracket and into your TV. Be sure not to overtighten so you don’t cause damage to your TV. Repeat this step for the remaining TV holes.
Step 2: Attach Wall Plate to the Wall:
Simply enter the height of where you want your TV on the wall, and HeightFinder will tell you exactly where to drill your holes.
Now that you know how high you want your TV, let’s find your wall studs. Use a stud finder – generally most wall studs are either 16 or 24 inches apart.
Next grab the SANUS wall plate template and make sure the opening on the template overlap with your stud markings.
Now it’s time to drill. Grab your drill and drill four pilot holes through the wall plate template openings into your studs.
Next, grab your wall plate and align openings with where you drilled your pilot holes. Use your lag bolts to attach your wall plate to the wall using a socket wrench or a drill.
Step 3: Attach the TV
Now it’s the moment you’ve been waiting for, it’s time to put the TV on the wall. Depending on the size and weight of your TV, you may need a friend to help.
Lift your TV onto the wall plate. Once your TV is hanging on the mount, lock it into place. Refer to your installation manual for specific details for your mount.
And that’s it, with a SANUS tilting TV mount you tilt your TV without tools to the best picture and eliminate glare. Need to level your TV, no problem. You can easily make adjustments after your TV is on the wall.
All SANUS mounts are safety-tested, UL-certified and come with a warranty.
Questions? Our U.S.-based customer care team is available 7-days a week to help: 1-800-359-5520.
 0:00:41
TV Wall Mount Basic FIXED (M)
 0:09:25
SECURELY Mount a TV to the Wall in 5 Simple Steps
 0:00:42
How to Wall Mount Your TV Like a Pro 📺
 0:15:55
How to Mount a TV On The Wall (Step-by-Step)
 0:12:21
How to Wall Mount a Tv on ANY TYPE OF WALL - Complete DIY Guide
 0:00:19
Suptek TV Wall Mount MA2720 Swivel Tilt Rotation Full Motion Adjustable for Most 15-27 inch
 0:10:13
How to Properly Mount a TV to a Wall: Step by Step
 0:23:06
Install your TV on the Wall - Learn from a Pro
 0:14:02
3 Mistakes DIYers Make When Mounting a TV
 0:05:15
How To Mount Any Size TV Bracket Into Drywall With Just A Screwdriver!
 0:03:43
Mounting a TV on Your Wall - Tech Tips from Best Buy
 0:07:48
How To Wall Mount a TV (LED & LCD) - Abt Electronics
 0:04:09
How To Wall Mount A TV - DIY At Bunnings
 0:00:48
TV Wall Mounting in 30 sec. Professional TV Installation Toronto GTA.
 0:15:54
The Easiest Way To Mount A TV To A Wall | THE HANDYMAN |
 0:13:43
How to Mount a TV to the Wall: Simple and Safe Steps
 0:03:26
How To Mount TV Bracket on the Wall To Carry 22 - 55 Inches Plasma
 0:00:45
How to install 37'- 70' Tilt Slim TV Wall Mount for LED/LCD TVs |Texonic Model N64|
 0:01:00
How to hang an 86” Tv by yourself 😅 #reels #tvmounting #fyp #goat
 0:04:38
How to Hide Your TV Wires | EASY
 0:00:30
CHARMOUNT Wall Mount TV Installation TV Wall Mount Bracket Mounting A TV
 0:00:47
How To Properly Install TV Wallmount Bracket
 0:04:39
How to mount your Samsung TV with a VESA wall mount | Samsung US
 0:08:59
5 Mistakes People Make When Mounting a TV
Комментарии