filmov
tv
Clockmaking - How To Make A Clock - Part 9 - Etching, Waxing And Silvering A Chapter Ring

Показать описание
How To Make A Clock In The Home Machine Shop, Part 9, by Clickspring.
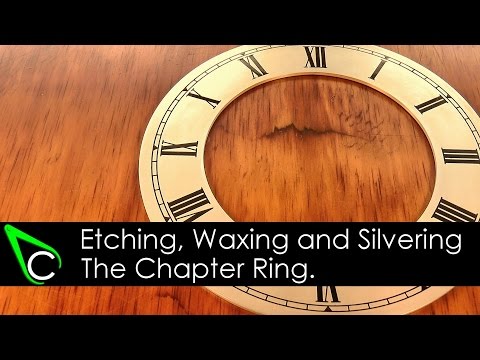
In this episode I use some relatively unusual techniques to make one of the most viewed parts of the clock: The chapter ring.
I show the chemical etching process, using photo resist and ferric chloride, as well as the traditional method of waxing and silvering a clock dial.
Thanks for watching. If you enjoyed the video please give a thumbs up, and leave me a comment.
You can also help me make these videos by purchasing via the following Amazon Affiliate links:
Cameras used in this video:
Tools & Shop Products:
Other Videos to Watch:
How To Make A Clock In The Home Machine Shop - Part 8 - Making The Barrel Arbor
Home Machine Shop Tool Making - Machining A Pinion Head Depthing Tool - Part 1
Ask Me A Question:
Abbreviated Transcript:
00:40 I'll be using photoresist film to mark out the design, and it needs a completely clean alkili free surface to do its thing. So I scrubbed the surface with emery paper and household vinegar and then cleaned it off with acetone. The result was a clean fresh metal surface.
01:01 I'm going to need this later on, so I'm mixing up the developer solution now. It's a mild alkiline solution thats used to dissolve the unexposed photoresist. The photoresist reacts to UV light, so all work from here on must be done under a yellow light.
01:30 And this is the photoresist. It's a thin light sensitive film, slightly sticky to the touch. It has 3 layers: The photosensitive layer is sandwiched between 2 removable coatings.
02:23 Now if all of the preparation has gone well, then the bond will be strong, and the resist will be well attached across the entire surface of the metal. I've made a simple light box to expose the resist, and a sheet of glass sits on top to position the work.
02 The dial artwork has been printed onto a clear film.
03:52 For the most part, the exposed resist forms a nice crisp line, but inevitably there are small printing flaws that need to be removed like these small dots. I scraped these off with the sharp point of the scriber.
04:22 I glued some small plastic risers on the corners to keep the plate above the bottom surface of the etchant bath, and I've also used clear tape to seal off all of the other surfaces. This center punch mark will help me position the work on the lathe, later on.
04:44 So after all of that preparation, it's finally time to do some etching, and the etchant that I'm using is ferric chloride.
05:15 After sitting in the etch solution for about an hour and a half, the surface is nicely etched, and its ready for the next step. A strong alkaline solution is normally specified to remove the resist, but have a look at what a great job acetone does, its hard to beat that. OK so that's the etching process complete.
05:47 The etched surface is quite pitted, but the edges are crisp, and the overall depth is perfect for accepting the shellac wax. What I need to do now is trim off this excess brass, and form the ring shape. Another job for a super glue arbor on the lathe.
06:39 Traditional dial wax is basically a colored shellac, so in its natural state its quite hard and brittle. But it melts to a sort of maple syrup consistency under a gentle heat. While its in that fluid state, it can be worked into all of the lines and numerals.
07:11 And that brings me to the final step that really makes the chapter ring come to life: The silvering.
07:34 The silvering compound was mixed with a small amount of water, to form a thin paste, and then it was applied by hand. And then it was followed in a similar way with the finishing compound. A gentle heat with the torch finishes off the process, by melting the sanded wax surface, and making it shiny again. A single coat of lacquer, and it's done.
References:
Tony Moss's Excellent Sundial Etching Series:
John Wilding "Large Wheel Skeleton Clock" construction book can be purchased online from Ian T Cobb:
How To Make A Clock In The Home Machine Shop, Part 9, by Clickspring.
 0:09:29
Clockmaking - How To Make A Clock In The Home Machine Shop - Part 1 - Making The Clock Frames
 0:19:12
Clockmaking - How To Make A Clock - Part 21 - The Mainspring And Escapement Pallets
 0:08:44
Clockmaking - How To Make A Clock - Part 10 - Machining A Bezel For The Chapter Ring
 0:12:55
Clockmaking - How To Make A Clock - Part 17 - Making The Regulator And Suspension Post
 0:11:59
Clockmaking - How To Make A Clock - Part 12 - Making The Collets And Other Arbors
 0:07:50
Clockmaking - How To Make A Clock In The Home Machine Shop - Part 4 - Cutting The Wheels
 0:15:41
Clockmaking - How To Make A Clock - Part 16 - Making The Motion Work And Hands
 0:09:33
Clockmaking - How To Make A Clock In The Home Machine Shop - Part 7 - Making The Barrel
 0:14:44
Cardboard wall clock making|| Use Six-sense activity in classroom| #craft #activity #classroom
 0:09:37
Clockmaking - How To Make A Clock - Part 11 - Making Polishing And Bluing Bezel Screws
 0:11:18
Clockmaking - How To Make A Clock In The Home Machine Shop - Part 8 - Making The Barrel Arbor
 0:15:18
Clockmaking - How To Make A Clock In The Home Machine Shop - Part 18 - Making The Pendulum
 0:17:00
Clockmaking - How To Make A Clock - Part 20 - The Crutch Assembly And Eccentric Bushing
 0:08:45
Clockmaking - How To Make A Clock - Part 9 - Etching, Waxing And Silvering A Chapter Ring
 0:07:15
Clockmaking - How To Make A Clock In The Home Machine Shop - Part 2 - Machining The Clock Pillars
 0:10:02
Clockmaking - How To Make A Clock In The Home Machine Shop - Part 3 - Making The Washers And Screws
 0:12:41
Clockmaking - How To Make A Clock - Part 22 - Making The Stopwork Mechanism
 0:01:14
Making pinion for clockmaking
 0:10:46
Clockmaking - How To Make A Clock - Part 15 - Fitting The Dial Assembly To The Frames
 0:10:17
Clockmaking - How To Make A Clock In The Home Machine Shop - Part 5 - Cutting The Pinions
 0:12:24
Clockmaking - How To Make A Clock - Part 23 - Making The Key, Polishing And Assembly
 0:14:42
DIY Wall Clock Making// Great Woodworking Ideas
 0:18:26
Clockmaking - How To Make A Clock In The Home Machine Shop - Part 19 - Making The Legs And Base
 0:13:11
Clockmaking - How To Make A Clock - Part 14 - Making The Barrel Click And Clickspring
Комментарии