filmov
tv
[BEGINNER FRIENDLY] How to Animate A Character in Alight Motion (Full Tutorial) | Check Description!
Показать описание
🚩 A MILLION THANKS TO @penguin22penguin22!!!
They helped me finally fix this video so THANK YOU SO MUCH! (I cut out segments of this video accidentally, and some parts went missing.)
Finally!
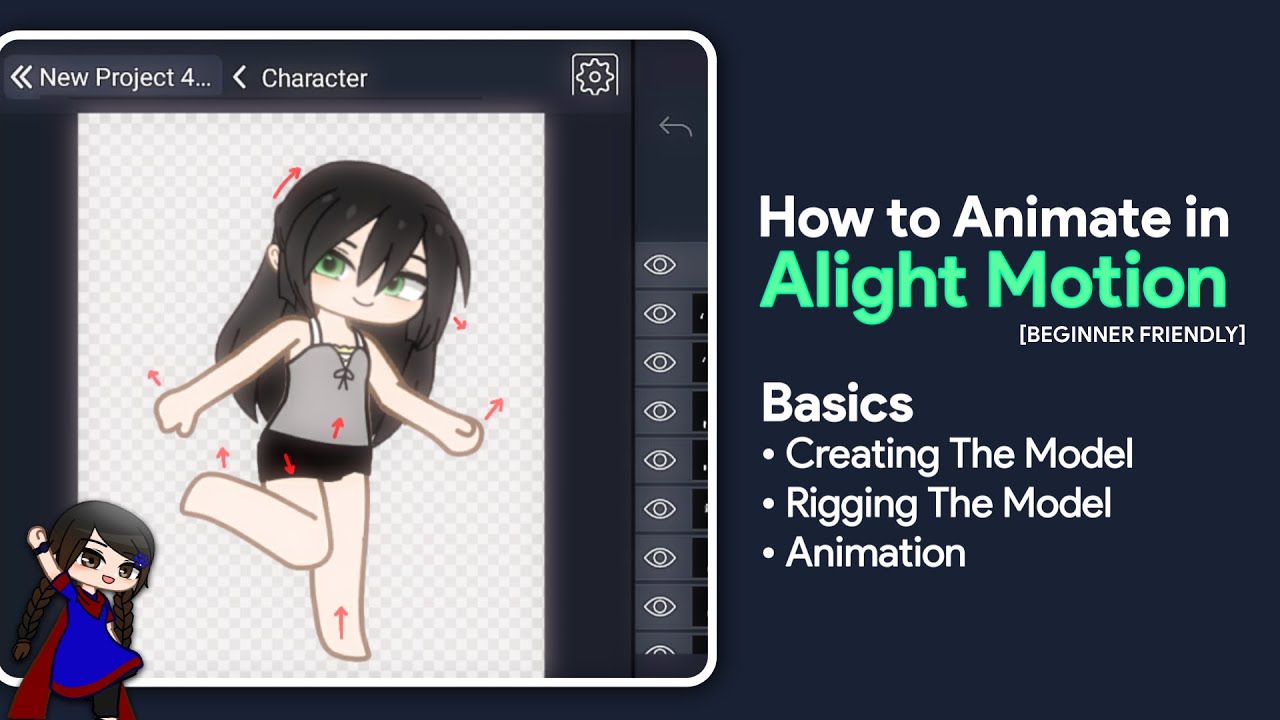
The app name is "Alight Motion", it's in the title 😭
🔷 IMPORTANT INFO:
Yes, there are several ways of doing this.
• For separating a Character, the method I've shown will help you suffer less with 'unproportioned body parts' & will give you higher-quality body parts.
PLEASE, the Body Map way will cause disproportionate & low-quality images. And the IbisPaint part is required for getting rid of the background.
• You can only use either PARENTING or GROUPS
It's not mandatory to use any or both.
(Only use one of them to set up the character) Parenting requires Premium and Grouping is Free.
• If you can't put a layer onto the Folder (In IbisPaint X), then simply just swipe right the layer that is under the folder.
🛑 HAVING A FOLDER ISSUE?
Just skip that part and select the Transform Tool.
Then scroll down and set it to "Canvas."
That part was only added because the Canvas Transform feature was not available at the time.
● Check 07:10 for pivot points.
TAP ON THE LOCATION SYMBOL
AND THEN YOU'LL GET THE PIVOT POINT.
Now just place it using the control pad.
• To separate the Eyes or Hair, use these.
🔷 Gacha Stu-Club is a combination of Gacha Studio and Gacha Club.
🎵 Music: J Bliz - Paralysis
🔷 | Playlists:
You can download this and open it to get the Separated Character that you've seen in this video. (IPV only works with IbisPaint X)
🔷┃Honorable Mentions & their links:
🔷┃Timestamps:
00:00 | Intro
00:07 | STEPS
00:20 | STEP 1: Separating The Body Parts
00:25 | Screenshoting The Body Parts
02:00 | 3 ways to create a Canvas
02:43 | Importing All The Body Parts
03:43 | Erasing The Background And Saving it
04:53 | Process
04:33 | Lasso
04:51 | Layer Order & Renaming
05:16 | IMPORTANT NOTES AND SOLUTIONS
05:45 | STEP 2: Setting Up a Character
05:47 | Importing & Naming Up The Body Parts
07:10 | Pivot Points
09:26 | Parenting
11:15 | Group
12:30 | Face & Hair
14:55 | STEP 3: Animating The Character
15:05 | Basic
15:40 | KEYFRAME
18:18 | EYES
23:09 | HAIR
16:18 | EXPORT | Saving The Animation
26:39 | Outro
🔷┃Social Medias:
Written.
Keywords & Tags:
#alightmotion #am #howto #animateinalightmotion #animateinam
How to Animate in Alight Motion
Gacha Alight Motion Tutorial
How to separate the body parts
How to set up a Character in Alight Motion
They helped me finally fix this video so THANK YOU SO MUCH! (I cut out segments of this video accidentally, and some parts went missing.)
Finally!
The app name is "Alight Motion", it's in the title 😭
🔷 IMPORTANT INFO:
Yes, there are several ways of doing this.
• For separating a Character, the method I've shown will help you suffer less with 'unproportioned body parts' & will give you higher-quality body parts.
PLEASE, the Body Map way will cause disproportionate & low-quality images. And the IbisPaint part is required for getting rid of the background.
• You can only use either PARENTING or GROUPS
It's not mandatory to use any or both.
(Only use one of them to set up the character) Parenting requires Premium and Grouping is Free.
• If you can't put a layer onto the Folder (In IbisPaint X), then simply just swipe right the layer that is under the folder.
🛑 HAVING A FOLDER ISSUE?
Just skip that part and select the Transform Tool.
Then scroll down and set it to "Canvas."
That part was only added because the Canvas Transform feature was not available at the time.
● Check 07:10 for pivot points.
TAP ON THE LOCATION SYMBOL
AND THEN YOU'LL GET THE PIVOT POINT.
Now just place it using the control pad.
• To separate the Eyes or Hair, use these.
🔷 Gacha Stu-Club is a combination of Gacha Studio and Gacha Club.
🎵 Music: J Bliz - Paralysis
🔷 | Playlists:
You can download this and open it to get the Separated Character that you've seen in this video. (IPV only works with IbisPaint X)
🔷┃Honorable Mentions & their links:
🔷┃Timestamps:
00:00 | Intro
00:07 | STEPS
00:20 | STEP 1: Separating The Body Parts
00:25 | Screenshoting The Body Parts
02:00 | 3 ways to create a Canvas
02:43 | Importing All The Body Parts
03:43 | Erasing The Background And Saving it
04:53 | Process
04:33 | Lasso
04:51 | Layer Order & Renaming
05:16 | IMPORTANT NOTES AND SOLUTIONS
05:45 | STEP 2: Setting Up a Character
05:47 | Importing & Naming Up The Body Parts
07:10 | Pivot Points
09:26 | Parenting
11:15 | Group
12:30 | Face & Hair
14:55 | STEP 3: Animating The Character
15:05 | Basic
15:40 | KEYFRAME
18:18 | EYES
23:09 | HAIR
16:18 | EXPORT | Saving The Animation
26:39 | Outro
🔷┃Social Medias:
Written.
Keywords & Tags:
#alightmotion #am #howto #animateinalightmotion #animateinam
How to Animate in Alight Motion
Gacha Alight Motion Tutorial
How to separate the body parts
How to set up a Character in Alight Motion
 0:00:26
TUTORIAL: How to animate the world around you!
 0:13:38
Animation Basics in 14 Minutes (6 Big ideas for beginners)
 0:04:56
Learning How to Animate with No Experience
 0:00:58
Why is my animation in FlipaClip so fast!!!
 0:09:33
Tutorial: Curtain animation - beginner friendly
 0:10:42
How to Start Making Your Own Animations
 0:00:54
The SIMPLEST Way To ANIMATE CHARACTERS in AFTER EFFECTS (Puppet Tool Tutorial)
 0:15:31
Blender- Abstract Mountain Animation Tutorial (Eevee 2.9) - Beginner Friendly!
 0:00:55
Day 14 After Effects Trips and Tricks \Collecting Files in Folder Tips \#gb_creation
 0:24:45
how to animate on alightmotion | beginner friendly
 0:03:19
Making An Animation Channel: BUDGET EQUIPMENT!
 0:02:13
HOW I TWEEN / HOW I ANIMATE // FLIPACLIP | polarfox08 *Beginner friendly*
 0:21:33
Java HashMap Explained: How It Works Internally | Beginner-Friendly Animated Guide |
 0:00:12
My first animation💕🌸 #shorts #edit #gacha #gachalife #first
 0:12:39
How to animate for beginners? (Easiest method!)
 0:01:51
The Last Unicorn 🦄// Beginner Friendly Re-Animated M.A.P Call // OPEN// 9/19 TAKEN
 0:06:00
How to Make a Beginner Friendly Satisfying Animation in Blender - Blender Tutorial
 0:10:50
Beginners Guide To Animation
 0:00:36
Straight Up Villian Animation Meme M.A.P (Beginner friendly)CLOSED
 0:08:27
I Learned Animation with No Experience
 0:00:07
Stairs ILLUSION || Minecraft Animation || #shorts
 0:03:47
Tutorial: How to make a sound driven rig animation - beginner friendly
 0:12:49
Blender 4.2 | Make This Loop Animation | Tutorial
 0:11:51
Beginners Guide to LEGO Stop Motion Animation
Комментарии