filmov
tv
Custom designed FLIGHT SIM - Simionic G1000, Honeycomb Alpha and Bravo running MSFS 2020 and XPlane

Показать описание
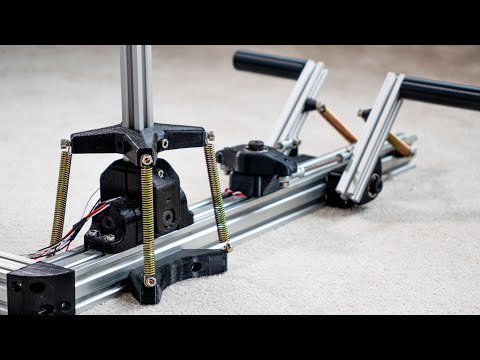
I designed and built this simulator on wheels using aluminum extrusion, 6mm PVC plastic walls, dual adjustable racing seats, the Simionic G1000 avionics suite, and the Honeycomb Alpha and Bravo flight controls. I'm currently running XPlane and MSFS 2020.
If you're interested in building something similar, I will freely share my design and encourage you to go for it. It's so worth it.
If you can't download the updated MAY-CAD software, I have a Jan, 2023 copy here:
And here's my design:
Here are a couple of sources for the aluminum and panels. Just tell them to repeat my order and have everything cut to size. Lead time is about 10 days for the aluminum and a few days for the plastic:
You will also need to order screws, nuts, and right-angle brackets from Amazon. Just print out the BOM from the design and see what you need. Then start building!
Here was my budget:
Simionic: $989 (1 bezel/1 com panel)
(I already own a bezel and iPad from several years ago so add another $1000 if you need these)
Apple iPad 10.2inch 10th Gen (Amazon): $329
Honeycomb throttle (Honeycomb): $258
Computer (XForcePC): $3080
Two 32” monitors (ViewSonic VX3276-2K-MHD) (Amazon): $543
Two TV mounts for 32” monitors (Amazon): $29
One 75” TV (BestBuy): $695
MantelMount TV mount (down and out) (Amazon): $245
Rudder pedals (Thrustmaster TFRP) (Amazon): $130 (plus Honeycomb Charlie $??)
FlightSounds 2-place intercom (FlightSounds): $244
Two leather chairs/rails (Ebay): $341
Ten 8080 corner brackets (Amazon): $117
Cockpit hardware (brackets, screws, t-nuts, rounded end caps): $461
PVC 6mm white panels (Meyer Plastics): $225
Lumber, hardware, carpet, primer and paint for panel/floor: $300
Subtotal: $9786
I also upgraded my network infrastructure a bit to improve the Wifi reception in my basement to sync the two iPads together, but didn’t include that in this build since not everyone will have that issue.
I used ½” MDF board to cutout the panel which is primed and painted. The floor is ¾” MDF board, which is primed and then covered using adhesive backed carpet squares.
 0:36:48
Building the FlightDeck Custom Flight Simulator Cockpit for MSFS, X-Plane, and P3D | SWITCHO
 0:00:16
Your E-42 vs Turboflex E-42 | Turboprop Flight Simulator #shorts
 0:02:06
720 degree rotation flight simulator
 0:09:49
Rating My FAN'S Flight Simulator Setups
 0:01:00
Best Budget Planes in Microsoft Flight Simulator
 0:28:15
How to Build a MODULAR Flight / Space Sim Cockpit? (Plans Included)
 0:09:10
DIY Flight Simulator Joystick
 0:00:21
PTFS now vs 2015
 0:00:20
Dont leave the Sim !
 0:01:31
This is How to Build a DIY Flight Simulator
 0:07:09
When Your Flight Sim Hobby Goes TOO FAR!
 0:00:13
✨Every kids dreams✨
 0:04:36
Microsoft Flight Simulator 2024 Gameplay - Character Customization First Look
 0:00:34
DCS Topgun Landing Experience www.rubix.com.hk
 0:25:02
Flight Simulator home setup 737 fully enclosed
 0:05:20
My Flight Simulator Cockpit Setup by Next Level Racing
 0:21:59
Build a C-172 Flight Sim Switch Panel #23
 0:01:00
North Korea in Microsoft Flight Simulator
 0:00:39
Hard vs butter landings | msfs
 0:00:24
WHAT IS THIS PROJECT FLIGHT 💀💀
 0:14:36
DIY Home Flight Simulator: Building a Custom Main Instrument Panel Glare Shield
 0:07:41
I Made a Real Autopilot for Flight Simulator! And You can too!
 0:02:14
How To Build a Home Flight Simulator in 2 Minutes
 0:16:14
Flight Simulator Switch Panel 2.0 DIY Project
Комментарии