filmov
tv
GIMP Grid Tutorial l How to add | render grid in Gimp
Показать описание
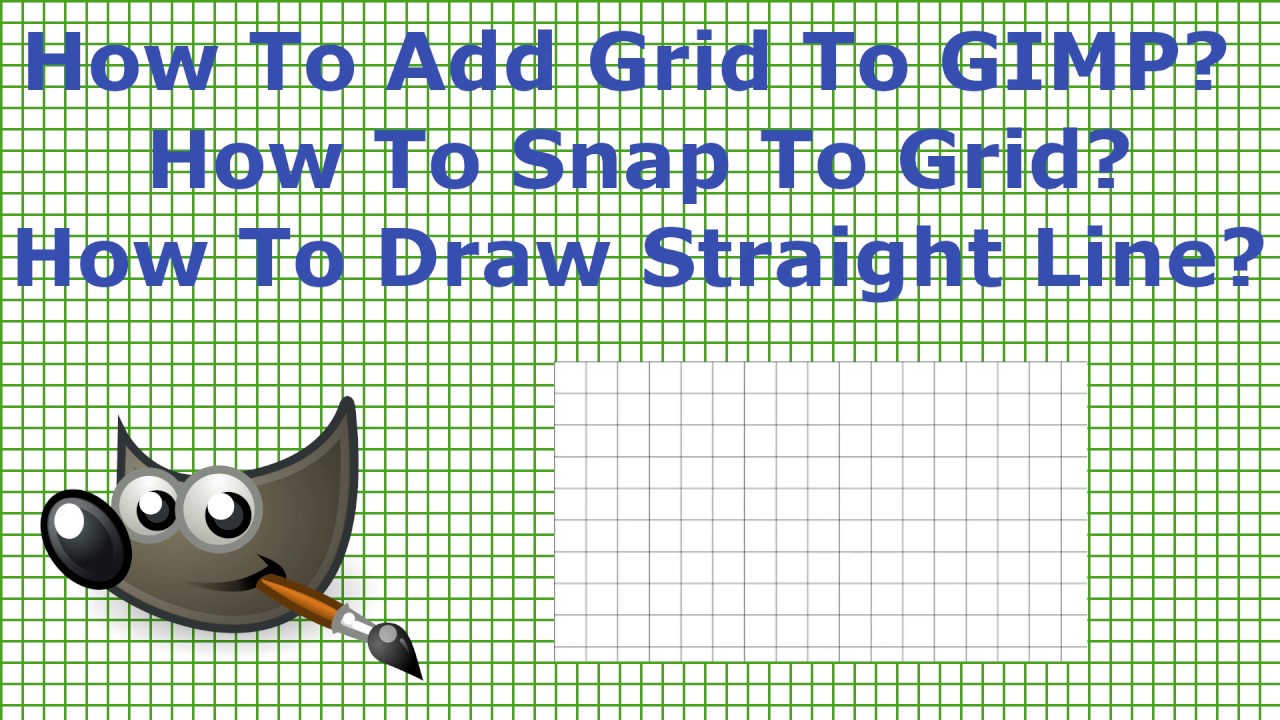
In this tutorial you will learn how to make or render a grid in GIMP. How to snap to a grid?
here's a step-by-step tutorial on how to add and render a grid in GIMP:
Open GIMP and create a new project or open an existing one.
Select the image layer that you want to add a grid to. If you don't have an image layer yet, you can create one by going to Layer - New Layer.
Go to View - Show Grid to turn on the grid display. By default, the grid is set to a 10-pixel spacing.
To customize the grid, go to Edit - Preferences - Image Windows - Grid. Here, you can adjust the grid spacing, color, and style.
If you want to align your image elements to the grid, go to View - Snap to Grid. This will make it easier to position your objects precisely.
To render the grid onto your image, go to Image - Configure Grid. Here, you can choose to have the grid displayed on your image only when you're in "edit mode," or you can have it rendered onto your final export.
To export your image with the grid, go to File - Export As. Choose your desired file format, and in the "Export Image" window, check the box next to "Enable Preview." This will allow you to see the grid on your image preview before you export it.
That's it! With these steps, you should now be able to add and render a grid in GIMP.
 0:03:20
GIMP Grid Tutorial l How to add | render grid in Gimp
 0:03:46
How to Create a Custom Grid in Gimp
 0:02:36
How to Create a Grid in Gimp
 0:01:48
How to show grid in GIMP | Configure grid in GIMP
 0:02:07
How to add / render a grid in Gimp - Tutorial
 0:09:48
How to create a grid collage in GIMP
 0:02:33
how to make a grid in gimp
 0:02:37
Grid Settings & Snap to Grid Pixel Perfect Select | GIMP 2.8 Tutorial for Beginners
 0:02:57
How To: Create Grids or Graph Paper in GIMP
 0:06:38
How to Create an Isometric Grid in GIMP 2.10
 0:03:08
Grid Method Drawing || GIMP Grid Tutorial (Updated)
 0:01:15
Grid Drawing Tutorial || How to Make a Grid in GIMP
 0:04:48
How to Create Custom Grid Paper - Snap to Grid GIMP 2.8 Tutorial for Beginners
 0:02:56
How to Create an Isometric Grid in Gimp
 0:25:56
GIMP - Lesson 06 - Upscale, Downscale, Crop, Compression, View, Grid, Rulers, Guides, Snap, Slice
 0:06:02
Create Image Grid using Gimp ( Free Software)
 0:01:58
How to Center Guides in Gimp
 0:00:12
How To Show Grid In GIMP
 0:01:48
GIMP tutorial: Beginners' Guide ep12 - Preferences - Default image grid
 0:03:35
How To Make A Simple Grid Pattern In Gimp
 0:05:45
Default Image Grid - GIMP 2.8 Beginners' Guide ep13
 0:05:43
Grid Text Effect 1 - GIMP 2.8 Tutorial
 0:09:14
GIMP: How to Create Perspective Grids with the Path Tool
 0:00:42
His laptop died so he used his TYPEWRITER. 😭🤷♂️ #shorts
Комментарии