filmov
tv
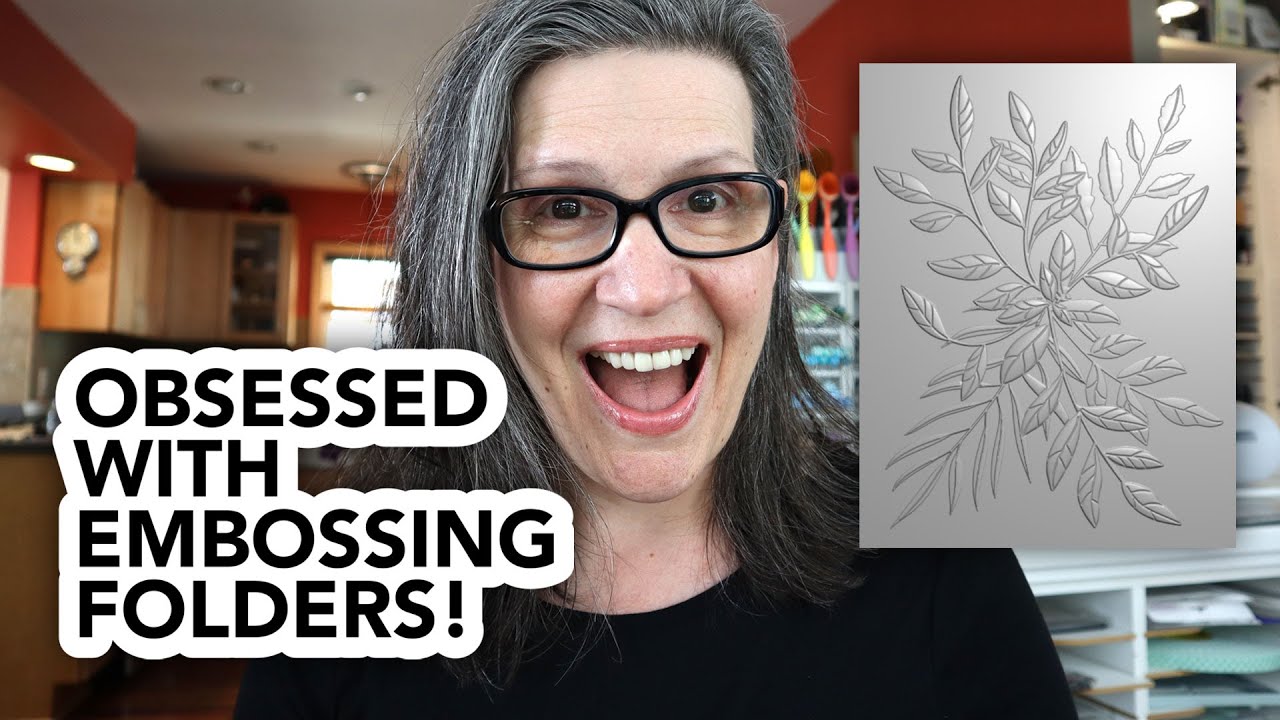
Obsessed! More fun with embossing folders!
Показать описание
Now that I know a bit about embossing folders, I'm officially obsessed! Today I'm sharing two easy cards featuring a technique I literally just tried but here's the deal: it's okay to NOT move on after you try something once! I'm going to play with this technique as long as I feel like. Why not? It's just paper and it's fun to see what shakes out!
⭐️⭐️ S U P P L I E S ⭐️⭐️
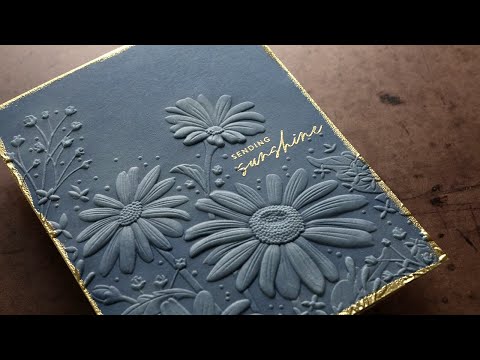
• Leaf Bundle Embossing Folder
• Hugs Wafer Die
•• Welcoming Clear Stamps
• Welcoming Stamps & Dies
• Rustic Wilderness Distress Oxide Pad
• Lucky Clover Distress Oxide Pad
• Twisted Citron Distress Oxide Pad
• Speedball 4-inch Soft Rubber Brayer
• Dazzling Diamonds GKD
• SSS Mega Thick White 130 lb Cardstock
• Neenah Classic Crest Solar White 110 lb (25 sheets)
• Gina K Designs Heavy Base Weight Cardstock Grass Green
• Waffle Flower A2 Layered Dies
• SSS White Fine Details Embossing Powder
• Simon Says Stamp Embossing Ink Pad
• Inkadinado Magic Embossing Bag
• Wagner Heat Embossing Tool
• Scor-Pal Mini Scor Buddy Scoring Board
• Teflon Bone Folder Simon Says Stamp
• Simon Says Stamp Metal Adapter Plate
• Spellbinders Platinum 6 Machine*
• Tim Holtz Distress Sprayer
• Original MISTI Stamping Tool
• Original MISTI Mouse Pad Insert
• The Debby Tool | Etsy
• Royal Langnickel Zen Fan Brush Size 4
• Lawn Fawn Stamp Shammy Cleaner
• Chef n'Dash Salt Cellar
• Tim Holtz Tonic Craft Pick
• PenBlade 3-Pack
• EK Success Craft Tweezers
• EK Success Cutter Bee Scissors
• Crystal Katana Pick Up Tool
• Bead Tray
• Therm O Web Ultra Bond Adhesive
• Elmer's CraftBond Spray Adhesive
• Crafter's Essentials Easy See Tape
• Scrapbook Adhesives Thin Foam Squares (combo pack)
• 3M Scotch Double Sided Foam Tape .75 inch
• C-Thru T Square Ruler
• Tim Holtz Tonic Travel Glass Media Mat
• Simon Says Stamp 3 x 4 Inch Acrylic Block
• Tim Holtz Tonic Guillotine Timmer*
• Altenew Self-Healing 24 x 18 Cutting Mat
Affiliate links are used in the description above at no additional cost to you. I receive a small percent of compensation when you click through and shop using the provided links. This helps me to directly support my YouTube channel and my small business. Thank you!
⭐️⭐️ S U P P L I E S ⭐️⭐️
• Leaf Bundle Embossing Folder
• Hugs Wafer Die
•• Welcoming Clear Stamps
• Welcoming Stamps & Dies
• Rustic Wilderness Distress Oxide Pad
• Lucky Clover Distress Oxide Pad
• Twisted Citron Distress Oxide Pad
• Speedball 4-inch Soft Rubber Brayer
• Dazzling Diamonds GKD
• SSS Mega Thick White 130 lb Cardstock
• Neenah Classic Crest Solar White 110 lb (25 sheets)
• Gina K Designs Heavy Base Weight Cardstock Grass Green
• Waffle Flower A2 Layered Dies
• SSS White Fine Details Embossing Powder
• Simon Says Stamp Embossing Ink Pad
• Inkadinado Magic Embossing Bag
• Wagner Heat Embossing Tool
• Scor-Pal Mini Scor Buddy Scoring Board
• Teflon Bone Folder Simon Says Stamp
• Simon Says Stamp Metal Adapter Plate
• Spellbinders Platinum 6 Machine*
• Tim Holtz Distress Sprayer
• Original MISTI Stamping Tool
• Original MISTI Mouse Pad Insert
• The Debby Tool | Etsy
• Royal Langnickel Zen Fan Brush Size 4
• Lawn Fawn Stamp Shammy Cleaner
• Chef n'Dash Salt Cellar
• Tim Holtz Tonic Craft Pick
• PenBlade 3-Pack
• EK Success Craft Tweezers
• EK Success Cutter Bee Scissors
• Crystal Katana Pick Up Tool
• Bead Tray
• Therm O Web Ultra Bond Adhesive
• Elmer's CraftBond Spray Adhesive
• Crafter's Essentials Easy See Tape
• Scrapbook Adhesives Thin Foam Squares (combo pack)
• 3M Scotch Double Sided Foam Tape .75 inch
• C-Thru T Square Ruler
• Tim Holtz Tonic Travel Glass Media Mat
• Simon Says Stamp 3 x 4 Inch Acrylic Block
• Tim Holtz Tonic Guillotine Timmer*
• Altenew Self-Healing 24 x 18 Cutting Mat
Affiliate links are used in the description above at no additional cost to you. I receive a small percent of compensation when you click through and shop using the provided links. This helps me to directly support my YouTube channel and my small business. Thank you!
 0:18:04
Obsessed! More fun with embossing folders!
 0:06:52
More Embossing folder fun with embossing folders and co-ordinating stencils!
 0:10:42
5 Fun Ways to Use Embossing Folders for Cardmaking!
 0:00:44
Embossing Folder Magic!
 0:26:05
More 3D embossing folder fun! Tags and a card with fabulous texture!
 0:06:32
MORE...debossed magic! Anyone can do this! Stretch those 3D Embossing folders!!
 0:33:37
The Technique I'm Obsessed With: Reverse Embossing With a Twist!
 0:04:57
This embossed card is gorgeous! And so easy, too!
 0:01:00
What is the difference between 2D and 3D Embossing Folders? #shorts #embossingfolders
 0:01:00
Eclipse Technique with Embossing Folders #altenew #cardmaking #papercraftingsupplies #shorts
 0:04:19
EMBOSSING 101 | EVERYTHING YOU NEED TO KNOW!
 0:41:10
AMAZING 3D embossing technique using Crafter's Companion embossing folders - Easy Cardmaking
 0:09:46
Mass Produce Cards using 3D Embossing Folders
 0:12:12
Beginners Guide to Heat Embossing - Craft Hacks 101
 0:16:49
Embossing Folders: 5 Different Materials to Use
 0:10:58
Using 3D Embossing Folders
 0:13:38
Embossing, tone-on-tone + shine = holiday elegance! Have you tried this?
 0:25:04
Sunday Funday Embossing Folders
 0:00:58
How to Emboss with a 2D Embossing folder using a Big shot Machine #shorts #embossingfolder
 0:08:13
Greeting card gift set! Let THEM customize what they need! Fun embossing technique!
 0:45:05
Amazing Embossing Folder Technique with Alcohol Inks
 0:39:56
MAGICAL Embossing Folder Technique + Hybrid Folder & Dies!
 0:28:42
Suestampfield Video Tutorial: Inking an Embossing Folder
 0:11:24
Embossing Folder Friday- Holiday Edition
Комментарии