filmov
tv
How to make a solid walnut picture frame // Woodworking | I Like To Make Stuff
Показать описание
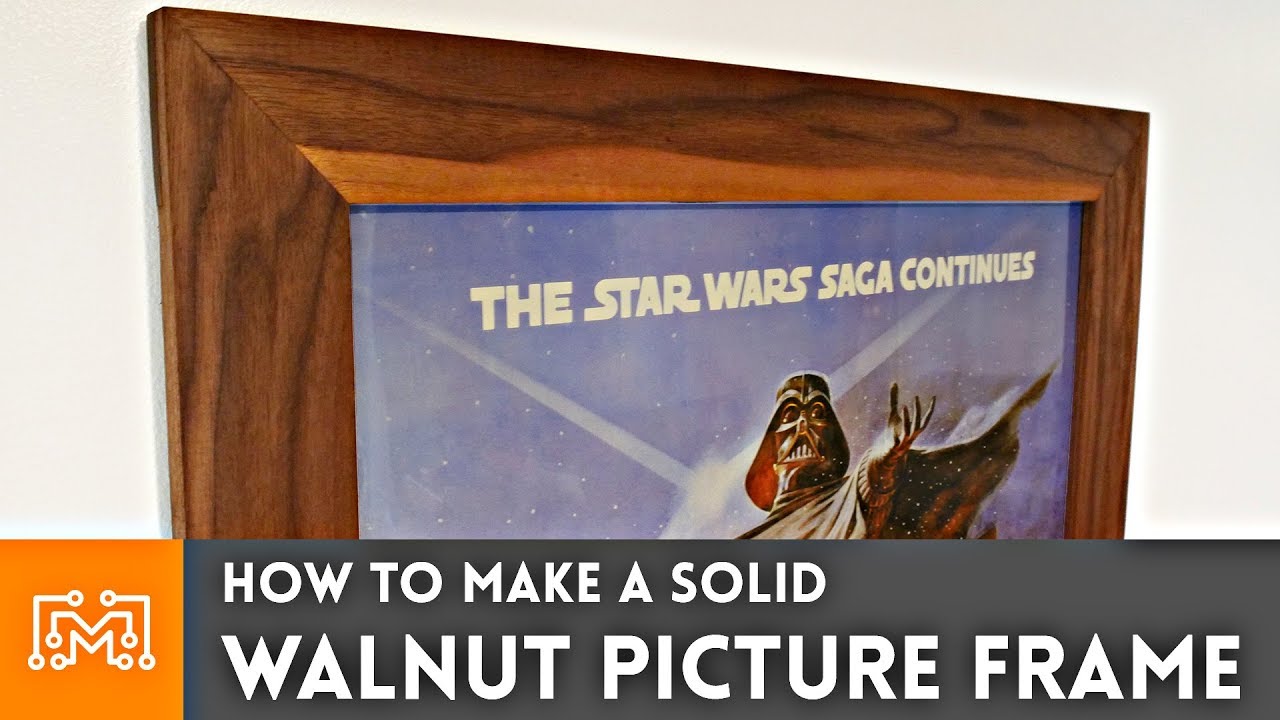
I made a beautiful walnut picture frame for my favorite movie poster!
TOOLS & SUPPLIES (affiliate links):
The poster was in an old, cheap plastic frame encased in acrylic instead of glass. Buying a custom cut piece of glass for this poster would be expensive, so I just reused the acrylic and the cardboard backer.
Before you cut any material for a picture frame, you need to make sure you have enough material. In this case, I measured the poster and added a 1/4 inch to each side. This measurement would be the inside dimensions of the frame pieces. To get the outside dimension (to make sure you have enough material), I added the thickness of the frame, which was going to be 3 inches, to the inside dimension TWICE, so 6 inches. This ensures that you have the artwork's inside dimension, and enough stock to create a 45 degree angle on both ends.
I cut a huge walnut board into 3 inch strips using the table saw. I then used the outer dimension I found in the last step to cut the 4 sides to length. Setting up a physical stop block on your miter saw can help ensure consistent cuts, this is super important when making cleanly-joining corners. If one side is longer than the other, even by a little bit, the corners may not align perfectly.
For smaller picture frames, simple 45 degree miter cuts glued together would totally suffice. The larger the frame, the more those corners need to be reinforced. Some people cut slots in the corners and glue in splines, professional frame shops use underpin nails to join the pieces. I decided to cut a joint I hadn't attempted before, a half-lap joint that looks like a standard 45 degree miter.
This is achieved by cutting a normal looking 45 degree corner on two sides of the frame and then cutting away half the material below that corner. On the opposing sides of the frame, the inverse would be done, cut away the top section to accept the 45 degree corner. This joint creates many strong glue surfaces and it still looks like a traditional picture frame from the outside. I used a wood glue specifically designed for darker woods like walnut.
Because the artwork, the glass (or acrylic), and the backing needs to be secured inside the frame, I cut in a rabbet on the back side. I used a 1/4 inch rabbeting bit on my trim router and made sure to cut in a clockwise path along the inside. I adjusted the depth of the bit to only cut a channel equal to the thickness of the acrylic, the poster, and the cardboard backing.
Thoroughly clean the glass or acrylic before laying it into the rabbet we cut earlier, then lay down the artwork (along with any matting you chose to use). Center the picture in the frame so that it looks straight from the front. Once you're happy with the placement, tape the artwork to the glass only at the top, tape along all sides can cause wrinkling, and lay down the backing.
To hold the piece in the frame, there are a lot of materials you can use. Most commercial picture frames use points, or the little thin metal tabs that hurt your fingers. In this case, I used small nails. Nails can also be used as a simple way to secure backing to picture frames. Make sure that you drive the nails in as flat as you can to avoid scuffing your walls.
Because I didn't want holes in my walls, and because I'm not sure where this piece will end up, I used adhesive-backed Velcro strips. These sticky strips don't leave any residue on the frame or the wall and 4 of them can definitely handle the weight of this frame.
I am so happy with how this frame turned out. I think the contrasting colors of the walnut against the Empire Strikes Back blue is beautiful. The construction of this big frame was a little different, and honestly a little challenging, for me. I am very proud of how it all came together and I think it makes a great addition to our house.
Learn 3d modeling, get digital plans, and cool merch at
Want to support ILTMS? Get exclusive content and more...
FOLLOW:
About I Like To Make Stuff:
We have lots of projects including woodworking, metalworking, electronics, 3D printing, prop making and more!
These videos are our attempt inspire and empower others to make the stuff that they want to have. Hopefully you'll see something here that will inspire you to make something that you're passionate about!
How to make a solid walnut picture frame // Woodworking | I Like To Make Stuff
 0:02:21
Cool Science Experiment #6 (Oobleck: the Amazing Liquid/Solid!)
 0:05:06
How to build solid oak exterior doors with floating panels
 0:04:43
Making SOLID Nitrogen!
 0:00:52
How to Make Solid Perfume
 0:00:39
MAKING OOBLECK 😱 #shorts
 0:18:51
Making a Solid Wood Door | Modern Door
 0:07:06
Making a Solid Wood Door | DIY Door 1/2
 0:09:01
3 States of Matter Science DIY Educational For Kids ( Solid Liquid Gas )
 0:51:47
National Lab Discovery Series: High Performing Solid State Batteries
 0:04:06
3-Ingredient Solid Lotion Bars! Non-greasy Recipe!
 0:06:00
How to Make Objects Solid in Sketchup
 0:12:48
How to Make a SOLID WOOD TABLE Top WITHOUT Stress
 0:01:00
DIY Solid Perfume | Solid Cologne | Using Essential Oils
 0:05:54
All Natural Solid Perfume Recipe | Essential Oils for Perfume
 0:07:27
3d shapes model out of paper | 3d shapes diy | Easy DIY 3d and 2d shapes making | 3d shapes names
 0:04:08
How to Make a Cube
 0:20:55
How To Design A Solid Rocket Motor - Simplex Ep 1
 0:01:59
How to make Cone | Solid Shape Cone | Geometrical Shape Cone
 0:25:34
How to Build a Solid Wood Door / Start to Finish / Fine Woodworking
 0:07:46
Geometry Dash how to create a not solid block tutorial
 0:06:14
How to crochet solid hexagon/ easy crochet solid hexagon
 0:14:03
What is a solid? Skill Builder
 0:00:16
SURFACE TO SOLID SPACECLAIM TUTORIAL 4
 0:17:07
Simple and easy solid granny square/ beginner friendly granny square
Комментарии