filmov
tv
Pinch Pot Cup Forms Day 1- A Ceramics I Exercise for Beginners in Clay

Показать описание
This video is a new version of my old Ceramics I pinch video. It solves several problems kids encountered throughout the years, and I try to address those to prevent it. I made this video for my Ceramics I students at Mason High School. This is the first exercise (non-graded) that the kids do in clay for their semester Ceramics I class. They are learning and building skills they will use throughout the semester. They learn pinching, cleaning, underglazing, sgraffito carving, majolica glazing, and dip glazing for this exercise.
Here is a list of a playlist of all the videos in this pinch cup exercise:
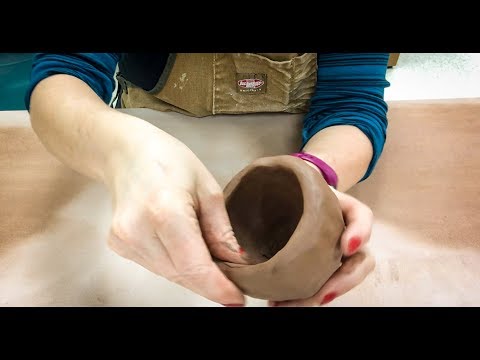
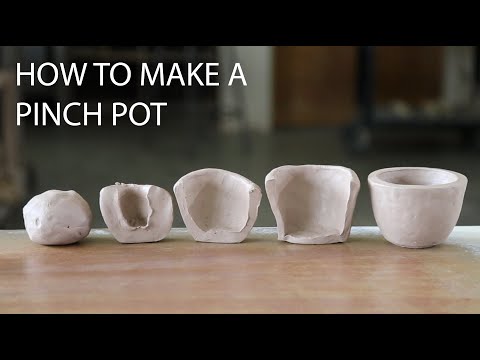
Students begin with a ball for this project, insert a thumb, and pinch between the thumb and fingers of the same hand. I emphasize to them that they should be doing the pinching while holding it in their hand as opposed to setting it on the table and pinching. The reason to avoid setting it on the table is that the pinch forms tend to flatten on the bottom and go really wide- more wide than they want them. I emphasize that they need to watch the thickness of the walls and the base- and they have to keep them the same thickness… to avoid a thick bottom which could potentially explode! I show them how they can use a little rib for some quick preliminary clean up if they have time on the first day.
We are using a hunk of clay about the size of their fists and mine was 1 1/8lb of clay, but you can use any size you desire. It fluctuates among each person as to how big they want to make theirs! The key is that you are still able to pinch your index and middle fingers to the thumb in the middle. If you can't reach all the way to the middle, I recommend a tad bit smaller. I describe it as "fist sized" for my students as well... it helps them to create a piece more fitting to their grip. Such as, a football player with big hands will have a bigger ball to pinch than the 5' little freshman girl! Maybe start with a pound ball, and see how that fits your hand. Honestly, many of my students have a very difficult time when I give them measurements in inches or centimeters. They just can't visualize it and things go terribly wrong... that's when I started calling it as "thick as a pinky"= TRANSLATE that to 3/8" - 1/2" in thickness!
We are using Standard 103 for this exercise. It is lowfire and grogless red earthenware. It can be sponged- unlike groggy clay.
Check out the next video in this series to show the second day: (I will add when it is posted)
I am a public high school ceramics teacher at William Mason High School in Mason, Ohio. (Mason is currently the largest high school in Ohio!) As a potter, I have been working in clay for over 30 years, and I have been teaching for over 28 years, the past 20 have been specifically teaching high school ceramics. I love what I do! I have my own studio in my home basement, where I work on my personal pottery for my Etsy site;
Here is a list of a playlist of all the videos in this pinch cup exercise:
Students begin with a ball for this project, insert a thumb, and pinch between the thumb and fingers of the same hand. I emphasize to them that they should be doing the pinching while holding it in their hand as opposed to setting it on the table and pinching. The reason to avoid setting it on the table is that the pinch forms tend to flatten on the bottom and go really wide- more wide than they want them. I emphasize that they need to watch the thickness of the walls and the base- and they have to keep them the same thickness… to avoid a thick bottom which could potentially explode! I show them how they can use a little rib for some quick preliminary clean up if they have time on the first day.
We are using a hunk of clay about the size of their fists and mine was 1 1/8lb of clay, but you can use any size you desire. It fluctuates among each person as to how big they want to make theirs! The key is that you are still able to pinch your index and middle fingers to the thumb in the middle. If you can't reach all the way to the middle, I recommend a tad bit smaller. I describe it as "fist sized" for my students as well... it helps them to create a piece more fitting to their grip. Such as, a football player with big hands will have a bigger ball to pinch than the 5' little freshman girl! Maybe start with a pound ball, and see how that fits your hand. Honestly, many of my students have a very difficult time when I give them measurements in inches or centimeters. They just can't visualize it and things go terribly wrong... that's when I started calling it as "thick as a pinky"= TRANSLATE that to 3/8" - 1/2" in thickness!
We are using Standard 103 for this exercise. It is lowfire and grogless red earthenware. It can be sponged- unlike groggy clay.
Check out the next video in this series to show the second day: (I will add when it is posted)
I am a public high school ceramics teacher at William Mason High School in Mason, Ohio. (Mason is currently the largest high school in Ohio!) As a potter, I have been working in clay for over 30 years, and I have been teaching for over 28 years, the past 20 have been specifically teaching high school ceramics. I love what I do! I have my own studio in my home basement, where I work on my personal pottery for my Etsy site;
 0:13:57
Pinch Pot Cup Forms Day 1- A Ceramics I Exercise for Beginners in Clay
 0:17:26
Ceramics II Cleaning Pinch Pot Cup Forms- (Day 2)
 0:08:12
Pinch Pot Cup Forms Ceramics I - First day Pinching (Older version)
 0:07:46
Ceramics II How to Make Handles on Pinch Cup Forms (Day 3)
 0:07:51
Ceramics II Pinch Pot Cup Forms
 0:21:54
Pinch Pot Cup Forms Day 2 CLEANING An Exercise for Beginners in Clay
 0:14:55
Cleaning Pinch Pot Cup Forms Ceramics I (2nd day)
 0:08:14
HOW TO MAKE A PINCH POT
 0:11:28
At Home: Pinch Pot Cup p1
 0:15:42
Ceramics II Attaching Handles on Pinch Cup Forms
 0:19:55
Creating a Pinch Cup with a Handle and Footring Ceramics II, Day 1
 0:11:01
How to handbuild a pinch pot ceramic mug | DIY Pottery start to finish
 0:13:47
Advanced Pinch Pot Making
 0:06:05
✨making ceramics at home during lockdown✨ pinch pot mugs, glazing and firing
 0:08:42
Pinch Demo #2 - Techniques for Refining Pinched Forms
 0:03:43
How To Make A Pinch Pot
 0:06:02
How to make a Ceramic Mug - no wheel required! // Pinch Pot Tutorial // pottery at home
 0:21:36
Pottery at Home! Step 3: pinch pot
 0:12:15
At Home: Pinch Pot Cup p2
 0:00:23
Pinch Pot Method Mug Making 🤍
 0:15:46
Handbuilding Clay: Pinch Pot Cup
 0:01:58
Pinch Pot Rap
 0:24:50
How to make a pinch pot
 0:05:42
Pinch Pots: Open Forms and Combined Forms
Комментарии