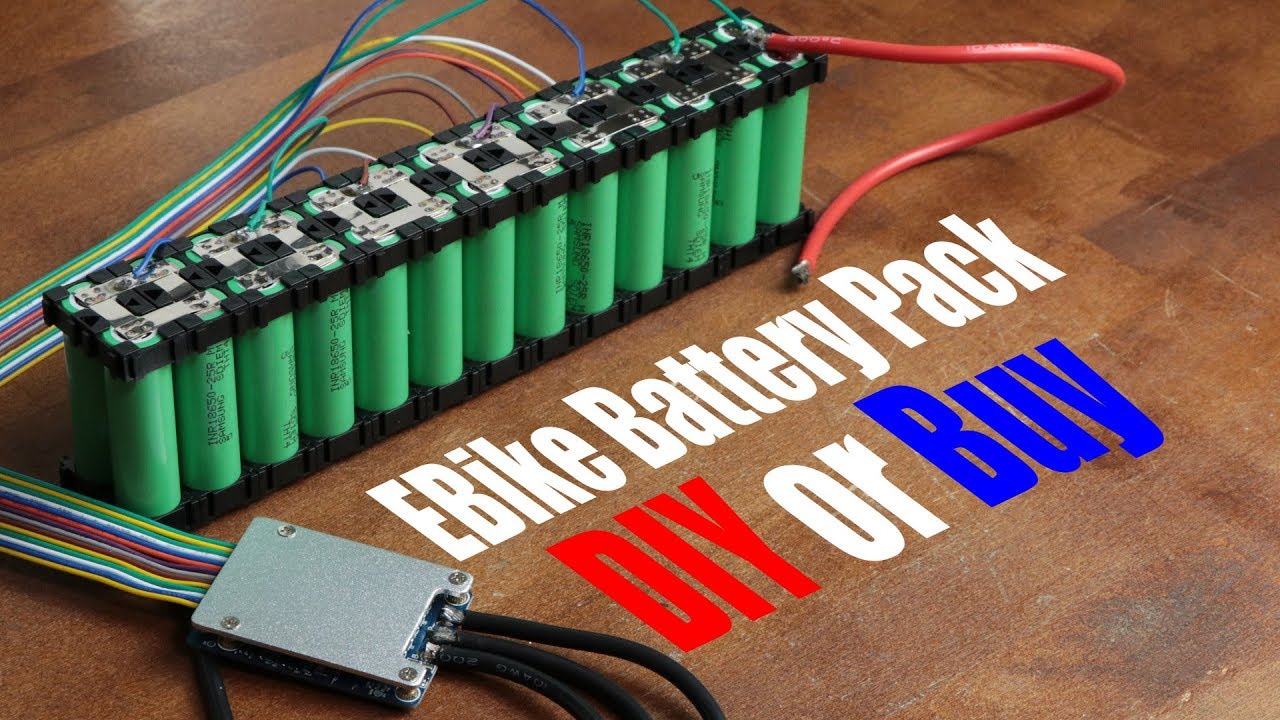
EBike Battery Pack || DIY or Buy || Electric Bike Conversion (Part 2)

preview_player
Показать описание


Parts list (incomplete, see Instructables for more, affiliate links):
Aliexpress:

Ebay:

In this episode of DIY or Buy I will show you how to create a proper EBike battery pack. The main components for the build are Li-Ion cells, nickel strips and a BMS. At the end of the project I will then conclude whether DIYing your own battery pack is cheaper than buying a premade one.

Thanks to JLCPCB for sponsoring this video

Music:
In the Hall of the Mountain King, Kevin MacLeod
2011 Lookalike by Bartlebeats
Killing Time, Kevin MacLeod
Рекомендации по теме
Комментарии
Автор

That feeling you get when you made something, and it works is "priceless".

-MrDontCare-
Автор

THE best “how to set up” battery pack video out there! I spent years clarifying and watching other ppl do it! You won’t BELIEVE how many ppl don’t tell you the orientations the batteries or the voltage. They just say “oh spot weld or soldier”

francishosey
Автор

At least with a DIY pack build you know that you have good quality cells. Not some cheap un-named brand with no capacity.

dj_paultuk
Автор

I began refurbishing ebike batteries a while ago and figured it can be quite a profitable business. That welder you got, appears quite nice and works a lot better than many readymade ones that are available for cheap.

blubbspinat
Автор

Your camera work is stellar. I wish more people on YT were this good.

mollygrubber
Автор

I guess I'll just buy.. It gets complicated after 00:01

thisisSherno
Автор

I really admires that passionate way to explain and recreate experiments like this one.
Keep going in that way mate!

jesusdavidcardenasangulo
Автор

The other benefit of building over buying is that you know you're getting genuine cells. As long as you buy from a reputable place anyway.

GadgetAddict
Автор

I really appreciate your effort in these videos.
Just one thing and this’ll be complete!, I’d really like to see a HOMEMADE MOTOR!
Thanks!

XdewGaming
Автор

This is by far the best concise video on DIY battery packs. Well done.

caveyak
Автор

I would disagree on the DIY=BUY statement here. When you buy components - you have control of what \how are you assembly your battery. When you buy ready product from 3rd party you can end up with bad quality battery(elements/bms etc) & waste of time & money.

yingbxua
Автор

I just use 2 multistar 6s 16000mah lipo packs in series. 12s rather than your 13, but that works fine with my bafang 750w midrive. It gives 35mph top speed, and in general use (at effort level 4 and me cycling) I get 35 miles range with that 16ah. Also extremely light - as both packs (giving me 12s 16ah) weight only 4kg. And the 2 packs cost me 120 pounds total. I already had a 10amp 6s charger for lipos. There's no protection from overdischarging of course, but the bike cuts off itself when too low. And the charger balances the cells. I've been using the same pack now for nearly 2 years, and have done around 1000 miles on them and they are still at full capacity.

TheFlyingScotsmanTV
Автор

I think the pro with making your own pack would be making it a larger capacity to the normal ones you buy off shelf. This pack is pretty small as it is. Good start though. Also picking up second hand cells is a good way of cutting costs, although adds risk of unreliability.

AdamWebb
Автор

Very nice!
Finally a FIY or BUY video that really makes sense - most of the other ones only show what was the best alternative for you (the same doesn't apply to everyone - it depends on your knowledge and budget).

SpeederXL
Автор

I like how you make the ads interesting. I have no idea about PCB design but I like hearing random little facts. Clever.

JamieBainbridge
Автор

this is great, i never understood how to use a BMS until i saw this, i'm using the same one as you

henryswan
Автор

You will find 1kw enjoyable for a brief moment. Then you want more. You will probably build an 5-10kw bike and enjoy it for a moment too. Then you will move into the heavier stuff and beat all the 450cc on the street while realising that you have spent 100x more money on the EV wave than the original budget. But in the end of the day it will all be worth it!

antonnpn
Автор

I think the most important is the connection to the rest of the controllers of the bike. Most of the time, the BMS of the battery needs to talk to the controller unit of the bike. Then p.ex. the display of the bike can show the state of charge (SOC).

simgplusnervt
Автор

Great video. I wish it had been out a bit earlier because I made my own replacement battery Pack a few weeks ago. I also ordered the cells at accuteile. I soldered the nickel tape to the cells which is a pain in the ... .
Theres one thing you might want to know: I realized the range at which the BMS turned off because of overdischarge was quite low. So I tried to get my head around it and realized that it might be due to short negative voltage peaks at the start of high power consumption (i.e accelerating). So I soldered a 1000uF support capacitor parallel to the output of the batterypack (i.e. the BMS). Et Voila: Range nearly doubled.

I also created a range extender from the old cells which were ok according to capacity but just developed a higher inner resistance. I still try to figure out a good way to parallel the two packs safely. What I do right now is charge them both and then just connect them via a 10A fuse (which by the way blew twice already).

Keep up the great work. I like the accent. I have the same (-;

florianfeith
Автор

Big benefit to DIY is knowing your pack is solid. Buying cheap modules can have poor results. Definitely a good idea to crack open what you bought if you can to see how good of a job they did inside.

EVLS
join shbcf.ru