filmov
tv
Roland VR-1HD Streaming Mixer Tutorial #4: Audio Panel Features

Показать описание
The Roland VR-1HD is designed to take on the realities of any live streaming broadcast, from podcasting, multi-camera music performances, and video game streams to corporate AV productions, remote church services, and distance learning. Combining video switching, audio mixing, and streaming capabilities into one convenient device, the VR-1HD makes it easy for a single operator to manage broadcasts in real-time.
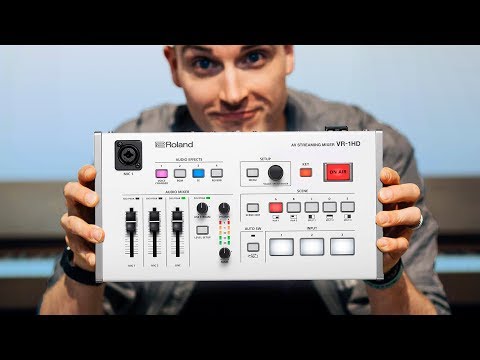
In this tutorial, you’ll learn about the audio features of the VR-1HD. We’ll cover audio levels, input and output set up, effects, and importing custom sound files.
Pressing the LEVEL SETUP button lets you quickly adjust the levels of all audio inputs, including embedded audio in the HDMI inputs. Preamp gain for the two mic inputs can also be adjusted here, and solo and mute controls are available for all inputs.
The VR-1HD includes many built-in effects for enhancing sounds. Effects for the microphone inputs include reverb, gate, compressor/limiter, EQ, high-pass filter, and voice changer. There’s also an Echo Canceller to eliminate mic bleed from remote users and a Howling Canceller to eliminate microphone feedback. Effects for other inputs include reverb and EQ.
To access effect settings for various inputs, press the MENU button and select the Audio Input menu using the VALUE knob. Next, choose any of the analog or HDMI inputs and edit their settings as desired. Many helpful presets are available to get great vocal sounds quickly and eliminate problems like wind, vibration, and lip noise. And if you have any timing differences between the audio and video, this can be adjusted as well.
Just like the input audio, you can quickly adjust the levels of all audio outputs, including HDMI, Aux bus, USB Stream, and headphones. Each of the audio outputs can be sent to the Main or Aux audio mix, and each mix bus has separate control of level, mute, limiter, limiter threshold, and EQ.
Using the free VR-1HD RCS (Remote Control Software) application for Mac and Windows computers, you can adjust settings even more quickly. VR-1HD RCS provides real-time VU meters for all inputs and outputs, including microphones, HDMI, sound effects, Main output, Aux output, and USB Stream output. And with the graphical EQ display, it’s easy to make adjustments visually.
Finally, the four AUDIO EFFECTS buttons each have a default effect printed on the front panel, which you can customize. Press the MENU button, go to Audio Effects, and choose the effect you want to edit.
It’s possible to play audio files with the AUDIO EFFECTS 2 and 3 buttons. To import a custom audio file, copy it to a USB flash drive and connect it to the VR-1HD. Then press MENU, go to Audio Effects and select the desired button. (Supported file format: 16-bit WAV audio, 44.1/48 kHz, a file name of eight characters or less.)
Watch the other tutorial videos for the VR-1HD here:
For more information on the Roland VR-1HD, please visit:
#rolandstreaming #rolandproav #livestream #vr1hd
 0:05:13
Roland VR-1HD Streaming Mixer Tutorial #1: Basic Setup
 0:01:16
Roland VR-1HD Streaming Mixer Tutorial #3: Key Function
 0:05:52
Roland VR-1HD Streaming Mixer Tutorial #4: Audio Panel Features
 0:05:58
Roland VR-1HD Video Mixer Tutorial
 0:11:52
How I use the Roland VR-1HD
 0:02:17
Roland VR-1HD Streaming Mixer Tutorial #8: RCS Remote Control
 0:03:27
Roland VR-1HD Streaming Mixer Tutorial #5: Audio Automation Features
 0:03:33
Roland VR-1HD Streaming Mixer Tutorial #6: USB Streaming
 0:09:26
Roland VR-1HD AV Streaming Mixer Switcher Overview and Demo
 0:02:29
Roland VR-1HD Streaming Mixer Tutorial #9: Firmware Update
 0:19:51
Roland VR-1HD - Streaming Tutorial
 0:15:44
Roland VR 1HD Auto Switcher Tutorial
 0:04:38
Roland VR-1HD - Streaming Made Easy
 0:02:09
Roland VR-1HD Streaming Mixer Tutorial #7: Import Stills Images
 0:07:15
Getting Started with the Roland VR-1HD
 0:02:37
Roland VR-1HD Streaming Mixer Tutorial #2: Scene Function Edit
 0:07:22
Roland VR-1HD, V-1HD & V-1HD+ STR Video Switcher Overview | Seth Miranda
 0:20:09
Roland VR-1HD Streaming Mixer in Depth Review
 0:08:45
Easy-to-Use HD Video Switcher for Live-Streaming — Roland VR-1HD
 0:01:01
Roland VR-1HD AV Streaming Mixer
 0:11:48
How To Use the Roland VR-1HD HDMI Video Switcher
 0:10:55
Your dream stream setup made SIMPLE & Affordable!
 0:01:15
Integrate 2019: Roland Shows VR-1HD AV Streaming Mixer with Three Video Inputs, Two Audio Inputs
 0:11:27
✅ Streaming profesional con Roland VR-1HD
Комментарии