filmov
tv
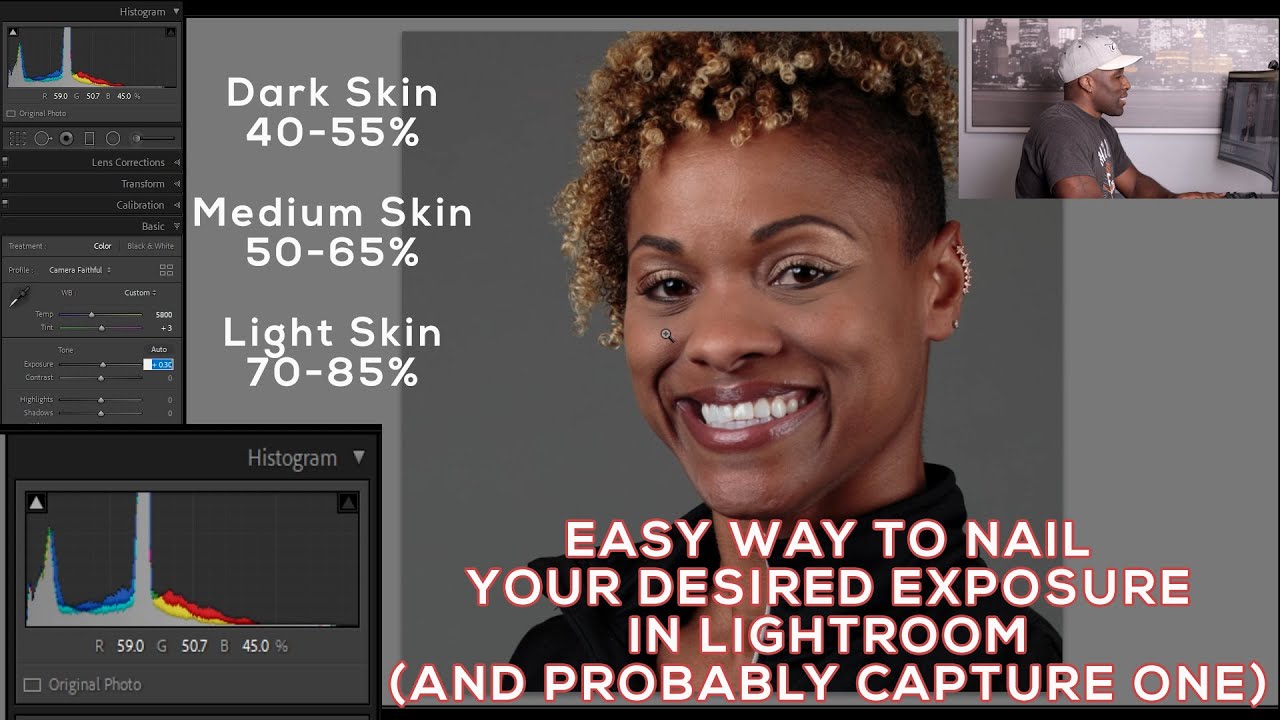
Using The Histogram RGB Values (In Lightroom) To Get Desired Exposure Every Time!
Показать описание
#Exposure #Histogram #Photography
IG: @1twentyfivephoto
A quick(ish) video providing a couple of tips on how to get your desired exposure while editing in Lightroom (and probably Capture One as well).
-f/16 Photography Podcast-
Apple Podcasts: Coming Soon
IG: @1twentyfivephoto
A quick(ish) video providing a couple of tips on how to get your desired exposure while editing in Lightroom (and probably Capture One as well).
-f/16 Photography Podcast-
Apple Podcasts: Coming Soon
 0:14:54
Using The Histogram RGB Values (In Lightroom) To Get Desired Exposure Every Time!
 0:03:44
Lightroom Histogram // HIDDEN SECRETS
 0:10:07
THIS IS WHY YOU 'BLOW OUT' YOUR HIGHLIGHTS. Get perfect exposure every time using the his...
 0:06:10
Using Histogram to Guide Targeted RGB Editing
 0:05:34
Fujifilm RGB Histogram
 0:04:31
Histogram Explained! Get Perfect Exposure Everytime!
 0:02:42
Zack Arias: RGB Histograms
 0:04:08
How To Read a Camera Histogram
 0:00:15
Create histogram of 3 channels of RGB image
 0:07:28
How to use your Histogram and RGB Highlights to check your Exposure
 0:14:36
Understanding the Histogram in Photography
 0:08:53
Astrophotography RGB histogram in nine minutes
 0:08:46
Do YOU understand your HISTOGRAM??
 0:15:00
Histograms for Beginners - And how it can improve your photography
 0:31:44
HOW TO READ A HISTOGRAM [RGB vs Luminosity] || The Landscape Photography Journals E4
 0:05:44
Canon Quick Tips: The Importance of Histograms
 0:01:30
I Wish I'd Known This Darktable Histogram Secret Before!
 0:05:16
Image Histograms - 5 Minutes with Cyrill
 0:03:50
Lightroom Histogram Tutorial for Beginners - Explained in 4 Minutes! Photography 101
 0:13:34
Histograms Explained: How to NAIL EXPOSURE!
 0:12:53
Image Enhancement in digital image processing with Histogram Equalization
 0:12:15
How To Use the HISTOGRAM
 0:20:10
How to Use the Histogram in Photoshop
 0:01:09
How to use the histogram in Canon 5D Mark II
Комментарии