filmov
tv
OpenStudio SketchUp - Daylighting Controls

Показать описание
In this video, we will discuss how to input daylighting controls that reduce space lighting power as sunlight enters the space.
Transcript:
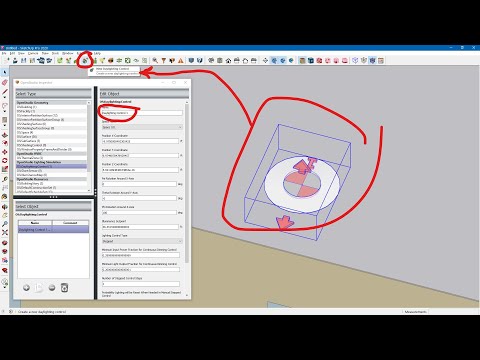
Today we are going to talk about daylighting controls. This button up here; Create New Daylighting Control.
This is used for controlling the lights within your space. If you have exterior windows, throughout the day the sun will shine through the windows and light up the space.
At that point, you might not need as much artificial lighting in the space. The daylighting controls will reduce your artificial lighting based on the amount of sunlight that is coming through the window.
You can click this button to create those controls. Let us edit the space. Click the button New Daylighting Control.
You can just drop it into the space. It automatically places it 3ft (0.91m) above the floor. That can be adjusted as you as need.
You can relocate the object to wherever it is most convenient within the space.
You might want to place it somewhere in the middle of the space, depending on how much daylight harvesting you intend. That is, how aggressive you are with with turning down the lights within the room.
That is how you drop it into the space. We can click the Inspector tool to take a look at the properties for the daylighting control.
You want to make sure that you click that daylighting control object. You can see that it was dropped in here.
It has a name,the space name, that it is associated with.
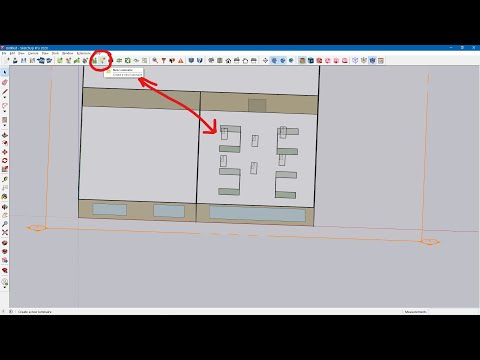
It is important to note: you can drop these into individual spaces, but EnergyPlus will only allow up to two day lighting controls thermal zone.
So, if these two spaces were part of a thermal zone, this daylighting control would control this space and this space. They are part of one thermal zone.
To get around that, it might be best to assign separate thermal zones to each of these spaces.
These are the position the coordinates of the daylighting control within the space.
These are the rotation axes of the daylighting control sensor. If we wanted to rotate this 180 degrees, you can see that this arrow changes.
We will point this this arrow...I believe this arrow is the glare sensor. It is also used for window shading controls. We will get into that later.
Right now, we are just doing daylighting controls, which is this arrow right here.
It is just a photo sensor that senses lighting levels within the space (in this direction).
You can adjust the glare angle, if you were doing shading controls. Like I said, we will get into that in another video. You can adjust that angle here.
For now, we will just set that at zero for our daylighting controls.
Illuminance Setpoint; this illuminance setpoint is the illuminance of the room in the middle of the night (no sun).
Basically, when there is no sunlight coming through the window. It is the design illuminance of your lighting fixtures.
You will need to know the design illuminance of those lighting fixtures. Or, know what the expected illuminance for this space type is.
You can put that value in there. It is the design illuminance; the daylighting control will dim your interior lights from a maximum of this value all the way down to your specified lower boundaries.
The lower boundaries are these two right here. The lighting control type can be selected here.
Continuous; continuous lighting control starts at your design illuminance and then it it continuously dims the lights until you get to a minimum input power fraction and minimum light output fraction.
The minimums are these values down here.
Stepped; it steps your lighting power down by the specified number of steps.
You can select Stepped, right here, you can specify the number of steps for the lighting power.
We will just leave this at continuous...oh...um
Continuous off; it lowers your lighting power down from design to a minimum input power fraction. Anything below that point it and it shuts the lights off.
Let us go back to continuous...
Probability Lighting Will Be Reset When Needed In A Manual Stepped Control; if you set this up as stepped control and you wanted to simulate this as manual switches (banked lights). No automatic daylighting control sensor.
For example, if you wanted to simulate this as people in the room, no daylighting sensor, but the people regularly flip off a bank of lights during the day to reduce the lighting in the space.
That is how you would simulate the activities of people stepping down the lighting themselves during the day instead of using an automatic sensor.
This probability function here takes into account the probability of people actually turning the lights down.
You might say...oh...if it gets too bright in the room, 30% of the time someone will flip a bank of lights off.
So, that is what the probability function is.
...
Transcript:
Today we are going to talk about daylighting controls. This button up here; Create New Daylighting Control.
This is used for controlling the lights within your space. If you have exterior windows, throughout the day the sun will shine through the windows and light up the space.
At that point, you might not need as much artificial lighting in the space. The daylighting controls will reduce your artificial lighting based on the amount of sunlight that is coming through the window.
You can click this button to create those controls. Let us edit the space. Click the button New Daylighting Control.
You can just drop it into the space. It automatically places it 3ft (0.91m) above the floor. That can be adjusted as you as need.
You can relocate the object to wherever it is most convenient within the space.
You might want to place it somewhere in the middle of the space, depending on how much daylight harvesting you intend. That is, how aggressive you are with with turning down the lights within the room.
That is how you drop it into the space. We can click the Inspector tool to take a look at the properties for the daylighting control.
You want to make sure that you click that daylighting control object. You can see that it was dropped in here.
It has a name,the space name, that it is associated with.
It is important to note: you can drop these into individual spaces, but EnergyPlus will only allow up to two day lighting controls thermal zone.
So, if these two spaces were part of a thermal zone, this daylighting control would control this space and this space. They are part of one thermal zone.
To get around that, it might be best to assign separate thermal zones to each of these spaces.
These are the position the coordinates of the daylighting control within the space.
These are the rotation axes of the daylighting control sensor. If we wanted to rotate this 180 degrees, you can see that this arrow changes.
We will point this this arrow...I believe this arrow is the glare sensor. It is also used for window shading controls. We will get into that later.
Right now, we are just doing daylighting controls, which is this arrow right here.
It is just a photo sensor that senses lighting levels within the space (in this direction).
You can adjust the glare angle, if you were doing shading controls. Like I said, we will get into that in another video. You can adjust that angle here.
For now, we will just set that at zero for our daylighting controls.
Illuminance Setpoint; this illuminance setpoint is the illuminance of the room in the middle of the night (no sun).
Basically, when there is no sunlight coming through the window. It is the design illuminance of your lighting fixtures.
You will need to know the design illuminance of those lighting fixtures. Or, know what the expected illuminance for this space type is.
You can put that value in there. It is the design illuminance; the daylighting control will dim your interior lights from a maximum of this value all the way down to your specified lower boundaries.
The lower boundaries are these two right here. The lighting control type can be selected here.
Continuous; continuous lighting control starts at your design illuminance and then it it continuously dims the lights until you get to a minimum input power fraction and minimum light output fraction.
The minimums are these values down here.
Stepped; it steps your lighting power down by the specified number of steps.
You can select Stepped, right here, you can specify the number of steps for the lighting power.
We will just leave this at continuous...oh...um
Continuous off; it lowers your lighting power down from design to a minimum input power fraction. Anything below that point it and it shuts the lights off.
Let us go back to continuous...
Probability Lighting Will Be Reset When Needed In A Manual Stepped Control; if you set this up as stepped control and you wanted to simulate this as manual switches (banked lights). No automatic daylighting control sensor.
For example, if you wanted to simulate this as people in the room, no daylighting sensor, but the people regularly flip off a bank of lights during the day to reduce the lighting in the space.
That is how you would simulate the activities of people stepping down the lighting themselves during the day instead of using an automatic sensor.
This probability function here takes into account the probability of people actually turning the lights down.
You might say...oh...if it gets too bright in the room, 30% of the time someone will flip a bank of lights off.
So, that is what the probability function is.
...
 0:10:05
OpenStudio SketchUp - Daylighting Controls
 0:05:04
7 Adding Daylighting Controls Objects and Illuminance Maps with the OpenStudio SketchUp Plug in
 0:05:03
Adding Daylighting Controls Objects and Illuminance Maps with the OpenStudio SketchUp Plug-in
 0:20:32
OpenStudio SketchUp - Illuminance Controls with Radiance
 0:10:21
Daylighting in OpenStudio of EnergyPLus (Course introduction module 8)
 0:02:01
Shading and DLC controls in OpenStudio
 0:04:26
OpenStudio SketchUp - Adding overhang elements in a few clicks
 0:26:15
EMDP Daylighting Intro
 0:13:57
OpenStudio SketchUp - Lights vs Luminares
 0:03:43
OpenStudio SketchUp - Boundary Conditions
 0:09:19
Integrating Radiance Simulations with OpenStudio with DaylightSim.rb
 0:00:08
SketchUp OpenStudio
 0:07:17
OpenStudio 0.8 Basic Workflow Guide (SketchUp Plugin - Building Envelope)
 0:11:40
Indoor Controls Technologies & Requirements - Module 5: Automatic Daylighting Controls
 0:03:39
Creating Clerestory Geometry with the OpenStudio SketchUp Plugin
 0:04:56
4 Setting Surface Constructions with the OpenStudio SketchUp Plug in
 0:01:22
Daylight Simulation Tutorial - SketchUp step 7
 0:07:42
OpenStudio 0.9 New Features - Radiance Integration 1 of 2
 0:06:51
Converting OpenStudio Models to Radiance with ModelToRad.rb
 0:16:29
Windows and Solar Control Part 1
 0:02:01
Create and Edit Geometry in OpenStudio using standard shape method
 0:04:55
Creating an OpenStudio Model with a Plant Loop - Part 1 (creating spaces, loads, and thermal zones)
 0:17:06
Daylighting Controls Part I
 0:03:11
Automatic Geometry Creation for Surface Matching in the OpenStudio SketchUp Plug-in
Комментарии