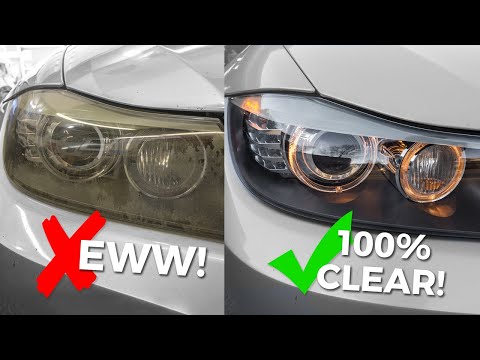
Clear Winner!! Headlight Restoration Methods Compared

preview_player
Показать описание
In this video, we dive into a head-to-head comparison of popular home remedies versus a store-bought restoration kit for restoring cloudy vehicle headlights. Watch as we test and demonstrate methods like toothpaste and baking soda against the restoration kit, highlighting the effectiveness, ease of use, and overall results of each approach. If you’re looking to save money and not sacrifice results when it comes to making your headlights crystal clear once again, this video is for you!

Please consider subscribing to Budget Mechanic so we can keep saving you money on car repairs!
Рекомендации по теме
Комментарии
Автор

Bought the 3M repair kit today. It took my Rav4 light fixtures from yellow to clear AND shiny for $15, in less than an hour. I'm a woman that constantly 2nd guesses myself, and it was easy even for me. Thank you so much for this video! 💞

MissMollee
Автор

This was a bright idea
Thank you for not adding music while you were talking

nomusicrc
Автор

I used this exact kit years ago and was amazed that my headlight assemblies looked absolutely brand new, then stayed that way for at least 2 years. It’s now been 3 yrs. and they’re due again, but I was reluctant to buy another entire kit since I still have the drill attachment and enough fine sanding discs to resurface the lenses (they’re not as bad as before). But what I DON’T have are the necessary 3M Headlight Clear Wipe packets. Thank you for providing the link to purchase the 40 packet box! If I have to, I can cut new sanding discs from sheets of 3, 000 grit wet or dry sandpaper, but those wipes are the key to making this job work! And I will use one per headlight every year to maintain the clarity. (This system will also work on the clear polycarbonate lens of my rooftop firefighting emergency light.) Thanks again!

mikemayone
Автор

Great informative video without the need for loud music, gimmicks or bullsh*t. Great post bro. 👍

WildlifeUKNatureByGlenO
Автор

Based on this video, i bought the 3M kit. Very pleased with the results. Thanks for the additional link to the bulk wipes to maintain. I’m hoping to never need to do a full restoration again (although it really wasn’t that hard)

Vanguard
Автор

I have also used the 3M kit, as well as several others. Most kits that include the assorted grits of sand paper and a sealer seem to all work about the same. The key is following the instructions when sanding without getting the lens hot, and sealing them. If your lights are really fogged or yellowed bad, you will see an improvement, but it doesn't always last for longer than a year or two before they go back to tarnished again. Taking a layer off of the lens is what removes the damage, sealing then keeps them protected. I guess for whatever the cost is these days of the better rated kits is worth it if you want to see better at night.

brine
Автор

Excellent presentation. You really layed to rest all those so called home remedies. I thank you. I am now a fan of your site.

peterzubritsky
Автор

I love the restoration kits. I got one from Amazon, did an outstanding job. 3 years later, yes it’s a tad less clear but wash and go and it’s clear again

gingerwolff
Автор

I am a new subscriber not only for your great Content BUT also for your clear and intelligible English.
Your speech patterns and light humor are absolutely the best! No weird inflections or harsh raised voice tones, all of which make your presentation easy to listen to and actually calming! Thanks!

adamalvarez
Автор

I really appreciated the side by side comparison and I'll be going out and buying a headlight restoration kit with everything, like this, today so I can address the one's on my kid's car. Thank you for taking the time to make the video. Super helpful!

thrashnbash
Автор

I use a headlight protection film like the one you put on a phone. I own 3 cars and have them on all 3 they're roughly 4-7 years old and none have cloudy headlights. They're clear like the first day I bought them. For around $50 each headlight set, it's the best investment.

TNAN
Автор

I use any insect repellent that contains DEET to clean my headlights (Cutter, Deep Woods Off), the higher the concentration of DEET the better. Simply spray it on and wipe it off. Repeat if necessary. This cleans the acrylic lens very well, only takes seconds and I didn't have to buy the kit. The result is nearly as nice as what you get from the kit but literally takes seconds. Although the lenses will need to be redone in 3 to 4 months, I don't mind because it is so easy, and I always have some Deep Woods Off in my truck.

starman
Автор

Best/cheapest "home remedy fix" I've found is Mother's Mag and Aluminum Polish. Takes about 2 min w/no elbow grease. It's freaky fast. Costs about 9-10 bucks. Agree with you on importance of adding a UV protection. I just apply a coat of wax over lenses when finished. Amazon sells a spray bottle UV protectant (orange and white bottle) but it costs about 30 bucks.
2nd method - buy wet sandpaper, use lots of water then rubbing compound and wax...longer and more elbow grease but cheap.

rabudman
Автор

I've tried all these silly methods in the past including wet sanding and spraying the headlights with clear lacquer. Easiest method is...If you have some car compound and any car wax kicking around then buy a small buffering sponge pad for your drill, apply the compound in as many coats as you want till all the grub/grime/haze has gone and apply a couple of coats of wax/liquid wax to seal/protect and bring headlight back to new.

ScratchyBaws
Автор

A few years ago I basically wet-sanded my headlights using finer and finer (3000 grit) paper and did a final polish with Meguiar's PlastX plastic polish. They looked brand new. Not being aware that I had to reseal them, they were back to cloudy within 6 months. I liked my method of cleaning them. They looked PERFECT. However, I definitely recommend your bulk purchase of the sealants. It's a quick and easy way to keep them looking great.

MadMonk
Автор

Had both cars done over a year ago with a 3m product. Both cars have been sitting in a years weather. Both are still as good as the day they were done. 3m Cerakote was used.

tassolorider
Автор

Great comparisons @BudgetMechanicHawaii !
The kit is definitely the way to go for DIY. Everything else is just a gimmick. Like he said, the only way is to remove the damaged layer. The 3M kit is probably the best, that or the Sylvania kit. And yes, the UV protectant/sealant is a must. However, the wipes are okay. The Meguiars spray is the best.
Only thing I’ll disagree with is the advice to buy a bunch of wipes and reapply each year. You can’t just put the sealant over top another layer of sealant. Trust on this. Better off letting them get to the point where you do the whole process again. But if you wax them regularly and avoid machine car washes, they’ll last another 4-6 years before needing to be restored again. Great video!

ClearPathHeadlightSolutions
Автор

I restored the headlights on my 2010 Chevy Silverado a few years ago before someone hit me and totaled it, and one of the things to realize it that it is the clear coat that is getting foggy! I used some 400 grit and 1500 grit sand paper to strip mine and a two part epoxy clear coat, and it worked out great. A regular clear coat may work for a short time but the life of it wont last as long as a two part epoxy clear coat. Eastwood 2K epoxy clear coat is the one I used. I've seen the Primers used as well as the paint on some of the off road vehicles when they build their racks etc. and it really is a great brand. I think it's like 40 dollars for a can of it. You have 24 hours after opening the can and mixing it to use it before it becomes useless. I used it 12 hours the following day to put a second coat on my headlights after using the 1500 sand grit paper to knock off any particles from the surface. They looked better than new with a nice finish!

comingtofull-ageinchrist
Автор

😊 if you're not wet sanding and buffing, you're wasting your time. That oil makes it look nice until you wash it. Then you're right back to square one.

curveballintx
Автор

I wet sanded the car lenses down from 600 to 12, 000 grit and then put on a relatively thick coat of spray clear gloss polyurethane, and it's perfect! Looks like new. I tried to put an additional coat of polyurethane on one lens, but for some reason it fogged up a little bit, so I had to use acetone to remove the second coat of polyurethane, then sanded from 1000 back to 12, 000 grit and it's perfect. Only put one coat of polyurethane on the lens!!

wiggsan
visit shbcf.ru